
It’s been about two weeks since our wedding, and I couldn’t be happier that I made my own wedding cake. However, this isn’t the right decision for everyone. There’s a lot you should think about before you decide to make your own wedding cake.
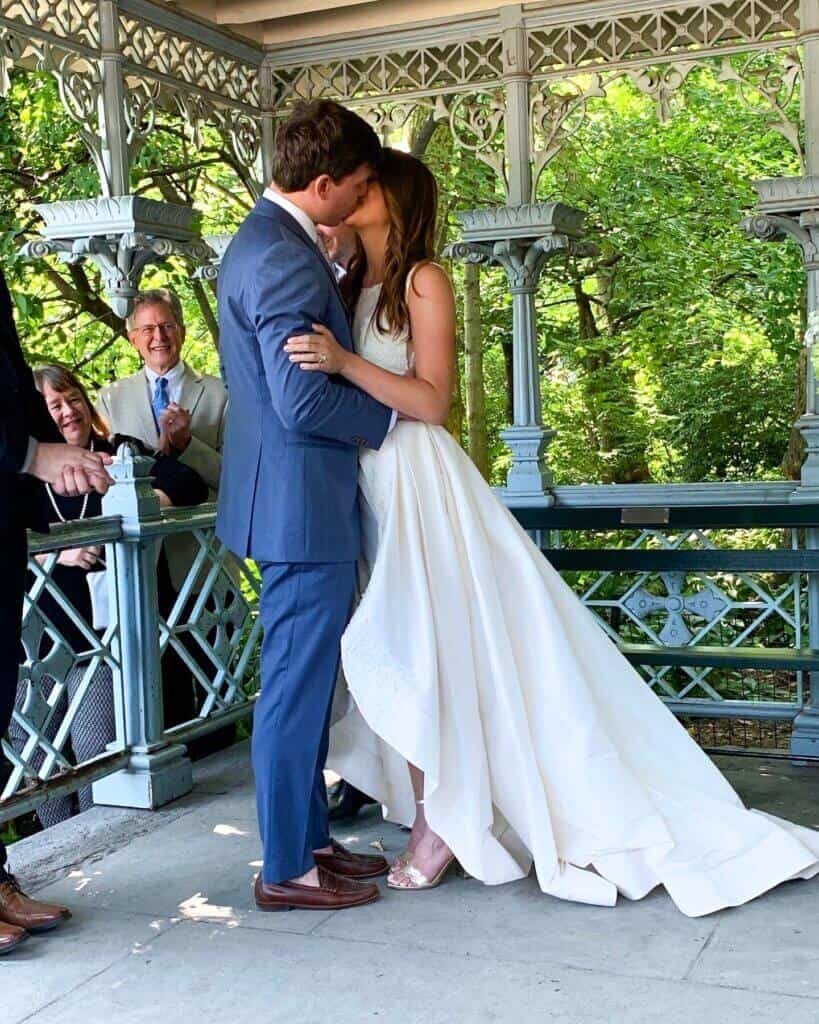

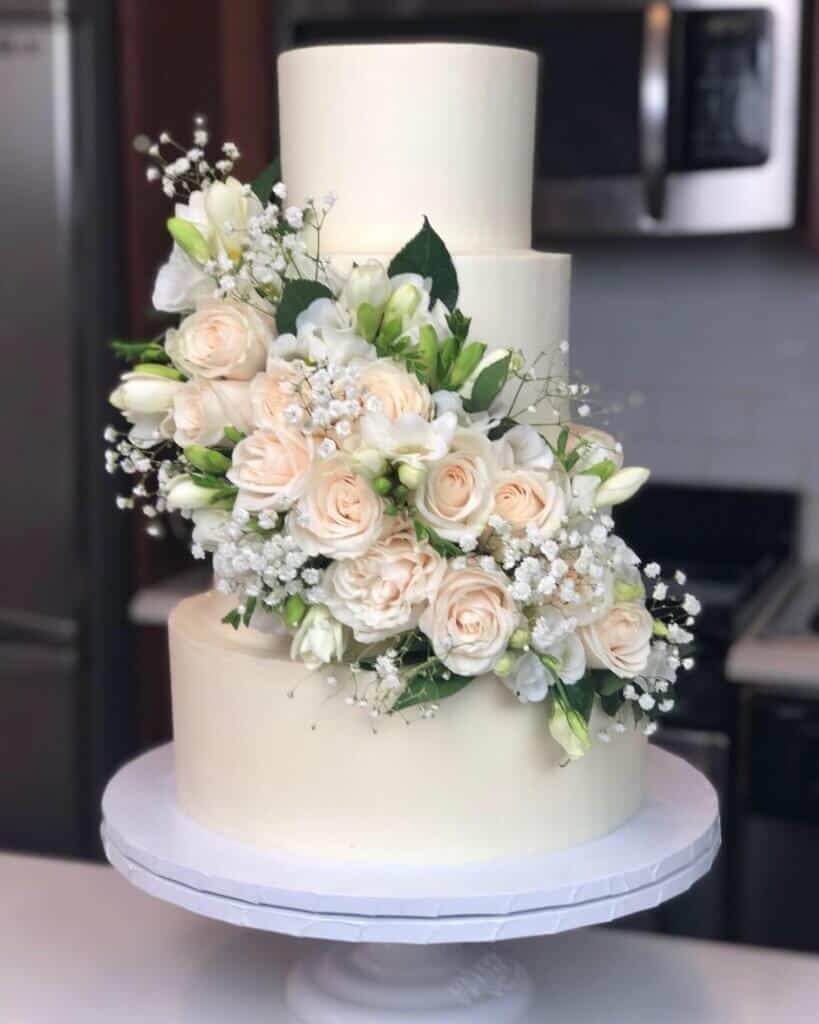
In retrospect, I couldn’t imagine it any other way. I’d been daydreaming about our wedding cake since we got engaged. In my mind, I pictured something simple, elegant, and decorated with fresh flowers.
I wanted a manageable design that wouldn’t add additional stress to my life the week of my wedding. But I also wanted to be proud of our cake when we cut into it in front of our friends and family.
Somehow I managed to make our cake ahead of time, deliver it to the venue the morning of our wedding, and had the time of my life on our wedding day.

I want to share the process I went through while making our wedding cake, and share my tips…just in case you’re as crazy as me, and plan to do the same thing.
Plan Ahead And Do A Little Math
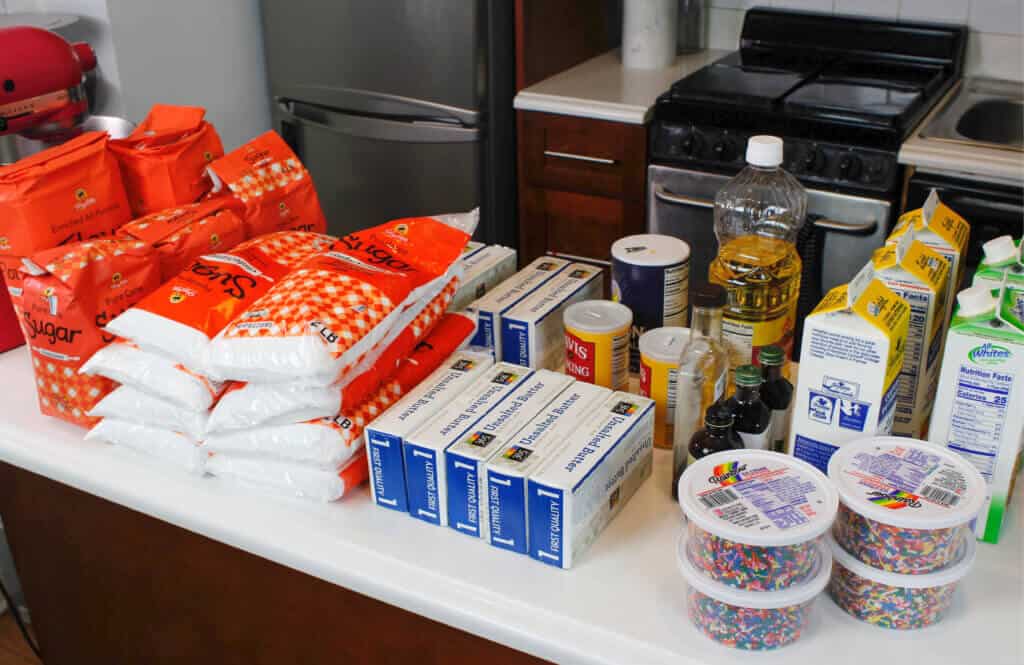
My husband (still getting used to saying that!) and I both love funfetti cake, so I used my funfetti cake recipe to make our entire wedding cake.
We expected to have about 110 guests, so I needed to make a cake big enough to feed all our guests!
I used my cake portion guide to consider my options, and ended up picking a combination of tier sizes that would give us some extra servings!
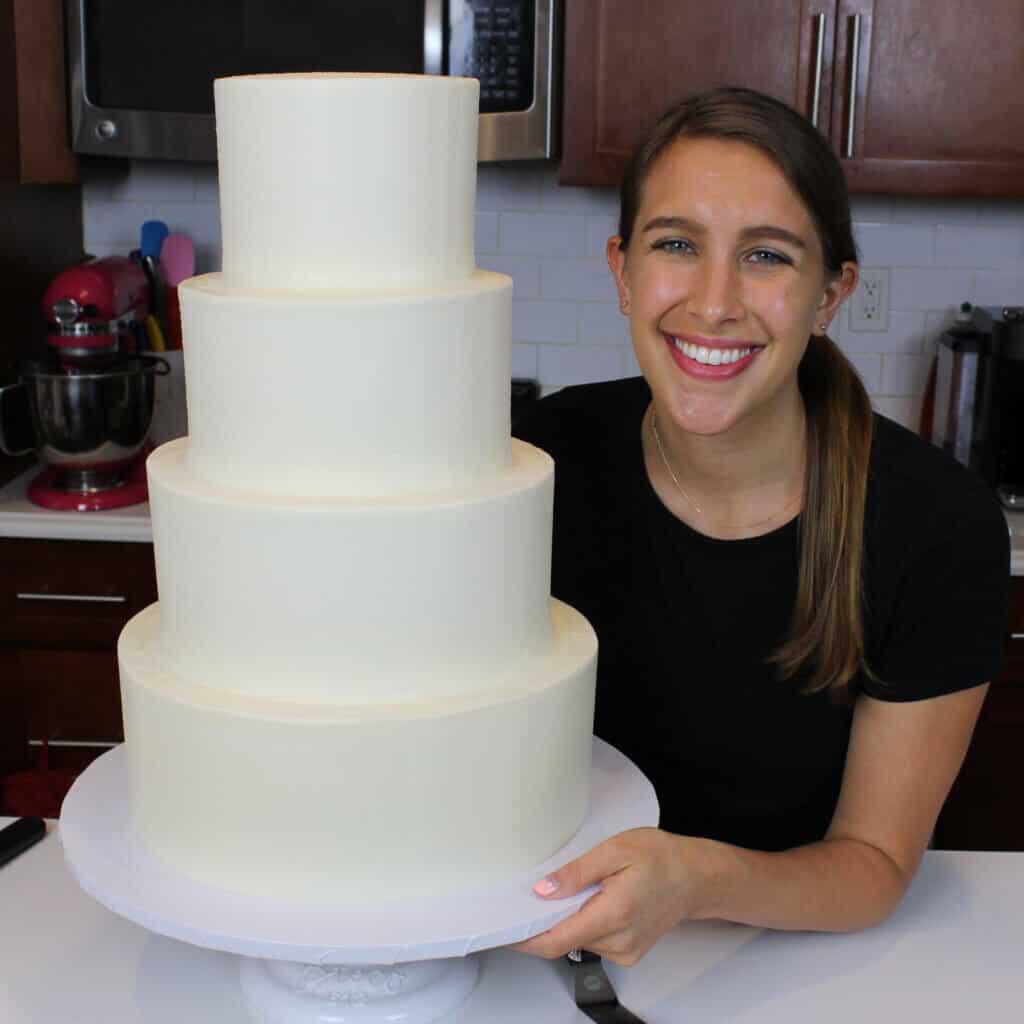
Our wedding cake was made with 12 inch, 10 inch, 8 inch, and 6 inch tiers. Each tier had 3 cake layers that were about 1 inch tall.

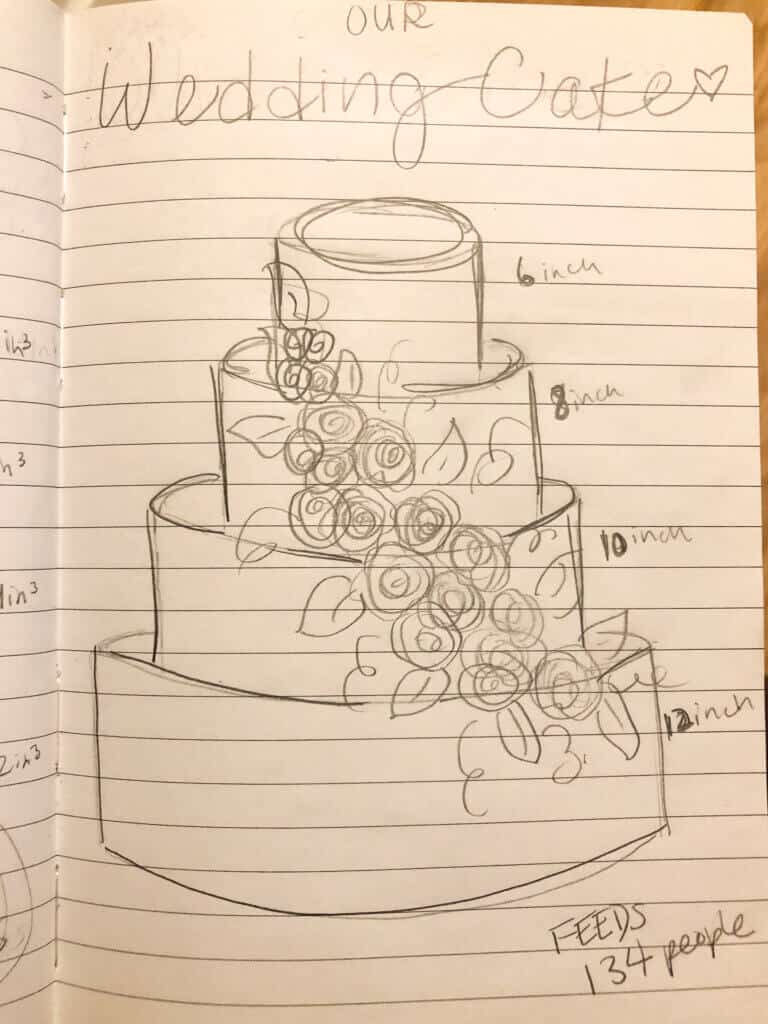
This size of cake feeds about 134 people. I didn’t want to worry about running out of cake (my slices tend to be on the large side), and thought it might be nice to have some extras in case anyone wanted seconds 😛
It took some math to figure out how many batches of cake batter I needed to make. I used my cake batter calculator to figure out that I needed to make 6 batches of cake batter.
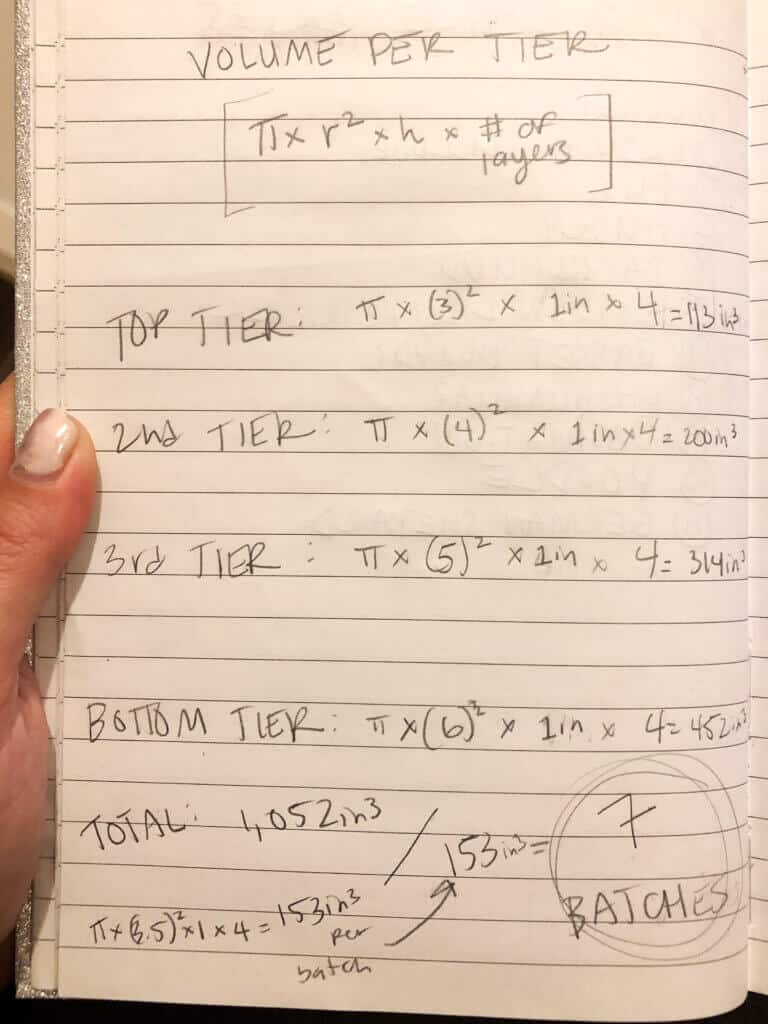

In my initial calculation I thought I’d use 4 layers per tier, but I changed my mind to 3 the morning of! This meant I only had to make 6 batches instead of 7.
Knowing this ahead of time allowed me to get the right amount of ingredients, and get everything ready to go before I started baking. A little planning goes a long way!!

Make Your Cake Layers In Advance
People always seem to get creeped out when they think about freezing cake layers, or baking layers several days in advance. I think people imagine dry, crumbly, freezer-burned cake and get scared.
We ate our wedding cake on Sunday, and I baked the cake layers on Tuesday. I would have liked to have made them further in advance (properly wrapped cakes stay good in the freezer for weeks), but I didn’t have a chance to make them any earlier.
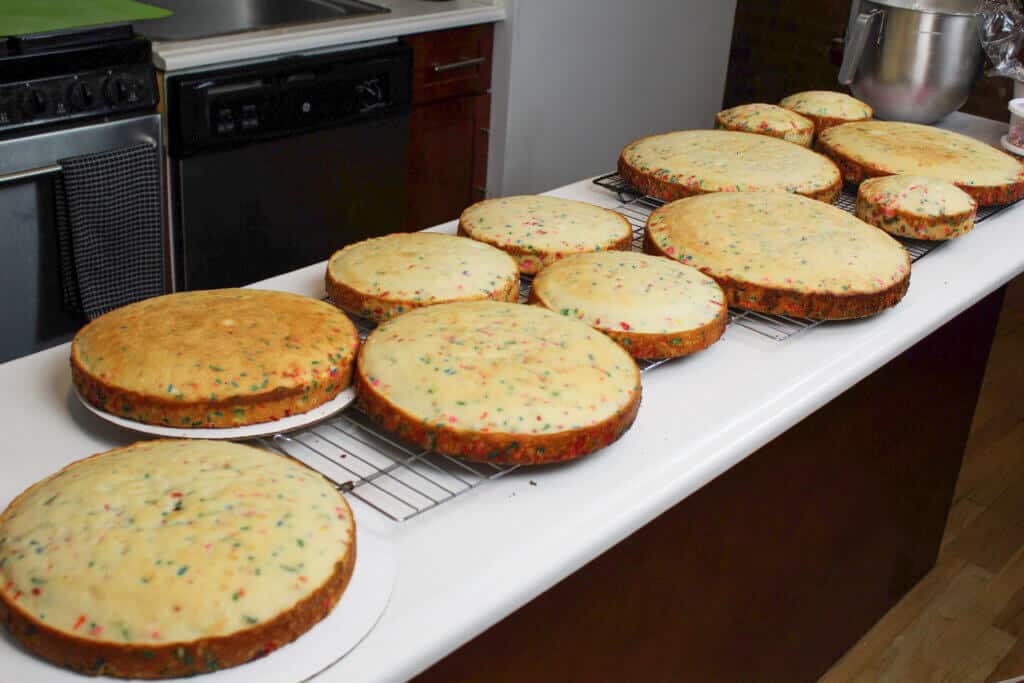

Properly sealed cake layers are anything but dry! In fact, frozen cake layers actually taste better, and are more moist in my opinion.
I wrap and freeze my cake layers when they’re still a tiny bit warm, so the steam gets locked in with the cake layer.
The result is an incredibly delicious and moist cake layer. The key to making cake layers in advance is properly wrapping them, to lock in all the good stuff and protect them from your freezer.
There are different ways you can wrap your cake layers, and they all work well. This blog post walks through the best ways to freeze cake layers, and all my tips on making cakes in advance.
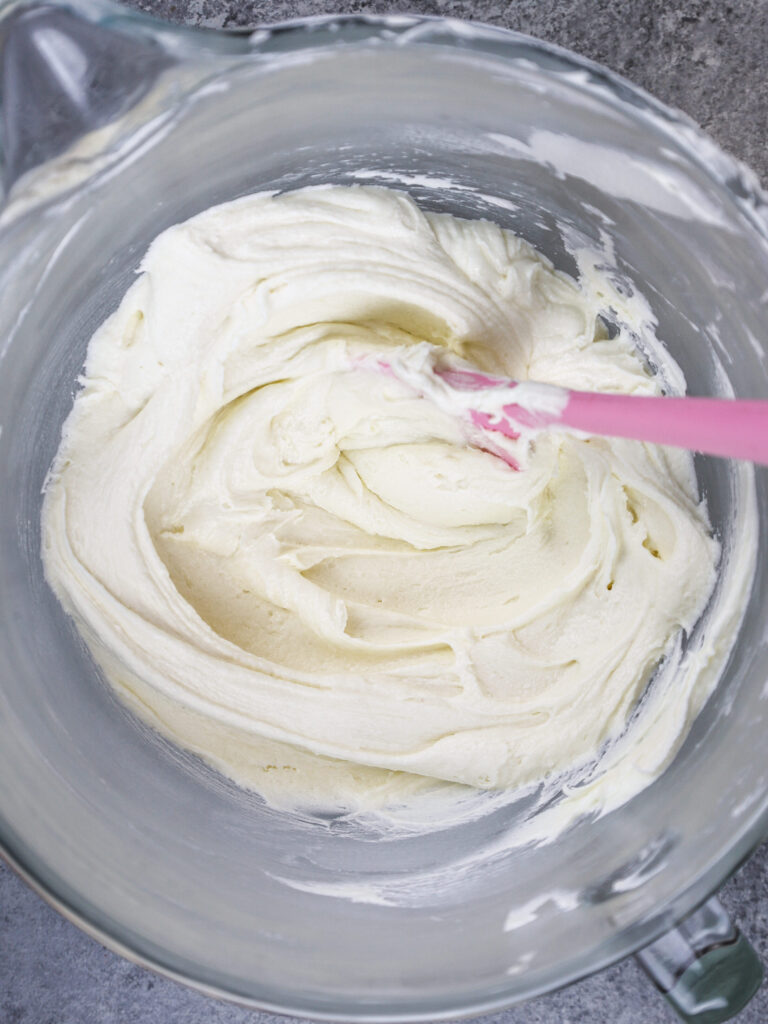
Make Your Frosting Ahead of Time Too!!
The whole “make ahead of time” concept doesn’t just apply to cake layers! Your frosting can be made in advance too.
I made our frosting the Tuesday before our wedding. It sounds excessive, but I made seven batches of my American buttercream for our cake.
My rule of thumb when it comes to wedding cakes is that you need about 1 batch of frosting per batch of cake batter.

In real life, I usually use about 1.25 – 1.5 batches of frosting on my 7 or 8-inch layer cakes. However, those cakes are made with 4 cake layers, and usually have additional frosting decorations (like fun swirls on top!).
When you think about a wedding cake, it’s usually 2 or three layers, and doesn’t normally have any additional frosting decorations. It doesn’t use quite as much frosting as a fancy, tall layer cake.
I ended up having about half a batch of frosting leftover, which I placed into piping bags.
This was great to have on hand to help fill in gaps once the tiers were assembled. I also brought a bag with me to the venue for any last minute touch ups.
Adding Supports Into Your Tiers
Whenever you make a tiered cake, it’s important that the cake is properly supported!
I added bubble tea straws into my tiers, to make sure it survived the 10 hours it had to sit at room temperature before we cut into it.

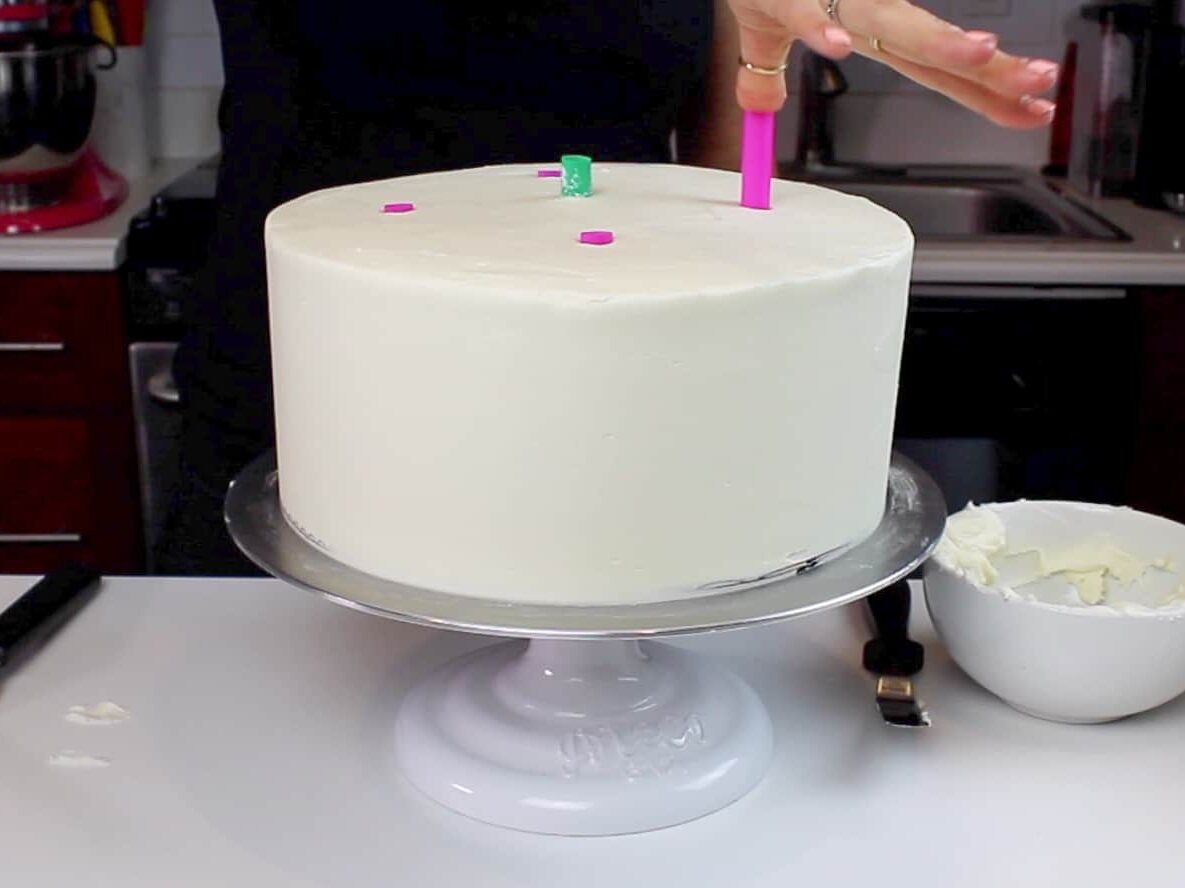
It’s crucial that the cake is built with supports in each tier. This helps ensure your wedding cake can support its own weight, and keep its shape the day of your wedding.
Some people use wooden dowels as supports, others use bubble tea straws. I know it sounds crazy, but they actually work very well! I prefer to use bubble tea straws, because they’re easier to cut.
Wedding cakes also should have a thick central wooden dowel, which helps keep the tiers centered. It acts as a guide as you stack the tiers on top of one another, and keeps your tiers stable during transportation.
Overtime I’ve learned is that it’s a lot easier to slide your cakes onto the central dowel if it’s sharpened.
When I first heard about this I was shocked, and had no idea how I could sharpen my own dowels. You can’t buy sharpened wooden dowels on Amazon. Trust me, I’ve looked!!
I live in Manhattan in a tiny apartment, and I don’t have any power tools. When I thought about changing the shape of a wooden dowel, it seemed like a daunting task. Most wooden dowels have flat ends. How could I turn that into a point?!
Luckily most central dowels are made from bamboo, which is a very soft wood. With a good piece of sandpaper, you can shape it into a point.
I know it seems like a lot of work, but after a few minutes of sanding, you’ll have a nice little point on your dowel.
Assembling Your Cake
I’ve found that assembling the cake before transporting it to the venue is less stressful. As long as a cake is properly supported, it should be easy enough to transport!
I assembled our cake on Thursday, and cleaned out my entire fridge to fit the 16 inch cake board that I built the cake on.

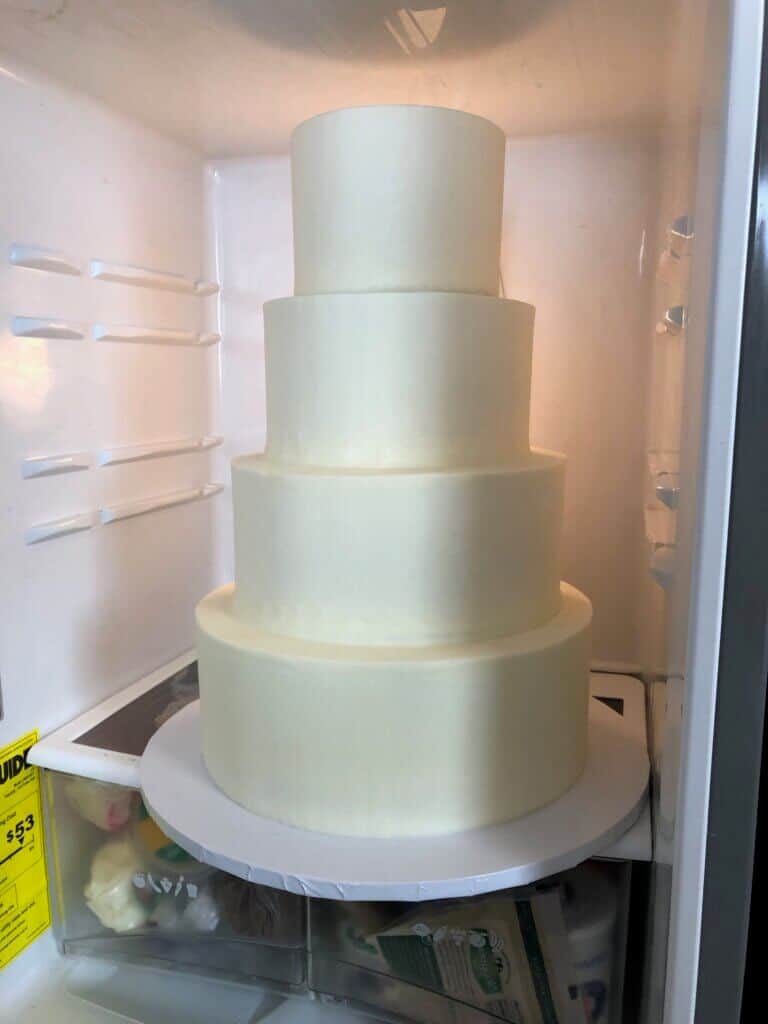
I had to remove all our shelves, and pretty much everything in our fridge. Luckily for us, we don’t really cook. I mostly just removed beer and seltzer from our fridge 😛
Another reason I like to assemble the cake at home is because it allows me to fill in any gaps between the tiers on a spinning cake stand with a bit of extra frosting.
Having a spinning cake stand makes this process so much easier. It also allows you to do all the hard work before getting the venue, or in my case before my wedding.

Assembling my cake earlier in the week made my life so much easier, and allowed me to enjoy time with my family and friends before our wedding.
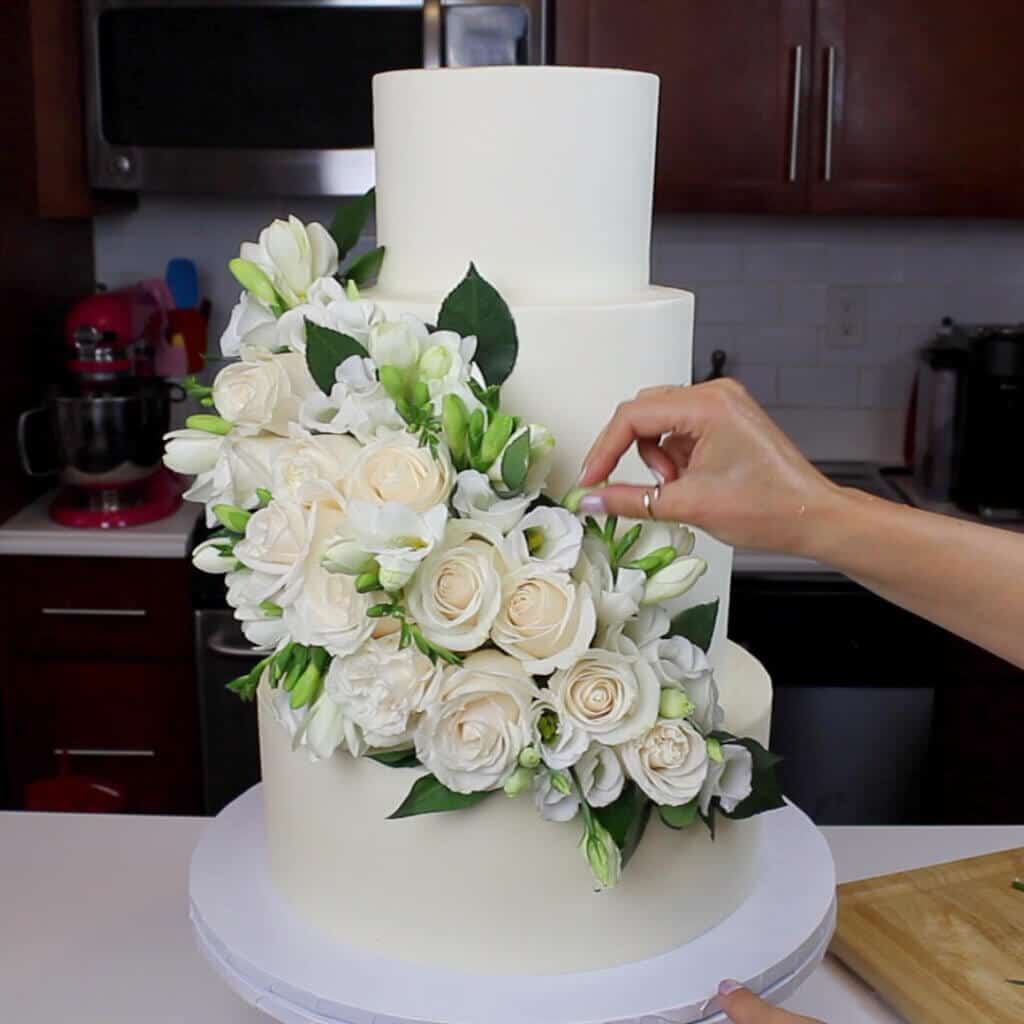
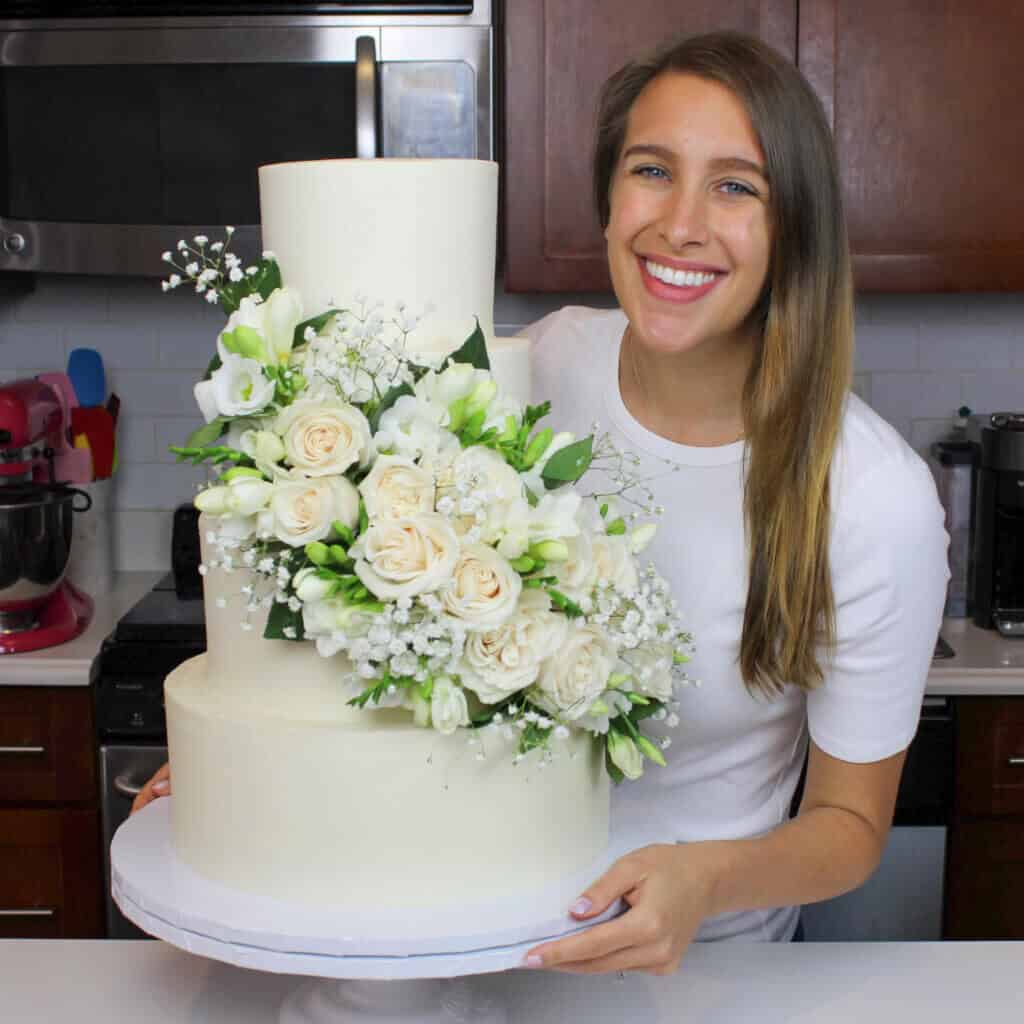
All that was left to do was add some fresh flowers the morning of our wedding!
The Finishing Touch: Fresh Flowers
One thing that simply can’t be done ahead of time is adding fresh flowers to a cake.
You can buy them the day before and keep them in water, but you really shouldn’t add them to a cake until the morning of the event.

If you add them earlier, they will wilt. Flowers need water to prevent them from wilting. If they’re added to cake more than a day before an event, they can really lose their luster.
While this makes life a bit more challenging, you have to trust me on this one. If you add them the day before, you will regret it.
My mom and I picked up some flowers the day before my wedding from our local flower shop.
I left them in water overnight, and then trimmed the flowers I planned to use to have a 1 inch stem the morning of my wedding.

I wrapped the stem of each flower with floral tape, to prevent any flower stem fluid from leaching into the cake. These fluids can result in a bitter taste, and wrapping the stems protects the cake.
To secure the flowers into the sides of the cake, I used clear bubble tea straws. Bubble tea straws are thick, plastic straws that work wonders when it comes to adding flowers to a cake.
They create a perfect opening for a flower stem, and allow you to place flowers into the cake at different angles.
This helps keep them in place without completely maring the sides of your cake. Flower stems are difficult to press into a frosted cake on their own!
Transporting The Cake To The Venue
Some people may disagree with the “build before transportation” viewpoint, but I almost always assemble before transporting. It all comes down to your preference, and your means of transportation.
An important part of cake transportation is a cake box!! I’ve said this before, but moving boxes from Home Depot make the best wedding cake boxes.
They come in a variety of sizes, are sturdy, and are so cheap! They’re less than $2, and can support the weight of a wedding cake.
I like to tape the box into place, then cut a flap on one side with an x-acto knife to allow me to slide the cake into the box. I then tape up the flap, and am ready to go!!

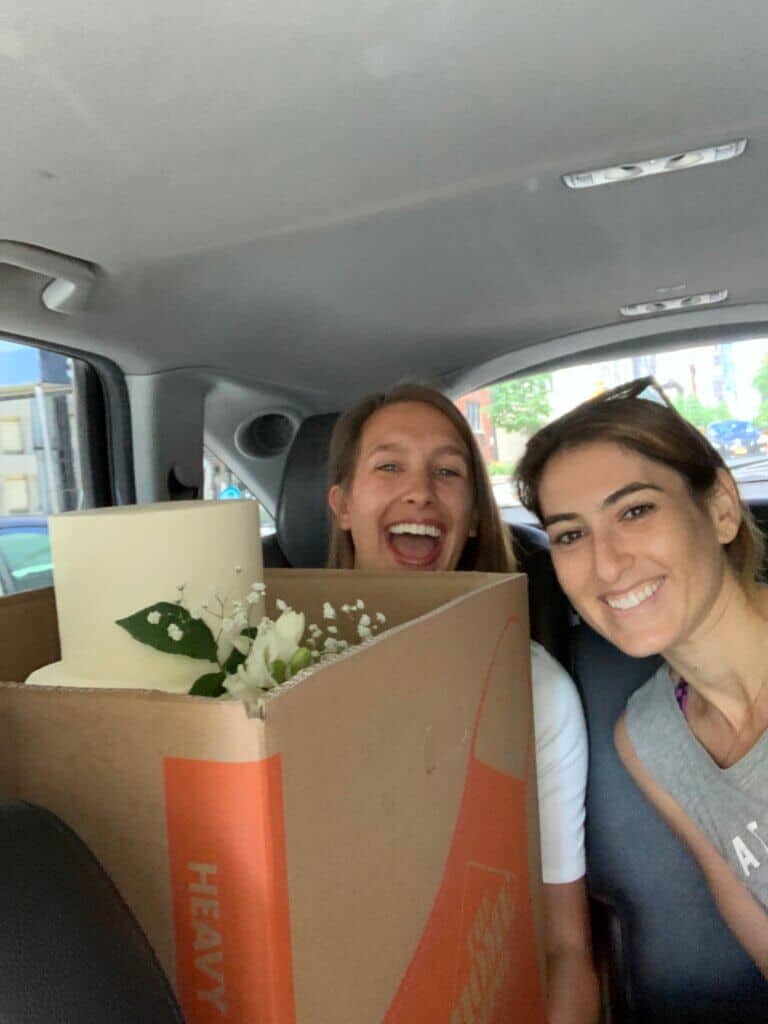
My cake was tall, but still easily fit in an Uber XL. However, it was INSANELY heavy!! Or at least for my little arms to carry.
I was lucky enough to have the help of two of my closest friends, who helped me get into the Uber and the venue.
Whenever I’m transporting a wedding cake, I like to hold the cake in my lap, so I can keep it safe during the trip.
Every Uber driver thinks I’m crazy and tries to tell me to put it in the back, but I refuse. I shift the weight of the cake during the drip, to help counter the various pot holes and sudden stops that are inevitable on any car ride in NYC.
Of course, I insisted on carrying our wedding cake myself. I had to carry it down a flight of wet stairs into our venue, which was by far the scariest part of my wedding day.
I was shaking once I got it down the stairs, and had the biggest adrenaline rush once I got the cake to the table where it would stay for the rest of the day.
Letting The Cake Sit
I dropped my cake off as early as our venue would let us, which was 10am the day of our wedding.
I couldn’t have dropped it off the night before because I had to add the fresh flowers that morning! We didn’t end up cutting into the cake until 8pm that night.
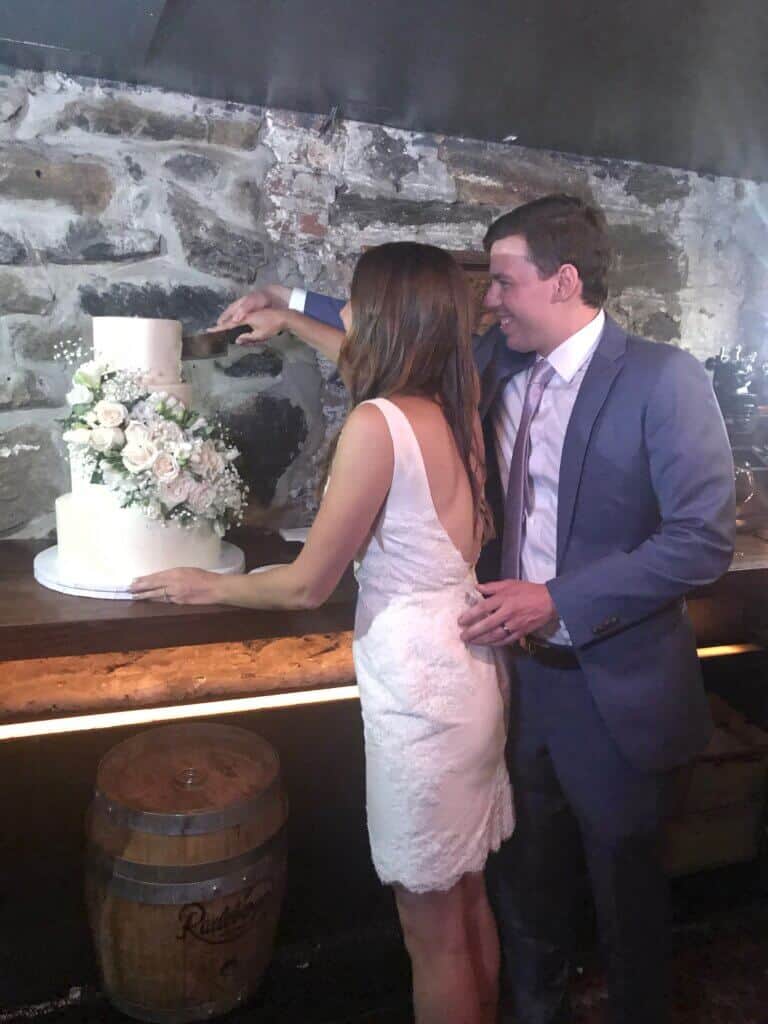

It might seem scary to let a cake sit at room temperature for that long, but if the cake is properly supported, it should be fine! Our cake held its shape just fine, and looked perfect when we cut into it.
We haven’t gotten our photos from our wedding photographer yet, but I’ll be sure to add the ones of us cutting into our cake once we get them! 🙂
My Final Tips
While the photos look great and I’m so happy I made our cake, it was exhausting! In the end, it took about 18 hours to make.
This timeline is a bit long because we have a mini oven (24 inches…gotta love NYC), and I’m not able to bake many layers at a time.
After baking the layers and prepping everything, I felt like I’d been hit by a bus. It was one of the worst baking hangovers (as I like to call them) I’ve had in a while.
Luckily this hit on Thursday, and was gone by the start of our wedding festivities.
If you choose to make your own wedding cake, PLEASE plan appropriately, make as much as you can ahead of time, and do a practice run before the real thing. Most importantly, only do it if it will bring you joy on your wedding day!!
You can have your cake and eat it too, as long as you plan ahead 🙂
Michelle
Monday 19th of September 2022
Wow, this was such a pleasure to watch. Beautiful cake. Well done ?
Chelsweets
Tuesday 20th of September 2022
Thank you Michelle!!! :)
Stephanie Cooper
Wednesday 31st of August 2022
Hello! You did an amazing job it looked beautiful and delicious ! I am Making a 4-5 tier wedding cake for the first time for about 150 people but the bride snd groom want Italian merengue buttercream. Will this frosting hold well the same way American buttercream does? It’s a Ny wedding in October and it is indoors. Also can I make merengue ahead of time or does it get gross in the fridge ? I have gotten mixed answers so I’m confused ..Thanks !
Chelsweets
Sunday 4th of September 2022
Hi Stephanie,
Thank you! I haven't personally made a wedding cake with Italian meringue buttercream, but as long as a tiered cake is properly supported any frosting should work!! I usually make meringue based frosting right before I plan to use it. You can make them ahead of time and rewhip them once they're thawed, but sometimes I run into issues doing that so I prefer not to make them in advance if possible. Hope that helps, and that the wedding cake turns out great!!
Clare
Saturday 5th of March 2022
This is incredible and so helpful, thank you! Question— did you find the cardboard cake boards to hold up to the weight of the cake, or were there any concerns? Did you buy a special kind or just standard cardboard ones?
Thanks!
Buttercream Consistency Guide: Get the Perfect Consistency
Sunday 23rd of January 2022
[…] is also a great idea if you’re making a cake during a hot summer, especially if it’s a wedding cake!! The only downside is that it does affect that taste of the […]
The Best American Buttercream Recipe: Ready in 5 minutes - Chelsweets
Sunday 9th of January 2022
[…] fact, I even left my frosting out overnight to decorate my own wedding cake and it tasted […]