
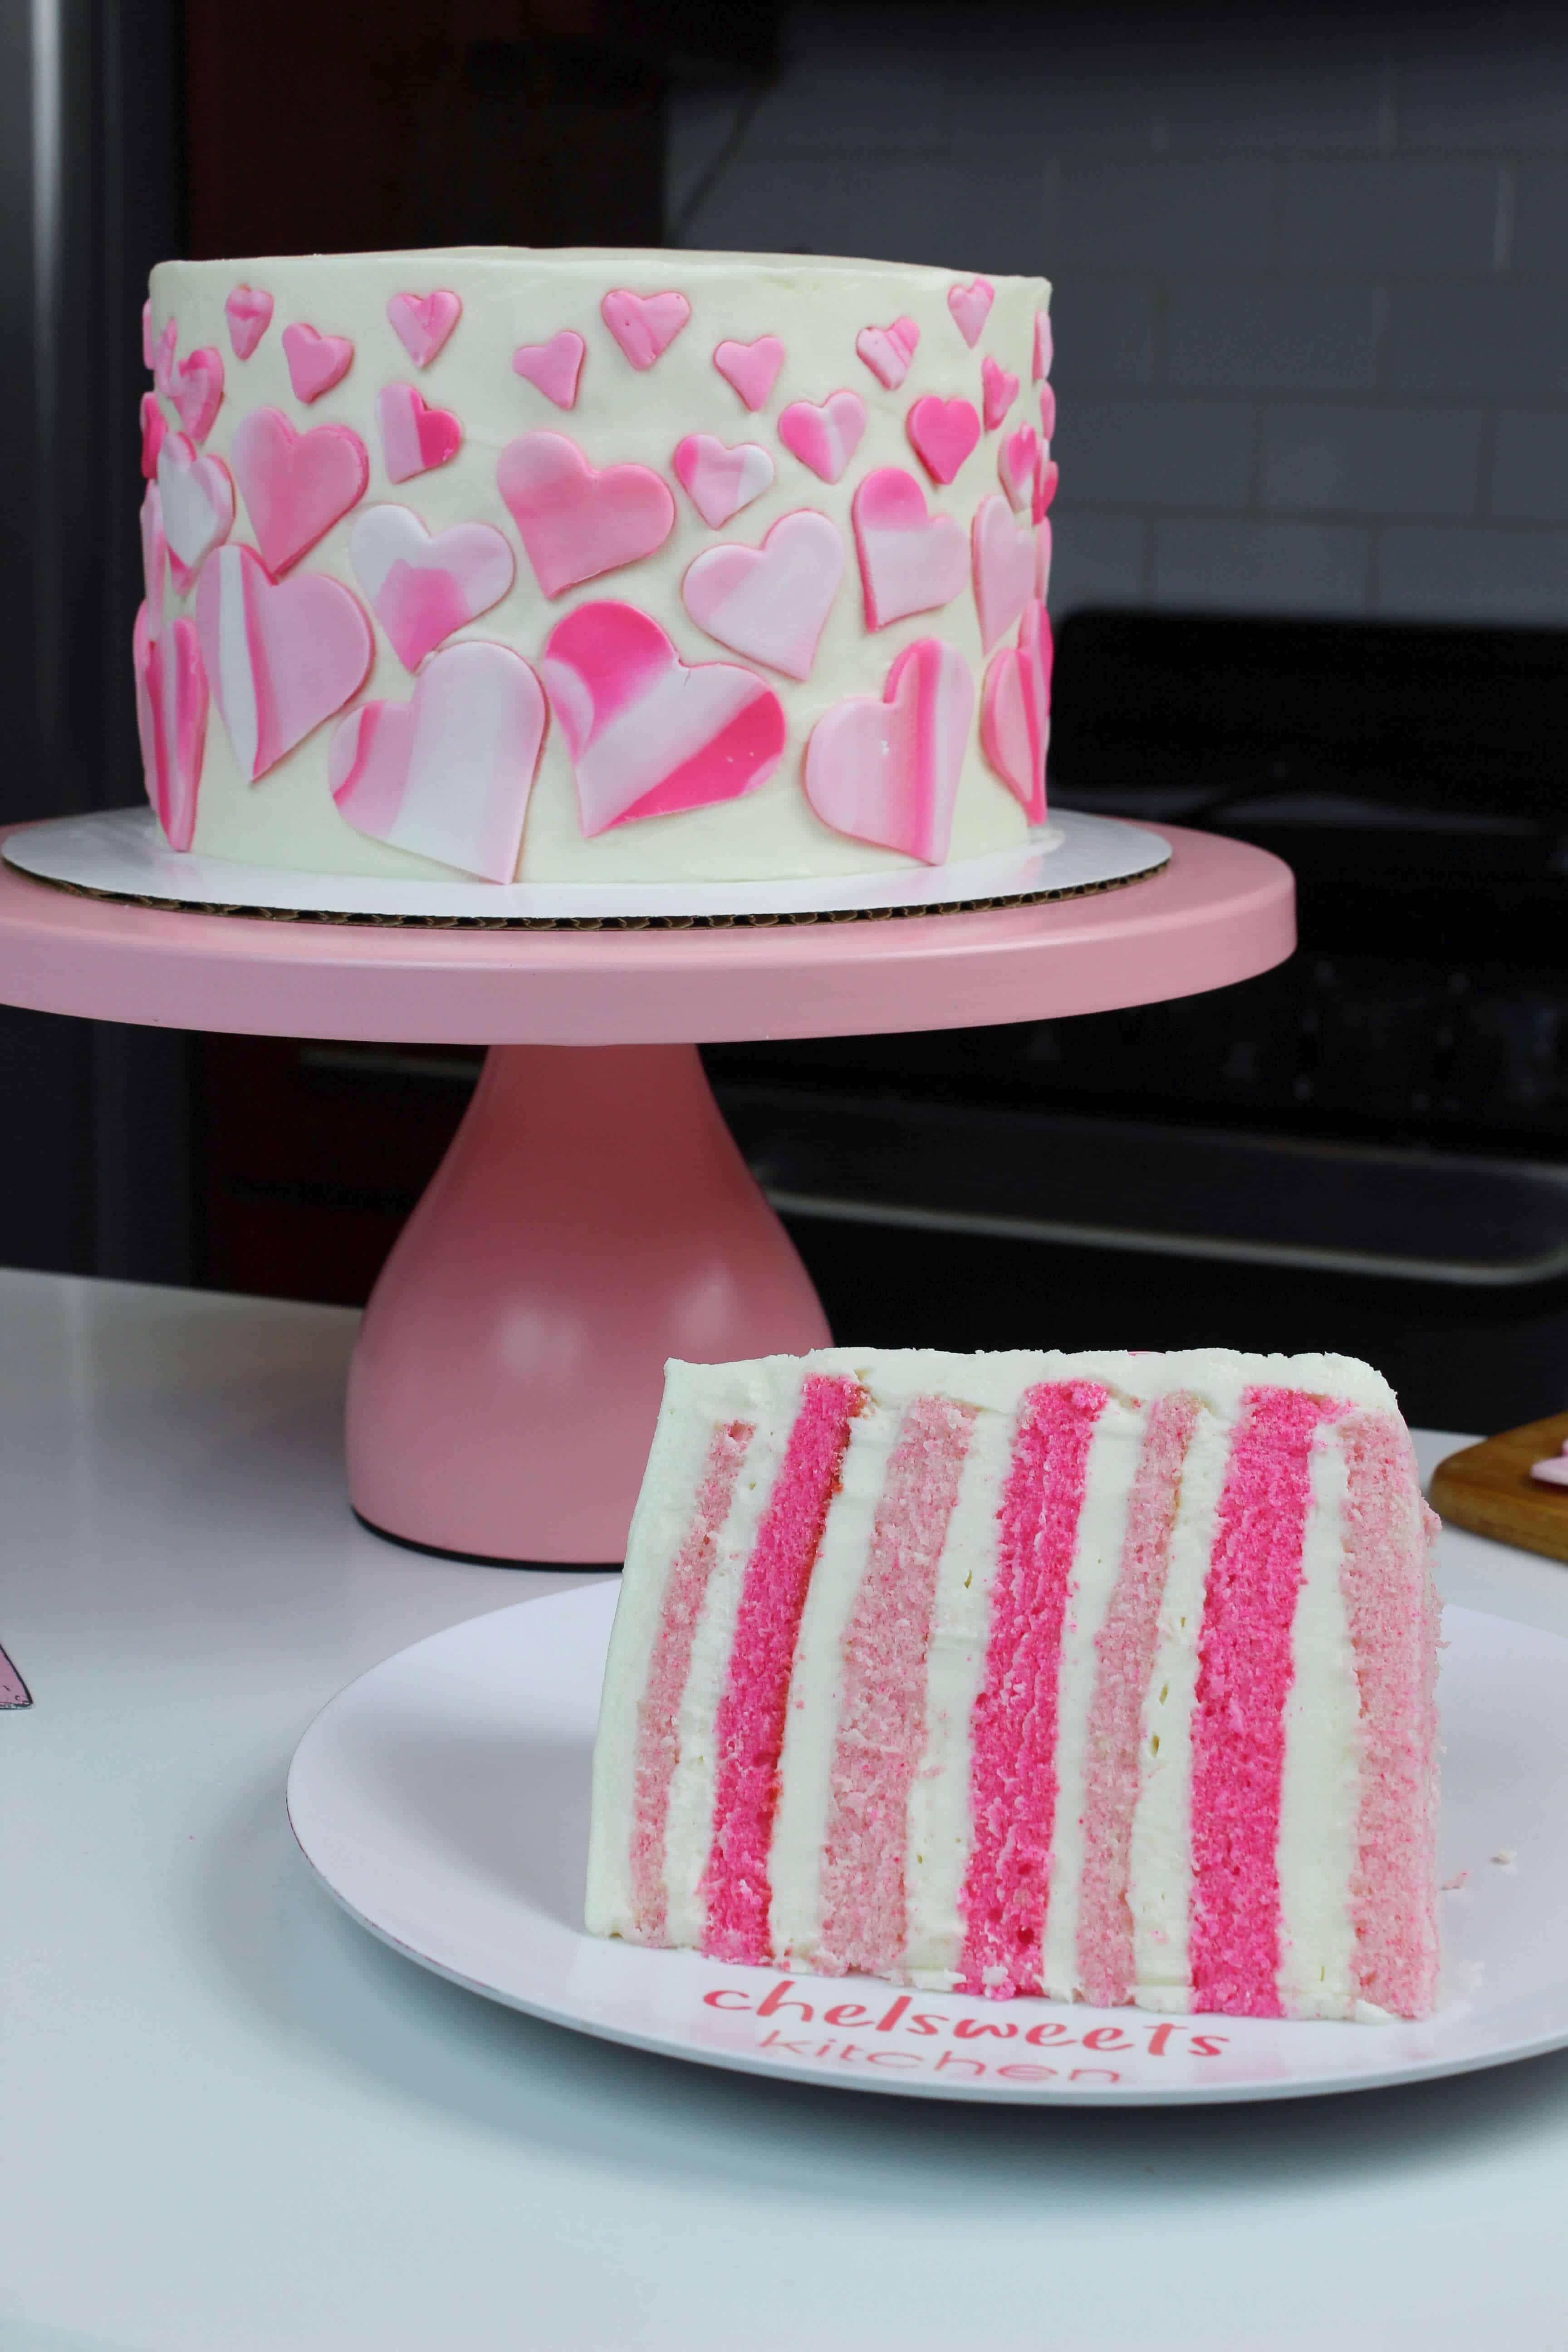
Whether you plan to celebrate Valentine’s day with your significant other, friends, or galentines, this pink velvet cake is the perfect way to show them you care.
It’s made with tender pink velvet cake layers (which is really just my white velvet cake recipe) and frosted with cream cheese buttercream. If that combination doesn’t say “Happy Valentine’s Day,” I don’t know what does!

Coloring These Pink Velvet Cake Layers
These colorful pink velvet cake layers are made with the help of a bit of gel food coloring. I colored half the batter light pink and the other hot pink.
You can use the same gel food coloring to create both shades. Just add a few drops to create the light pink and double the amount to create the bright pink layers.
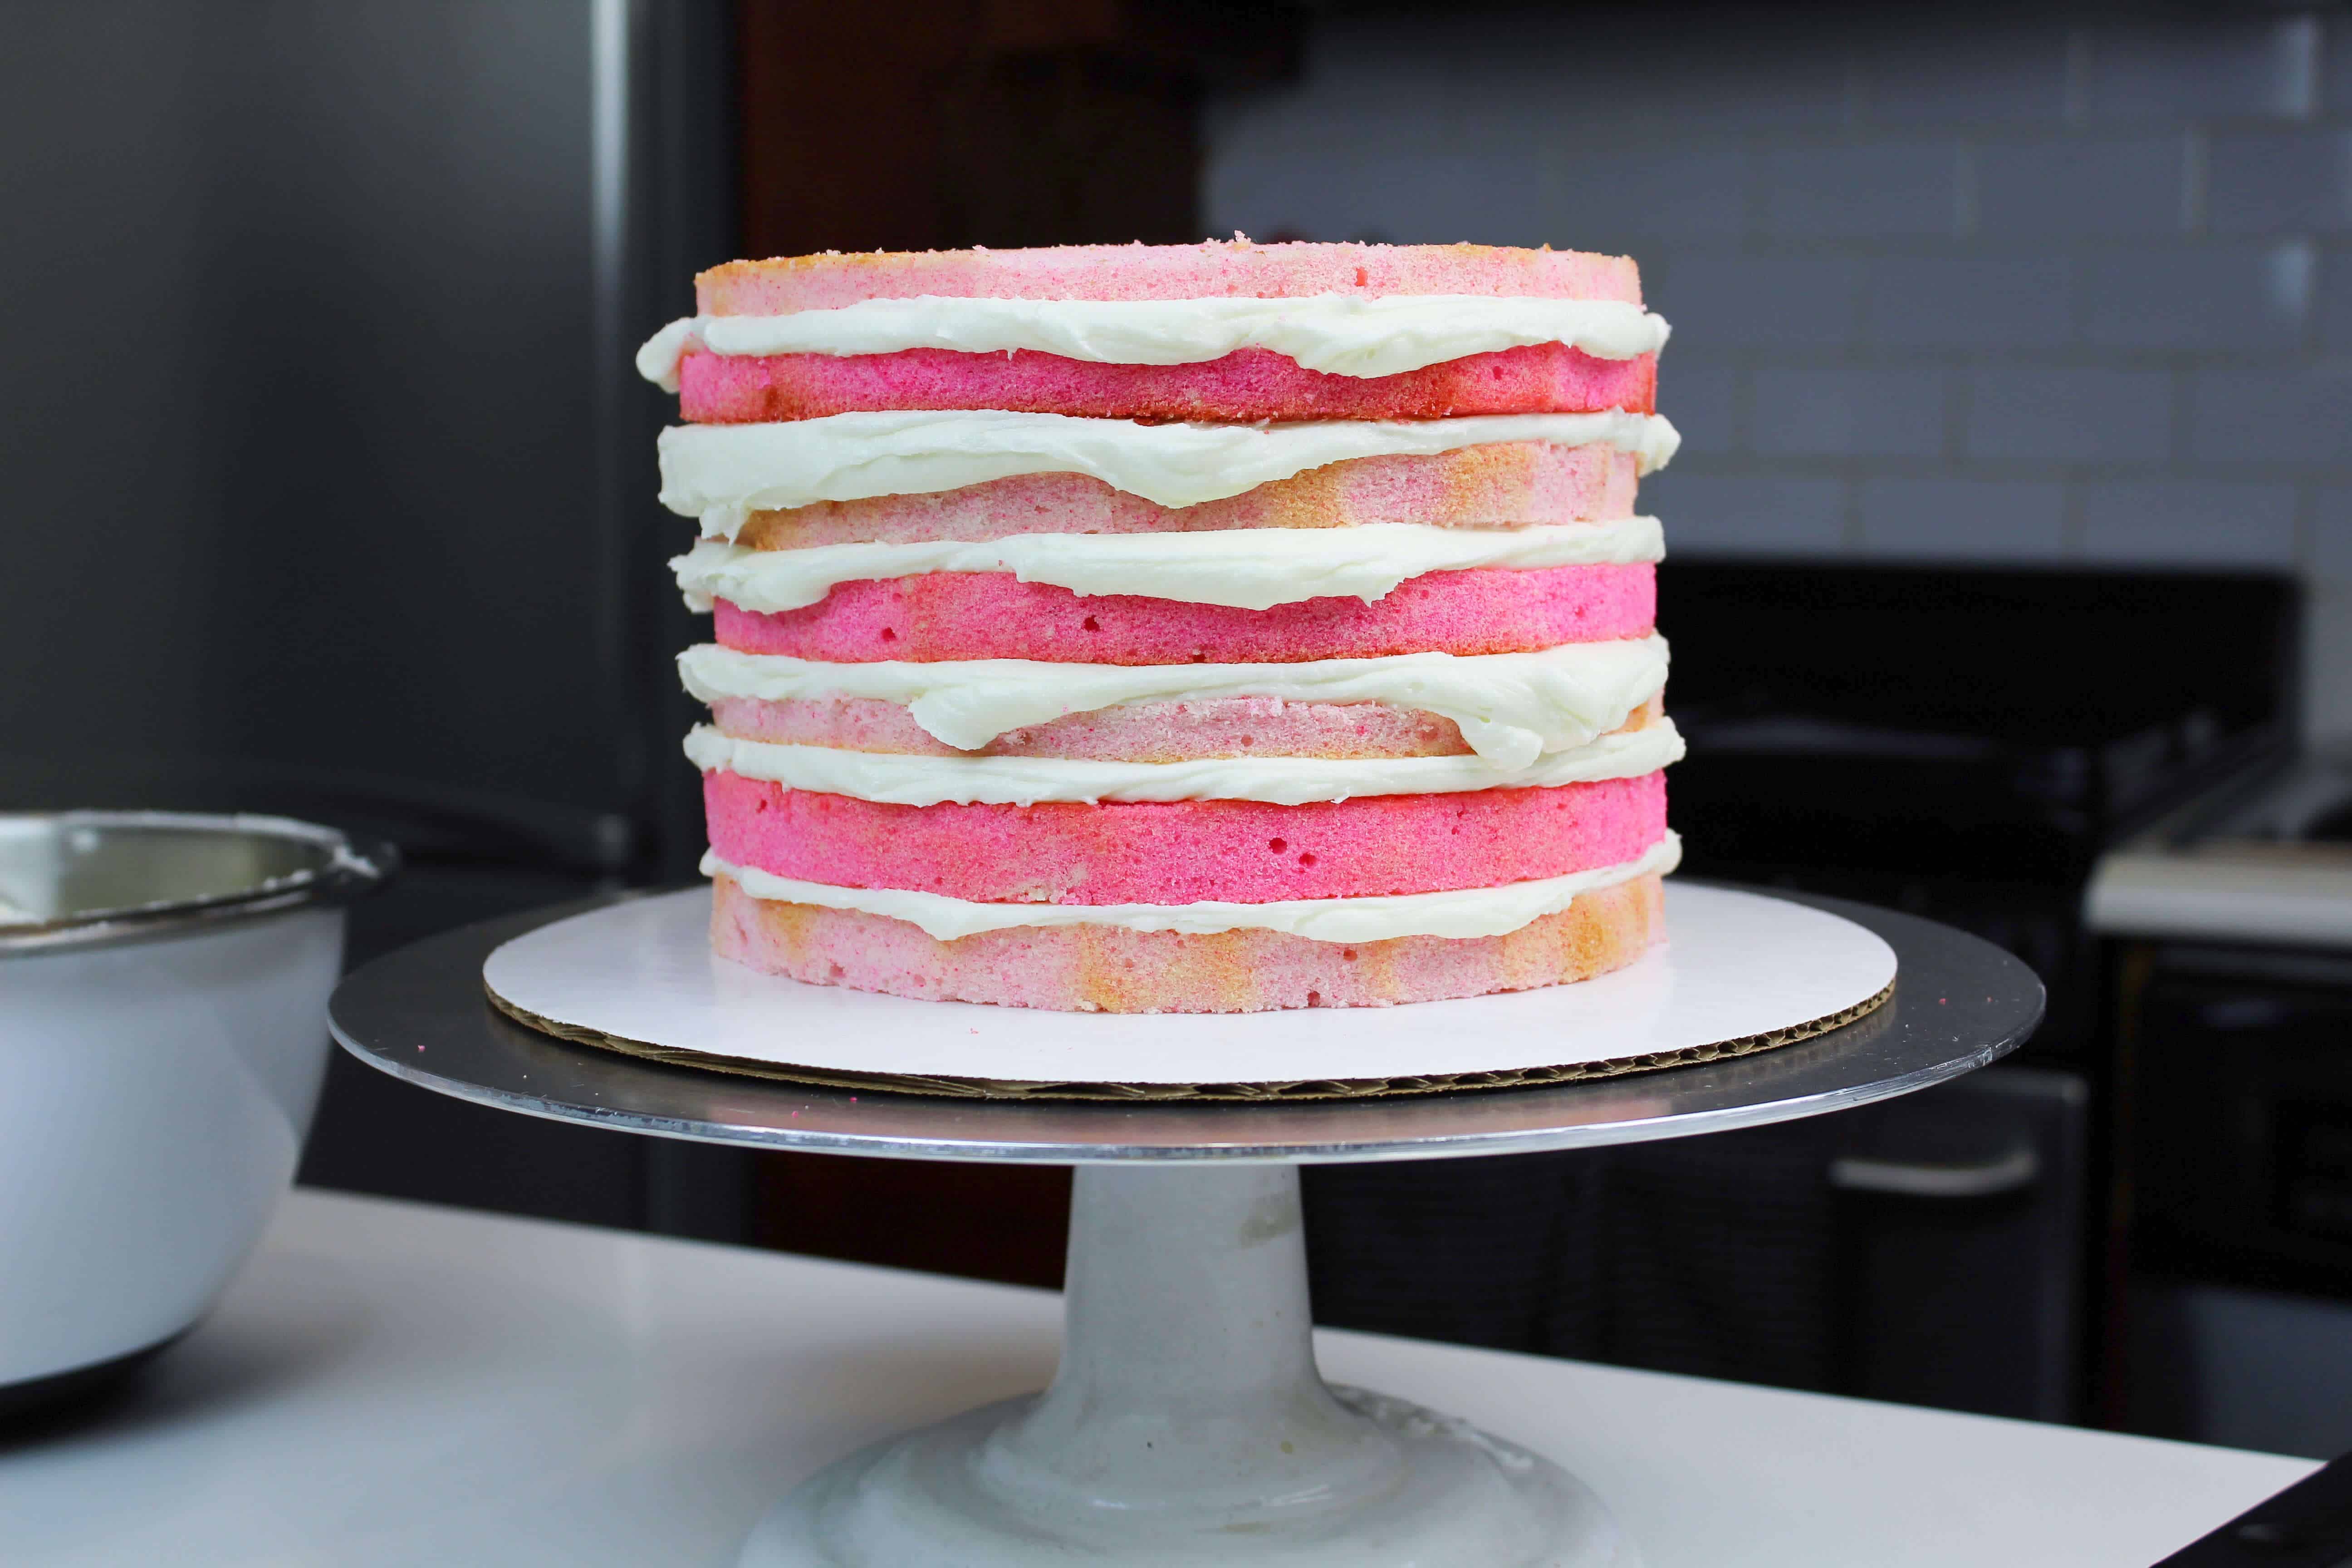

Torting These Pink Velvet Cake Layers
I usually use a serrated knife to trim the caramelization from the sides of my layers and level the top of each cake layer. This helps those vibrant colors shine through when you cut into it.
You can also torte your cake layers in half to create 8 thin cake layers. This is totally optional but really makes each cake slice so beautiful.

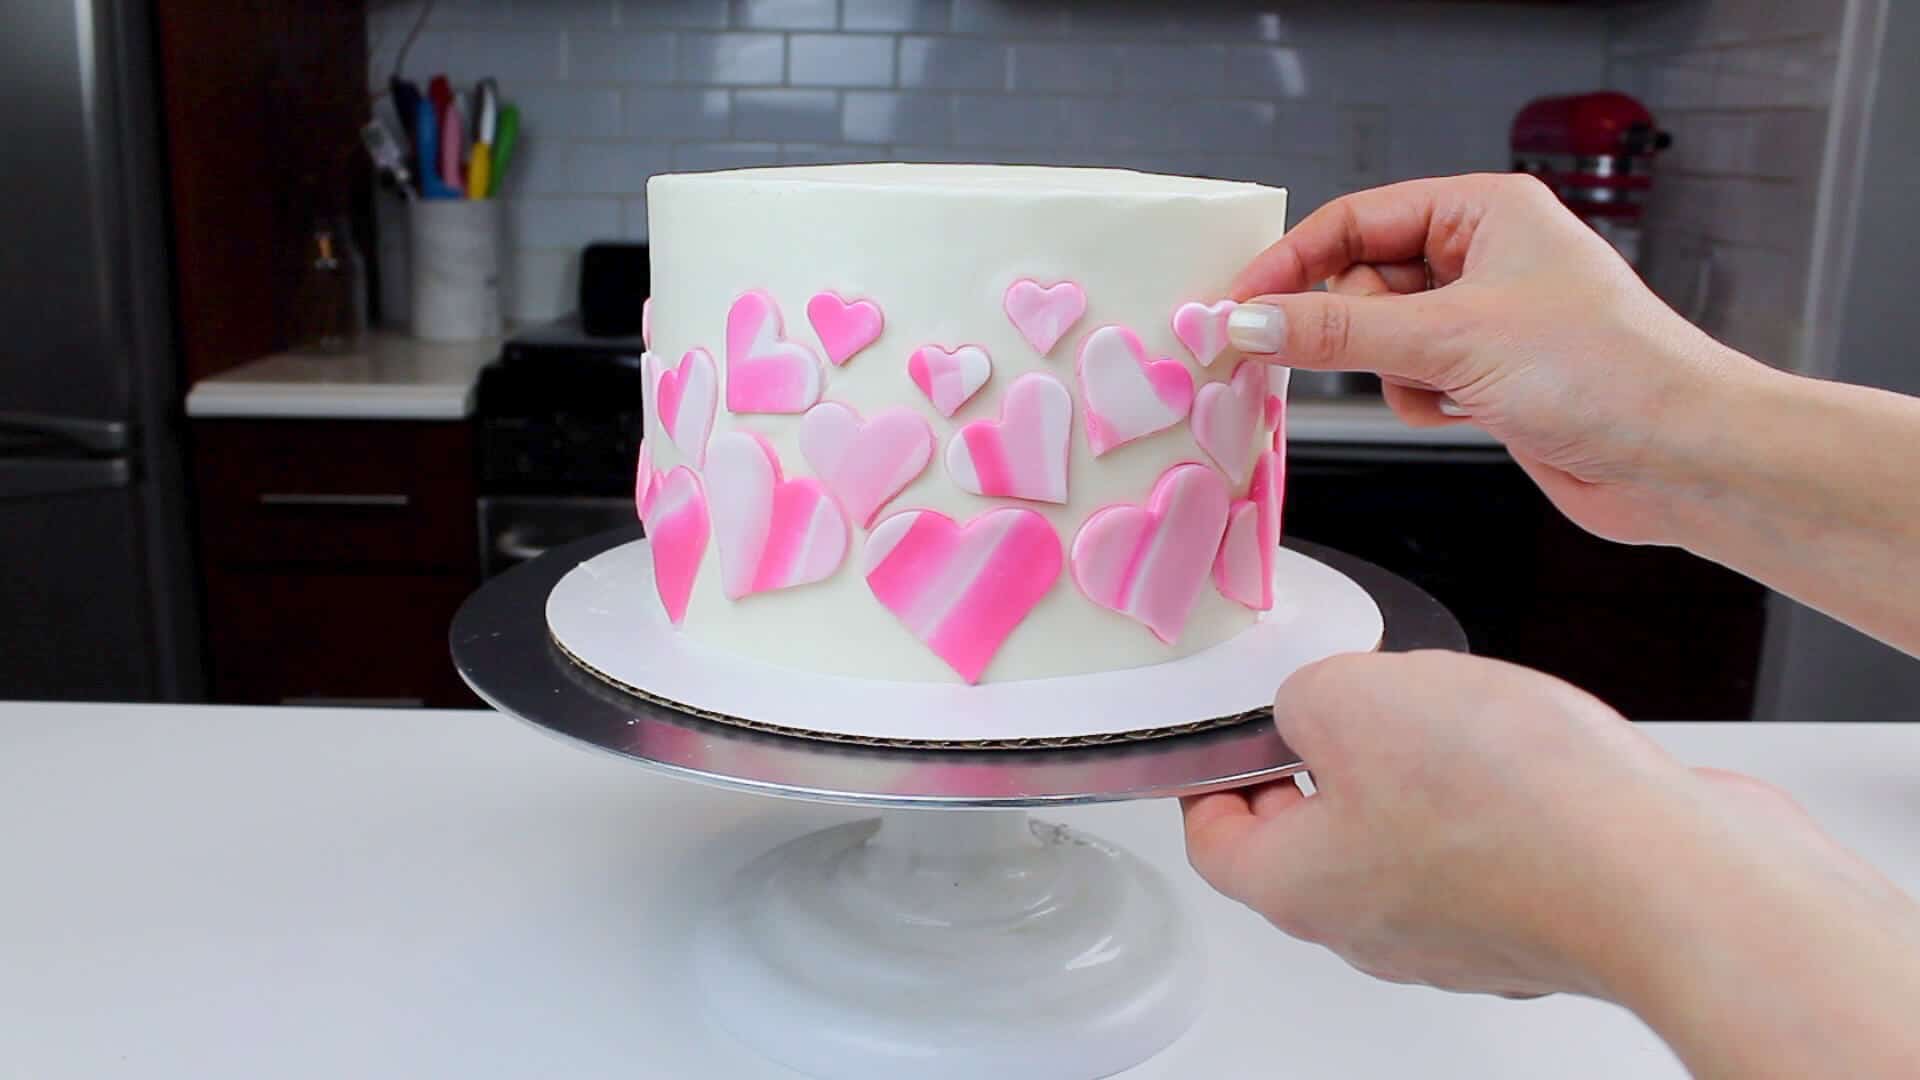
Marbled Fondant Hearts
In addition to beautifully torted cake layers, I also added some hearts to the side of the cake. Since I don’t work with fondant very often, I usually order premade fondant online!
I used about 1/2 cup of white fondant and 1 cup of light pink fondant.
Using the same food coloring from above, I colored 1/2 a cup of the light pink fondant to make the hot pink fondant.
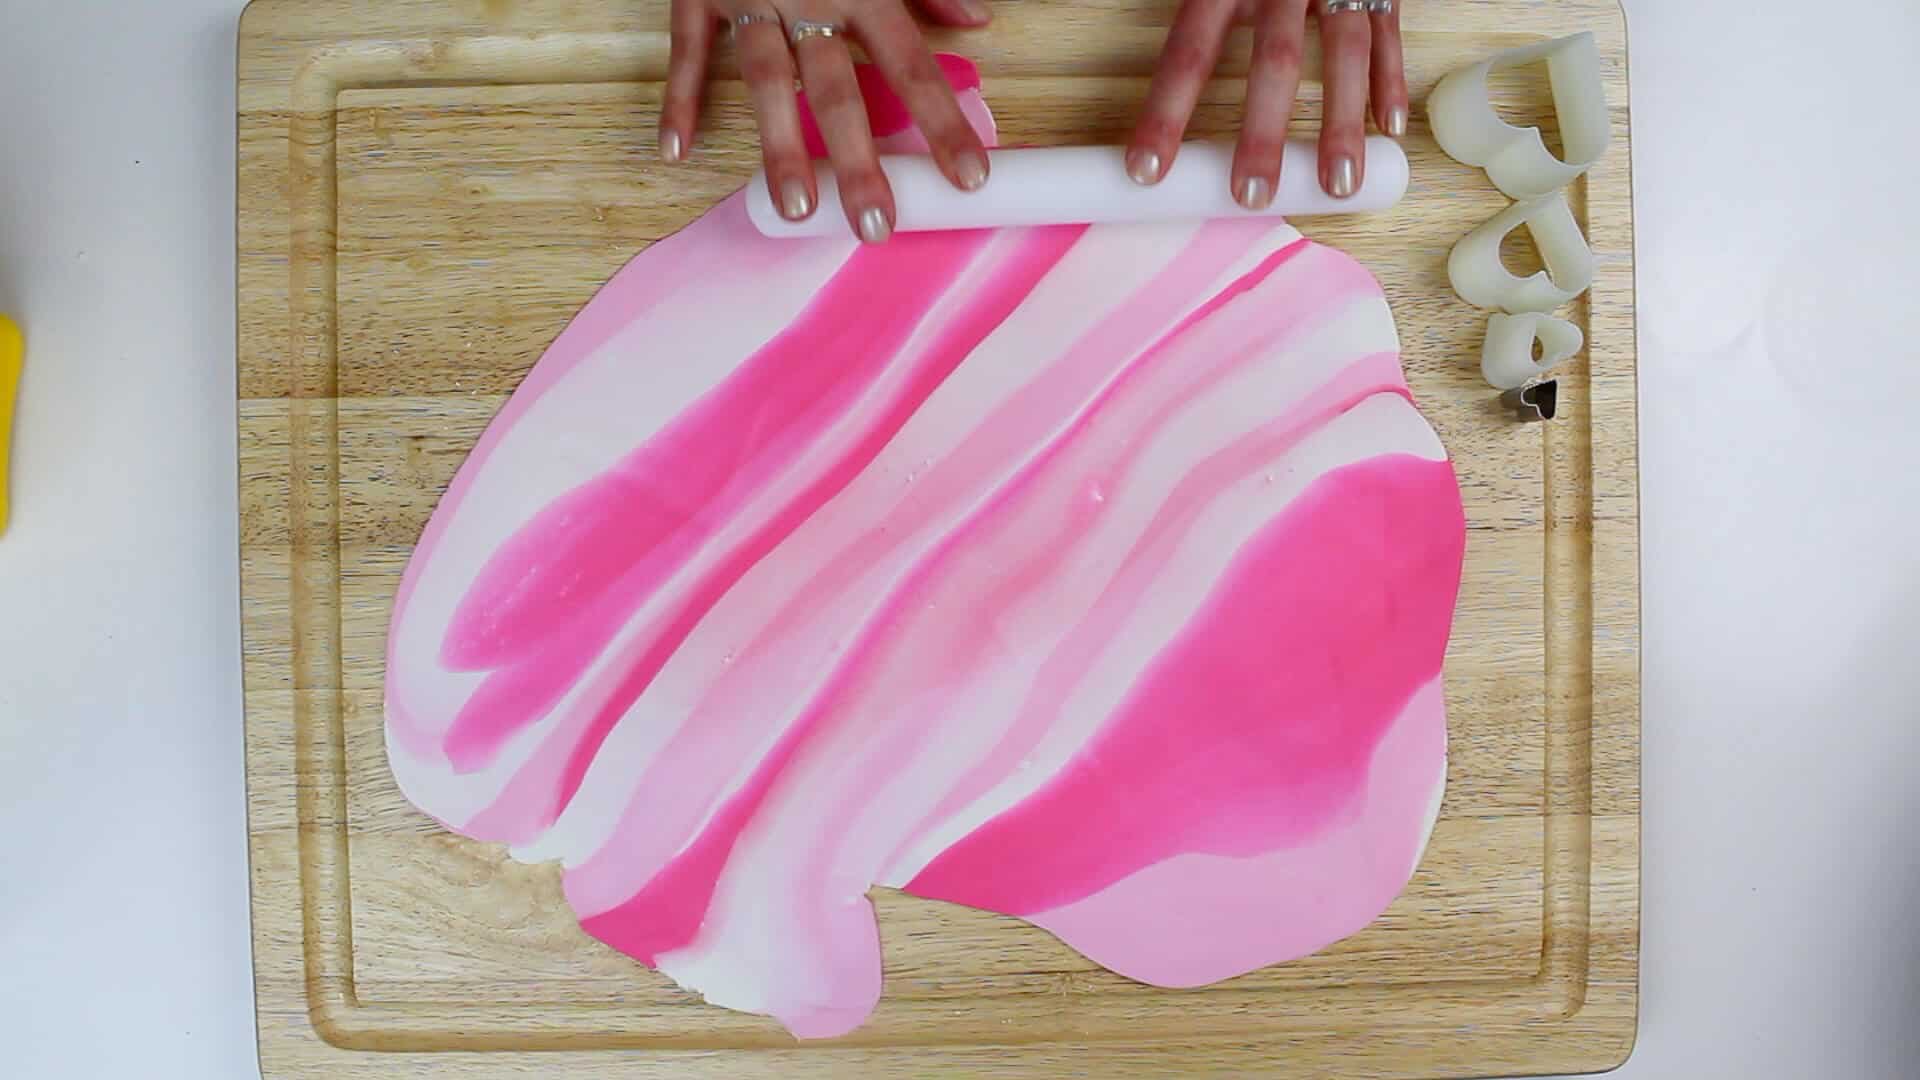

This step is always messy! I highly recommend either wearing rubber gloves, or working the coloring into the fondant inside of a plastic bag.
If you do color fondant with bare hands, your fingers will be dyed pink for days. And don’t even get me started on how difficult it is to get food coloring out from under your fingernails!!
I twisted together equal amounts of white, light pink, and hot pink fondant to create a beautiful marbled pattern in my fondant, and used heart shaped cutters to create the different sized hearts.

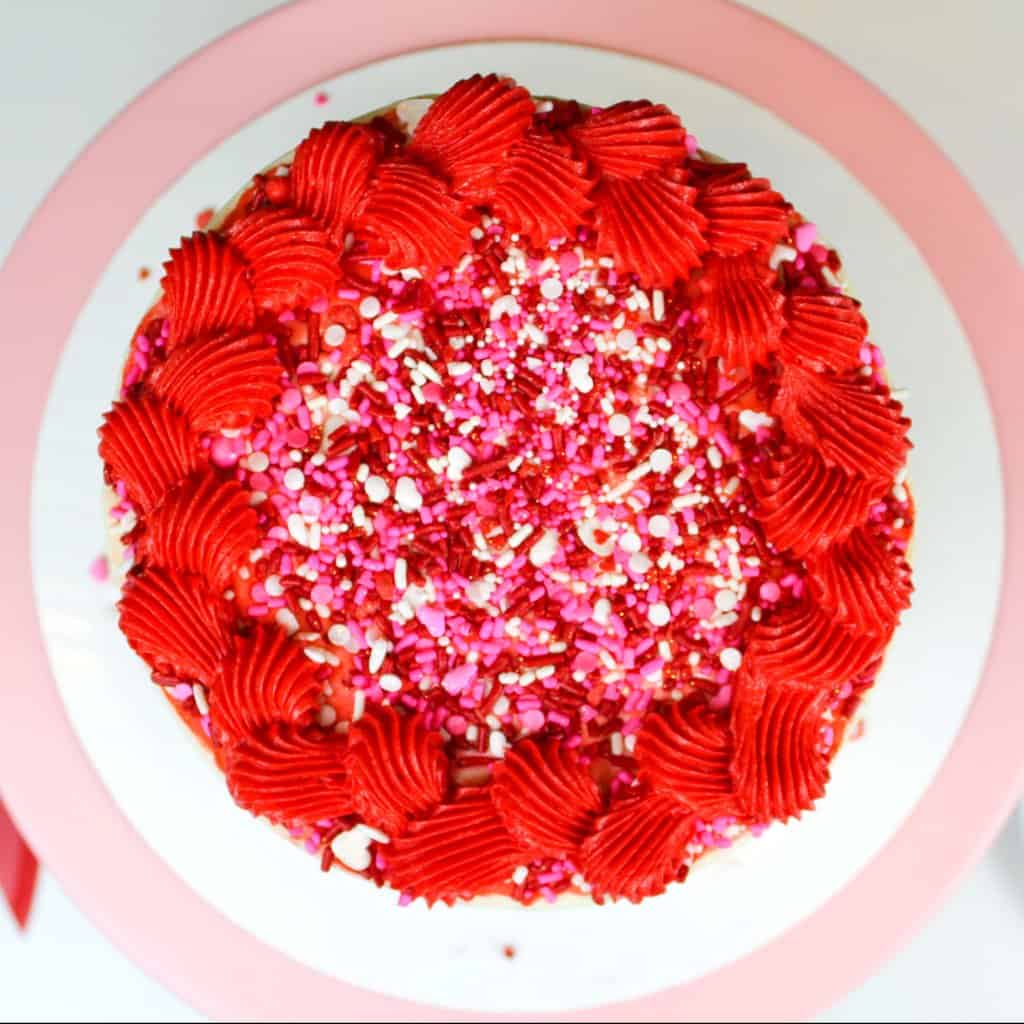
Decorating This Pink Velvet Cake
Once I stacked and frosted my cake, I added the marbled fondant hearts all around the cake. Starting with the largest hearts on bottom, I worked my up with cake with the smaller fondant hearts.
I completely covered the sides of the cake, fitting as many hearts onto it as I could.
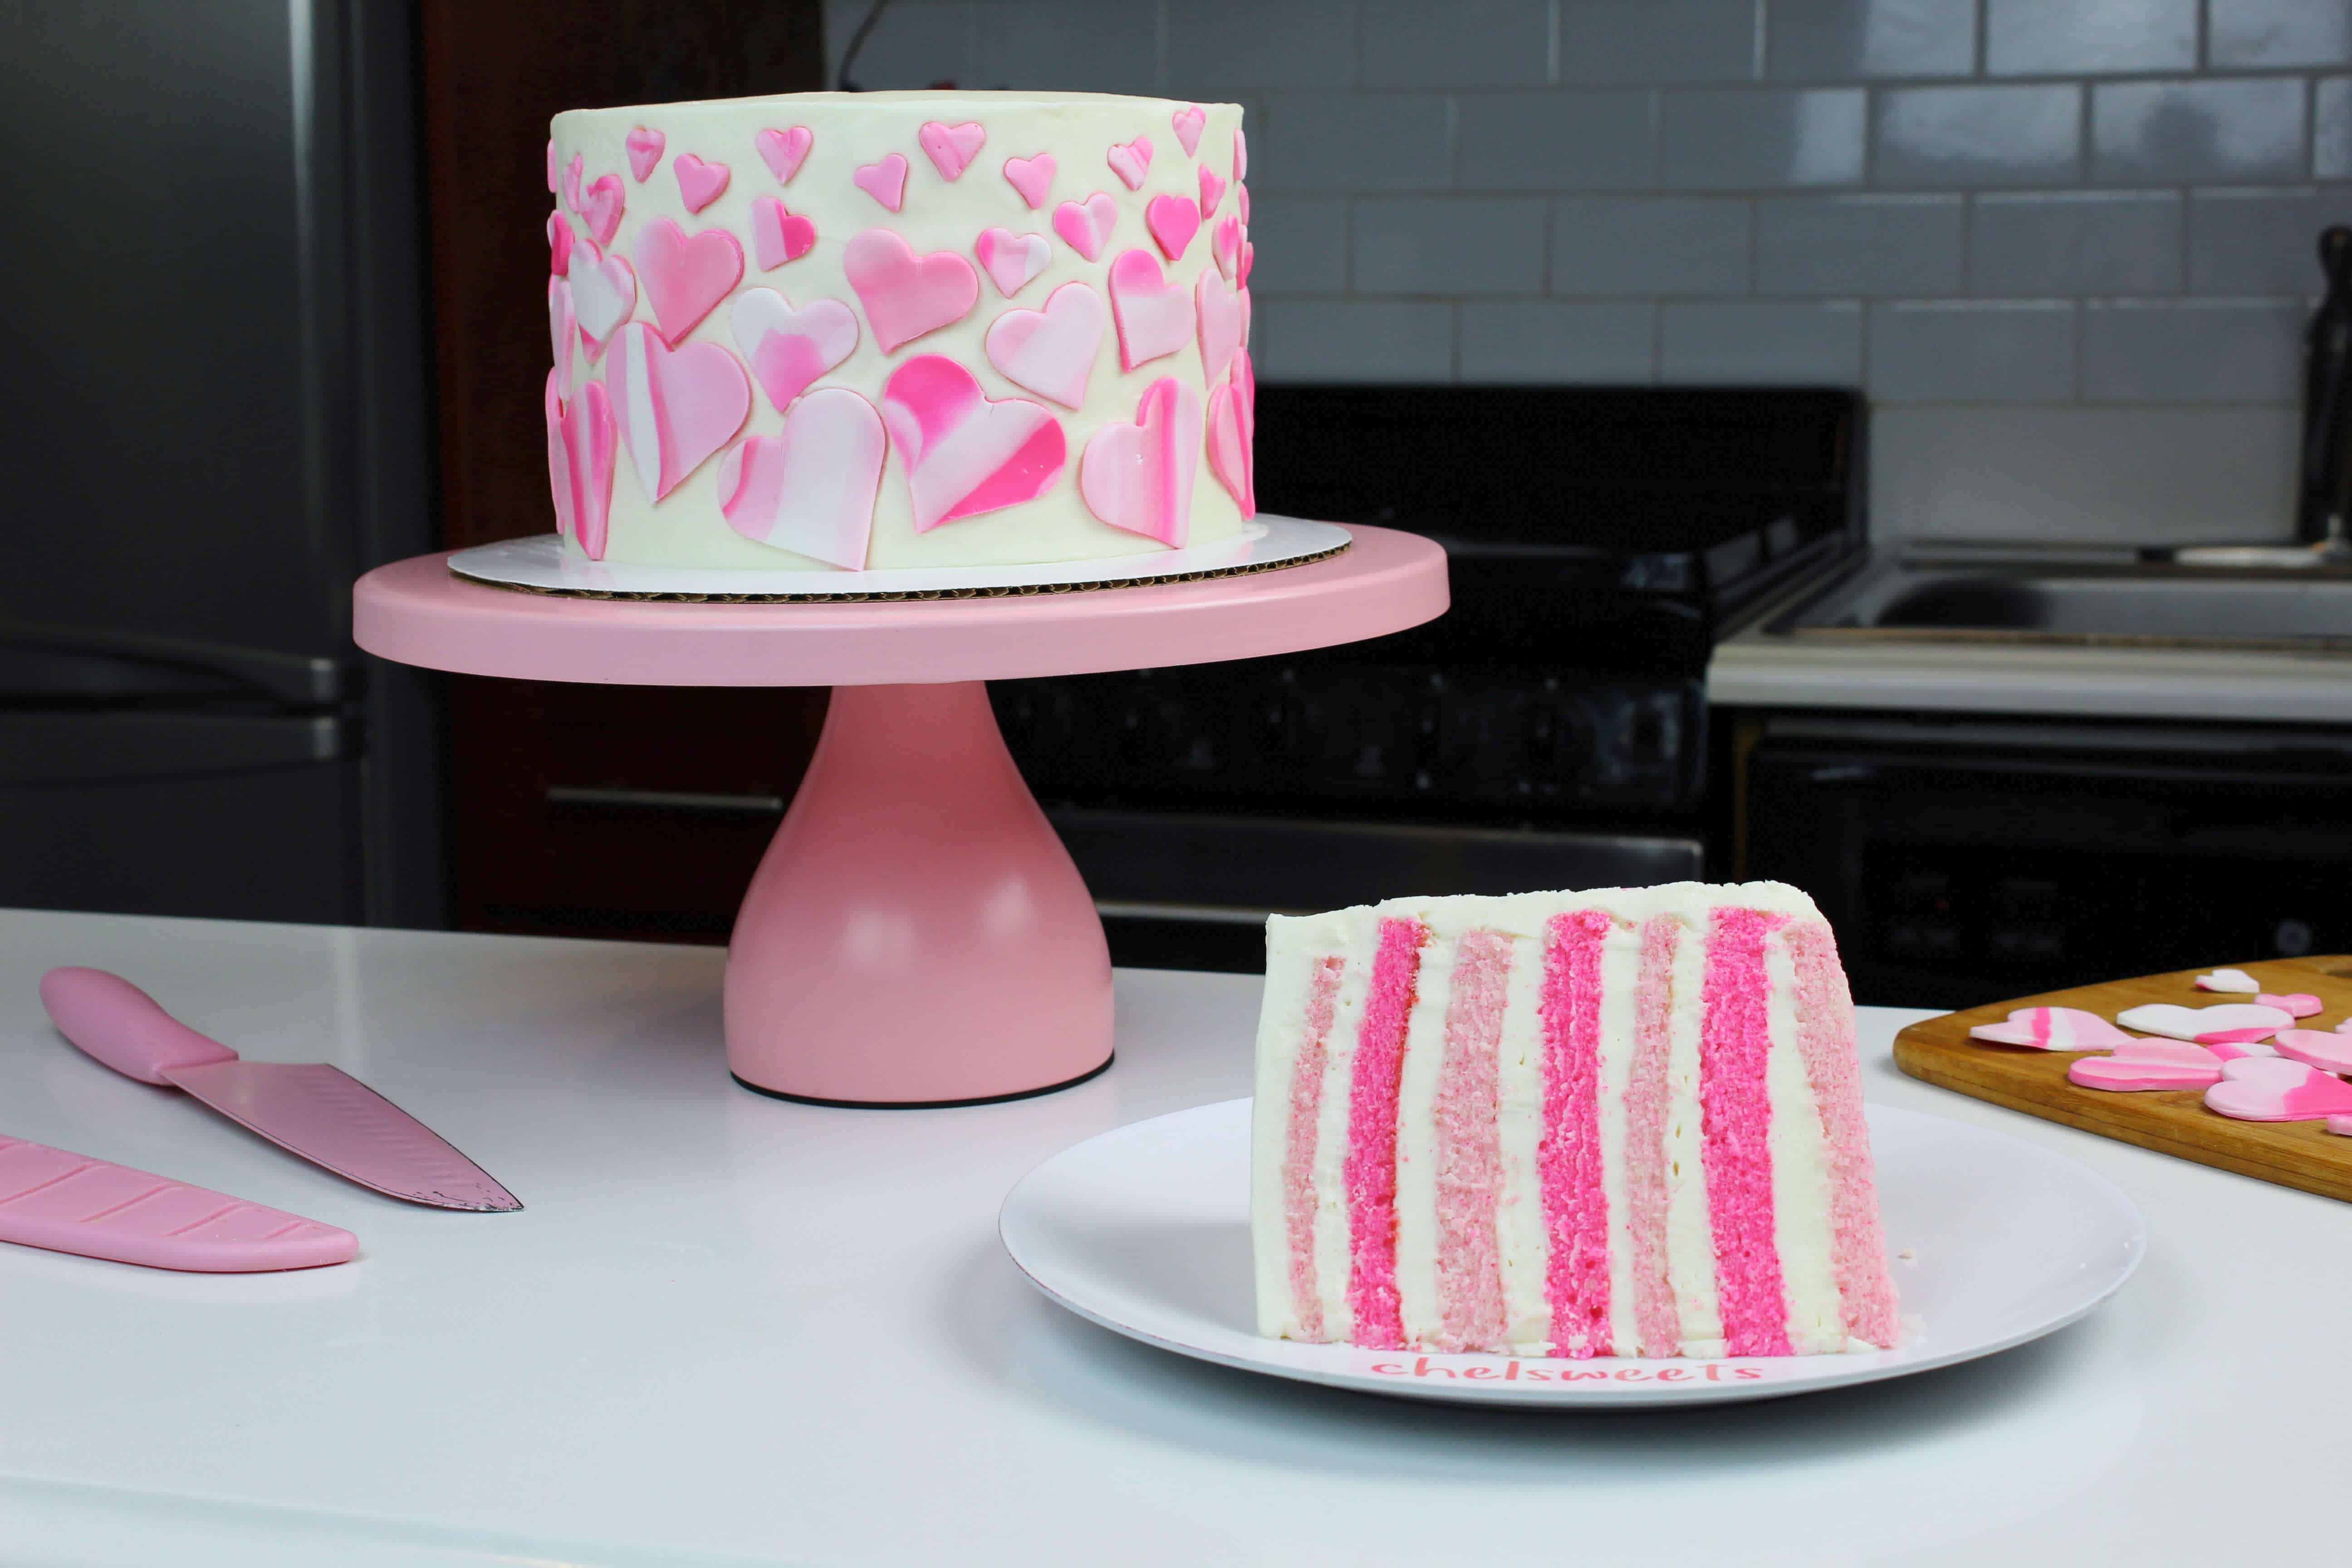

As beautiful as this cake was, I couldn’t wait to cut into it!
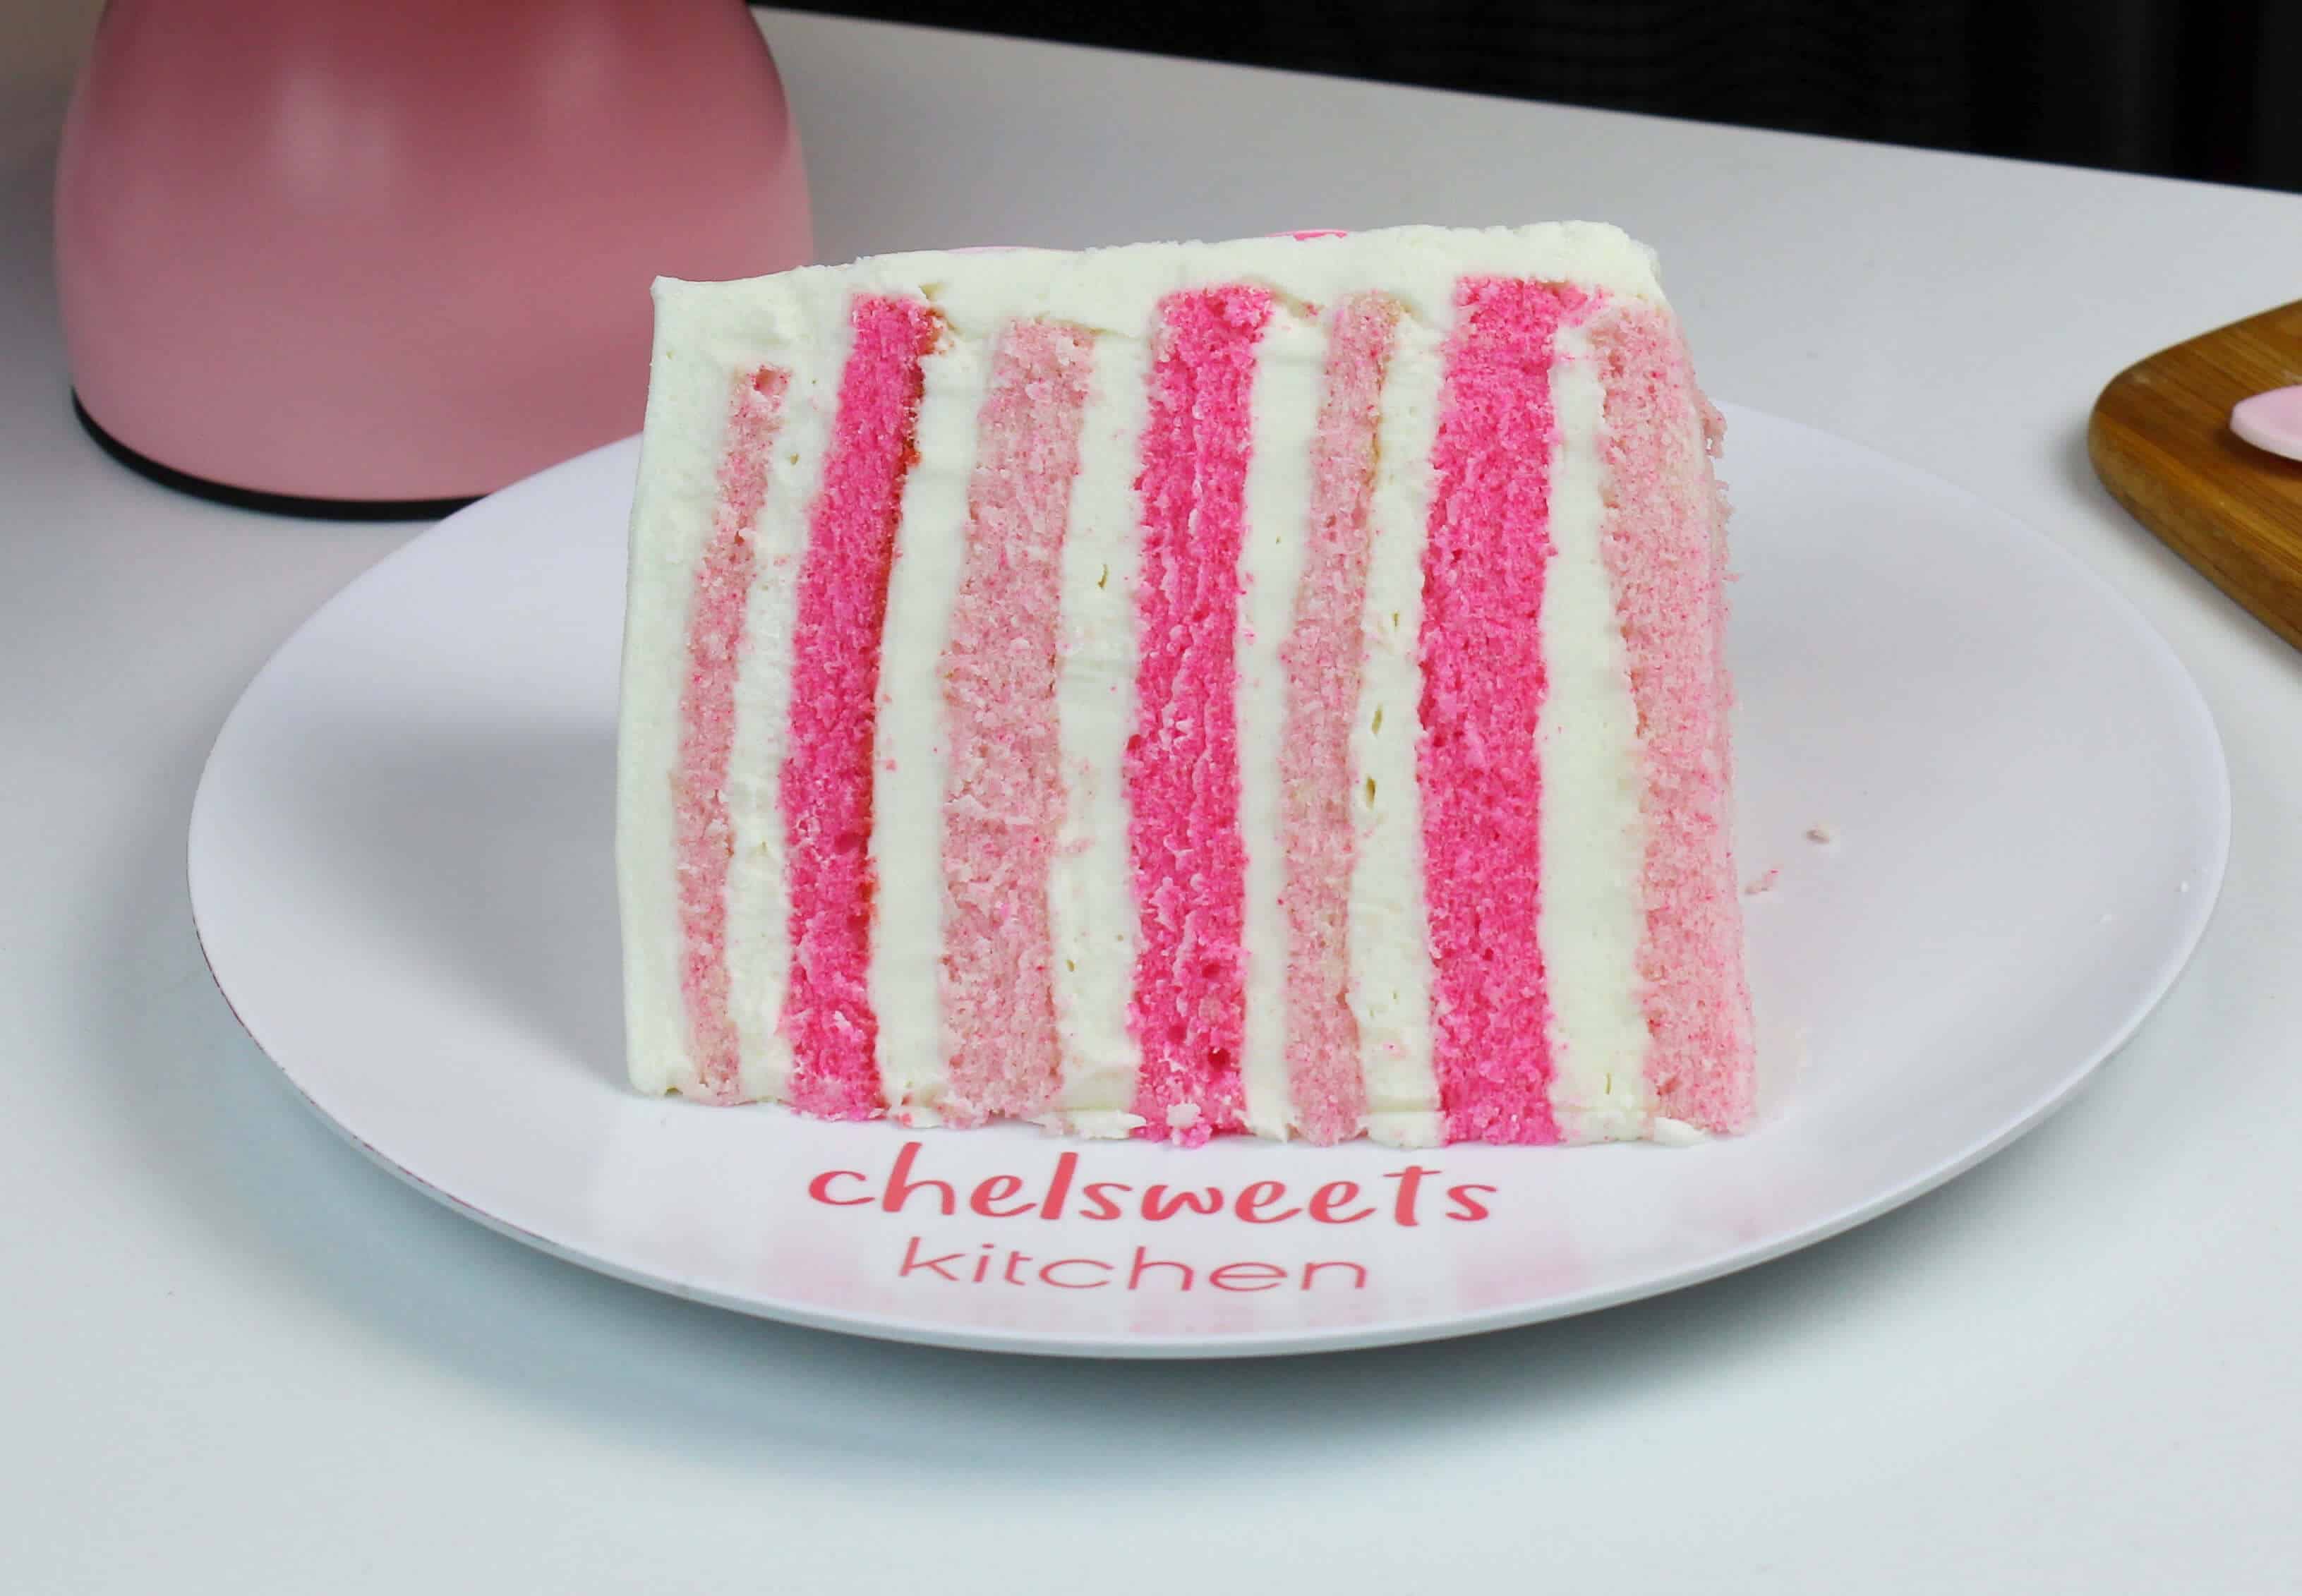
With all the effort I put into trimming and torting the cake layers, I was so ready to see the inside of the cake. I’m happy to say, this slice didn’t disappoint!
To help get super clean slices of cake, I run my knife under hot water before cut it. I also cut the cake when it’s still slightly chilled, so that each slice keeps its shape.
Tips for Making the Best Pink Velvet Cake
- Properly measure your flour. Either spoon it into the cup measure, then level with a knife or use a kitchen scale.
- Don’t overmix your batter! Mix on the speed the recipe recommends until the ingredients are just combined.
- Make sure your ingredients are at room temperature to help them mix together better.
- Don’t level your cake layers until they are completely cooled.
- Make this pink velvet cake vegan or dairy free! Use your favorite type of dairy free milk to replace the sour cream and heavy cream, vegan butter sticks in place of the butter, and flaxseed eggs in place of the eggs.
- Make sure your buttercream is the right consistency before frosting your cake! It will help give your cake proper structure and make it easier to decorate.
- If your cake layers turn out less than perfect, I recommend reading my cake troubleshooting guide to see where things might’ve gone awry.
Making This Pink Velvet Cake In Different Sizes
This recipe can also be used to make different sized cakes. You can also half or double the ingredients to make a half or double batch!
You can make four 6″ cake layers with one batch of batter. Bake the cake layers at 350F for 34-36 minutes or until a toothpick comes out with a few moist crumbs.
One batch of batter can be also be used to make one 9×13 inch pink velvet sheet cake. Bake it at 325F for 40-50 minutes and use flower nails or heating cores to help the cake bake evenly.
You can also use this recipe to make a bundt cake! Bake time can vary based on the size and type of pan you use, and can take anywhere from 45-75 minutes. I recommend using a toothpick to test for doneness and checking on it every 5-10 minutes once it’s been in the oven for 45 minutes.
The final variation of this recipe is cupcakes!! This recipe makes about 24 regular sized cupcakes. Fill cupcake liners 3/4 full and bake for 18-20 minutes or until a toothpick comes out with a few moist crumbs.
Making This Layered Pink Velvet Cake in Advance and Storage Tips
- Make your cake layers in advance and freeze them. It breaks the process up and make it more approachable.
- Make your frosting ahead of time too or save any leftover frosting! It can be stored in an airtight container in the fridge for up to 2 weeks, or in the freezer for up to a month. Be sure to give it a good stir once it thaws to get the consistency nice and smooth again.
- A frosted cake can last in the fridge for up to a week or in the freezer for up to a month. The frosting locks in all the moisture, keeping the cake fresh and delicious!
- If you cut into the cake and have leftovers, use any remaining frosting to cover the cut section to keep it moist and store in the fridge for up to a week.
Let Me Know What You Think!
If you try this pink velvet cake recipe, please tag me @chelsweets and use the #chelsweets so I can see your beautiful creations!!
Also leave a comment below and/or a rating to let me know your thoughts.
Other Recipes You Might Like:


Pink Velvet Layer Cake Recipe
This pink velvet cake recipe is incredibly moist, with the most delicious tang! It's just as delicious as it is beautiful.
Ingredients
Pink Velvet Cake Layers
- 3 cups all-purpose flour (390 grams)
- 3 cups granulated sugar (600 grams)
- 2 tsp baking powder (13 grams)
- 1 tsp baking soda (6 grams)
- 1 tsp salt (5 grams)
- 1 cup unsalted butter, room temperature (226 grams) – 2 sticks
- 5 large eggs, room temp
- 1 1/2 cups buttermilk, room temperature (360 grams)
- 1/8 cup vegetable oil (28 grams)
- 2 tsp. vanilla extract (9 grams)
- 2 tsp vinegar (9 grams)
- Pink gel food coloring
Vanilla Buttercream Frosting
- 2 cups unsalted butter, room temperature (434 grams)
- 7 cups powdered sugar (907 grams; or a 2 lb bag)
- 1/2 tsp salt (3 grams)
- 2 Tbsp heavy cream (or whipping cream) (30 grams)
- 1 Tbsp vanilla extract (12 grams)
Instructions
Pink Velvet Cake Layers
- Preheat oven to 350°F. Line four seven-inch pans or three eight-inch round pans with parchment rounds, and lightly spray with non-stick cooking spray.
- Mix together all dry ingredients (flour, baking powder, sugar, and salt) in a stand mixer with a paddle attachment until fully combined.
- Mix chunks of room-temperature butter slowly into the dry mix, on a low speed. Continue to mix until no large chunks of butter remain, and the mixture looks crumbly.
- On a low speed, mix in eggs one at a time. Beat on low until just incorporated. Mix in the buttermilk in two installments, on a low speed. Add in vinegar, vanilla and oil, and mix at a low speed until fully incorporated. Scrape down the sides of the bowl with a spatula, then beat on medium speed for about 30 seconds.
- Divide the batter in half, and use pink gel food coloring to color one half a light shade of pink, and the other half bright pink.
- Evenly divide the batter between the prepared cake pans. Bake for 35-37 minutes (or until a skewer comes out clean).
- Allow to cool for 10 minutes, then run an offset spatula around the pan to separate the cake from the pan. Place cake layers into the freezer for 45 minutes, to accelerate the cooling process.
- Once the layers have fully cooled, I like to trim the caramelized bits from the sides of the layers using a serrated knife. While these layers bake pretty flat, sometimes I’ll also trim the top of the layers too, to get my layers perfectly level.
Vanilla Frosting
- Beat the butter on a medium speed for 30 seconds with a paddle attachment, until smooth. Slowly add in the powdered sugar, 1 cup at a time. Alternate with small splashes of cream.
- Once fully mixed, add in the vanilla and salt, and beat on low until the ingredients are fully incorporated, and the desired consistency is reached.
- If the frosting is too thick, add in additional cream (1 teaspoon at a time). If the frosting is too thin, add in more powdered sugar (quarter of a cup at a time).
Did you try this recipe?
Tag @chelsweets on Instagram and use the hashtag #chelsweets
Notes
If you want to learn how to make your cake layers in advance, I share all my tips and tricks for freezing cake layers here.
I also like to use a digital kitchen scale to weigh my pans, and ensure they all have the same amount of batter. This guarantees your layers will bake to be the same height.
Nutrition Information
Yield
24Serving Size
1Amount Per Serving Calories 520Total Fat 26gSaturated Fat 15gTrans Fat 0gUnsaturated Fat 9gCholesterol 102mgSodium 287mgCarbohydrates 70gFiber 0gSugar 57gProtein 4g
30 beaux et délicieux gâteaux de la Saint-Valentin | mes emplois préférés
Tuesday 1st of February 2022
[…] Moulé Chelsweets […]
Samantha
Wednesday 1st of December 2021
Quick question your vanilla layer cake has 13g (2.5tsp) of baking powder on the recipe card but this pink velvet says 2tsp is 13g of baking powder. Just trying to make sure I have the right numbers so they each bake correctly. I have made the vanilla cake many times with the 10g of baking powder it says. Please advise! Cannot wait to try this pink velvet recipe!
Thank you for all you do!
Jessie
Friday 5th of March 2021
Hey!!! Been using your cake recipes for everything and they never disappoint!
I am looking to make this cake for Easter this year but need to do a Gluten Free version. Would I be able to just do a cup for cup substitute for the flour? I usually use Cup4Cup GF Flour but if you think a different gluten free flour would work better I am open to suggestions!
Thanks!
Sahar
Sunday 31st of January 2021
Looks so good! Can I make this cake using just the egg whites instead of the whole eggs?
Pauline Sto
Monday 27th of July 2020
Good morning, would this cake be sturdy enough to use rolled fondant instead of frosting?