
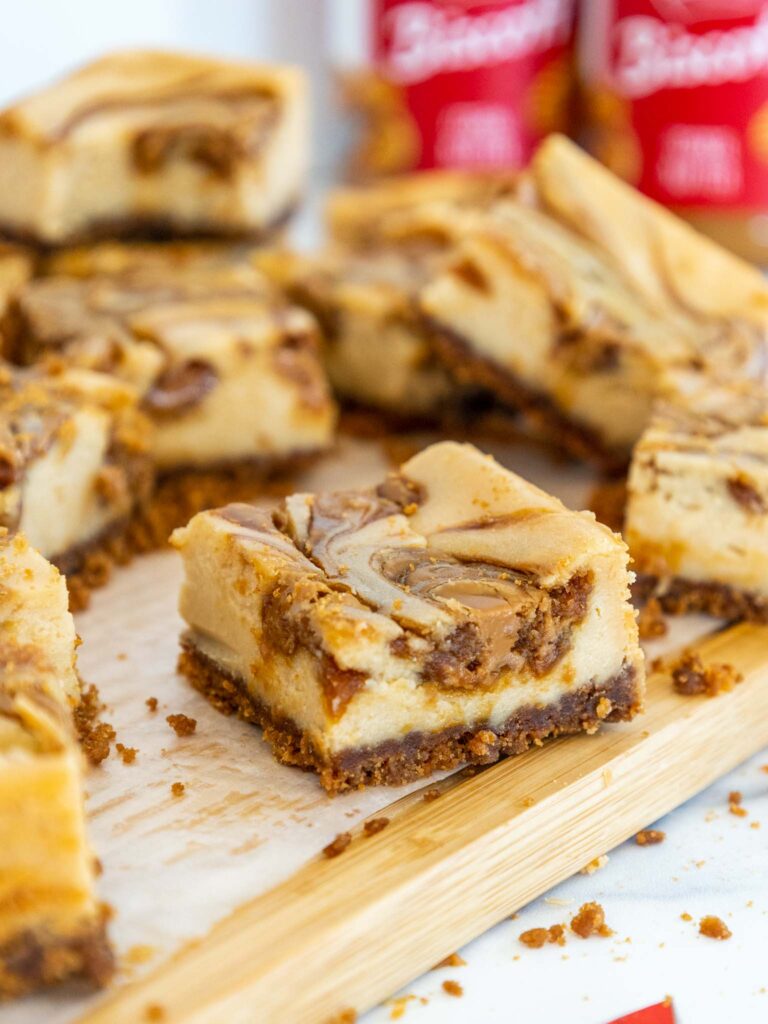
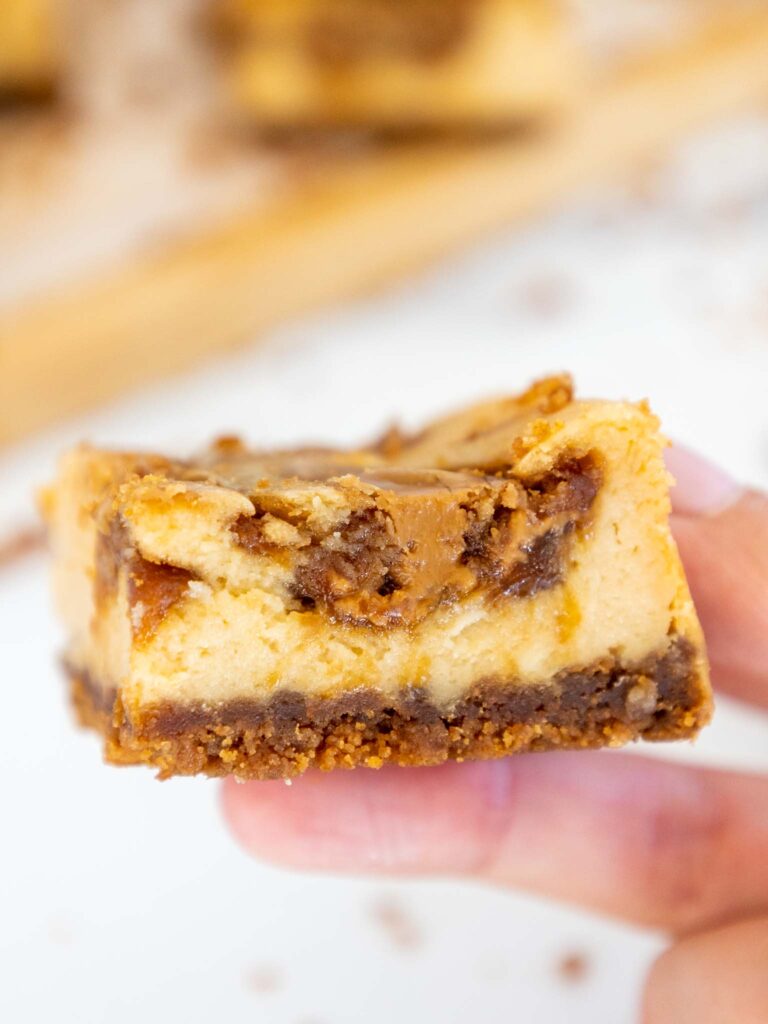
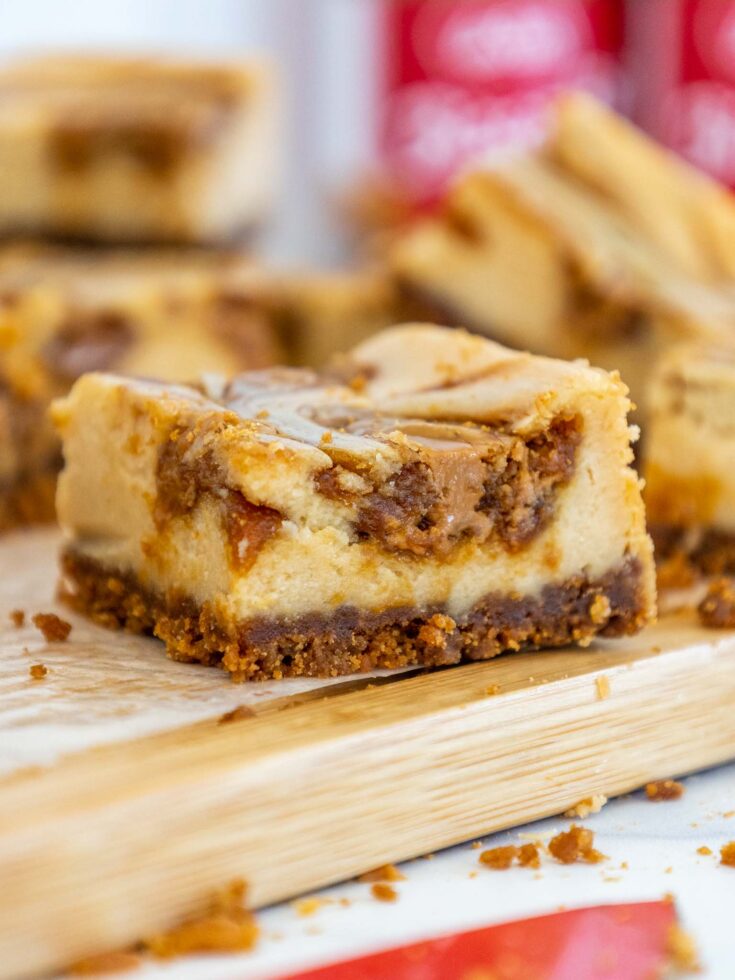
While I love my Biscoff cheesecake recipe, sometimes I don’t want to make an entire cheesecake. That’s where these Biscoff cheesecake bars come in!
They’re creamy, decadent, and swirled with delicious ribbons of cookie butter.


As an added bonus, they’re incredibly easy to make and are the perfect make ahead dessert.
Substitutions & Swaps in This Biscoff Cheesecake Bar Recipe
This recipe uses quite a few ingredients and I know you might not have all of them on hand. Or if you have food allergies or restrictions, I’ve got you covered.
Below are some swaps and substitutions that can be made in this recipe.

- Biscoff Cookie Crumbs – I like to crush up Biscoff cookies. I pulverize them in my food processor, but you can also crush them up with a rolling pin in a Ziploc bag. You can also use crushed graham crackers.
- Salted Butter – To keep things simple I use salted butter to make the cookie crust. If you only have unsalted butter, add a pinch of salt (1/8 tsp) into the crust mixture.
- Cream Cheese – This recipe turns out best with full-fat cream cheese. However, you can use low fat cream cheese or Neufchatel cheese if needed.
- Granulated Sugar – I think these cheesecake bars have just the right amount of sweetness, but you can either increase or decrease the amount of sugar by a few Tablespoons based on your preferences.
- Eggs – Sadly this recipe does not turn out with egg alternatives like applesauce or flax seed eggs. I highly recommend using regular large eggs.
- Cookie Butter – You can use any brand of cookie butter spread. If you can’t find cookie butter, peanut butter or Nutella can be used in its place.

Making These Biscoff Cheesecake Bars in Advance
These cheesecake bars keep in the fridge for up to 5 days. Store them in an airtight container to keep them fresh.
You can also freeze these bars for up to two months! I like to freeze the whole sheet of bars, then cut them once I thaw them. Freeze the bars on a sheet pan until they’re firm to the touch, then wrap them in a layer of plastic wrap and then foil.
You can also cut them and wrap them individually before freezing them.
When you want to enjoy the bars, place them in the fridge overnight, then unwrap and enjoy them the following day.

How To Make the Best Biscoff Cheesecake Bars
- Use cream cheese that is at room temperature. If you forget to set it out ahead of time, cut the blocks into smaller squares and heat it in the microwave in 10 second intervals until it reaches room temperature.
- Beat the cream cheese on a low speed until it’s smooth and creamy before adding the other ingredients. This helps to prevent any lumps from forming in the cheesecake batter.
- Place a pan of water on the rack beneath the cheesecake bars in the oven as the bars bake. This will help the bars bake more evenly and prevent the center from sinking.
- Don’t use a toothpick to check if your bars are done! Instead, gently shake the pan while it’s still in the oven. If only a small circle in the center jiggles a little, it’s ready! The center will set as the bars cool.
- Use a warm, sharp knife to get clean slices. Fill a tall cup with hot water and drip a sharp knife into it. Dry the knife fully, then make a slice. Repeat with each cut and wipe the blade completely clean after each cut.
- If you want to make this recipe in a 9 x 13-inch pan, double the recipe and bake at 325 F for 40-50 minutes with a pan of water in the rack beneath the bars.

Let Me Know What You Think!
If you try this recipe for Biscoff cheesecake bars, I’d love to hear what you think of it! Please leave a rating and share a comment below.
Biscoff Cheesecake Bars

These Biscoff cheesecake bars are absolutely delicious! They're rich & creamy and have the most delicious cookie butter swirl!
Ingredients
Biscoff Cookie Crust
- 1 1/2 cups Biscoff cookie crumbs or about 20 Biscoff cookies (160g)
- 1/4 cup salted butter, melted (56g)
Biscoff Cheesecake Filling
- 2 cups or 16 oz. full-fat cream cheese, room temperature (452g)
- 1/4 cup cookie butter (60g)
- 2/3 cup granulated sugar (133g)
- 2 large eggs, room temperature (112g)
- 1 tsp vanilla extract (4g)
Biscoff Swirl
- 1/2 cup cookie butter (120g)
Instructions
Biscoff Cookie Crust
- Preheat oven to 325 F or 165 C and line and grease an 8-inch x 8-inch square baking pan with parchment paper. I like to use unpainted metal binder clips to keep my parchment paper in place.
- Place 1 2/3 cup of Biscoff cookie crumbs and 1/4 cup of melted butter into a medium bowl. Mix until the ingredients are fully combined, and the cookie crumbs look moist.
- Pour the cookie mixture into the prepared pan. Use the bottom of a measuring cup or cup with a flat bottom to press down firmly and create a compact, even crust.
- Bake for 8 minutes then remove from the oven. Place the pan on a wire rack to let it cool. Be sure to keep your oven on!!
Biscoff Cheesecake Filling
- While the cookie crust bakes and cools, make the cheesecake filling.
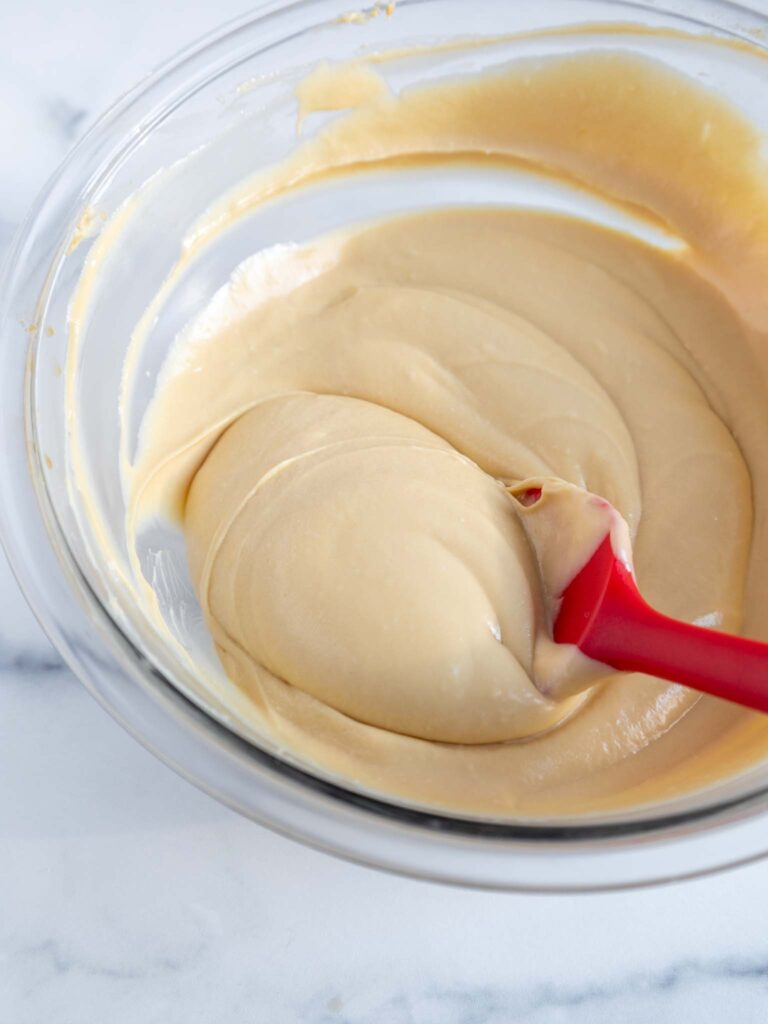
- Place 2 cups of room temperature cream cheese and 1/4 cup of cookie butter in a medium sized bowl. Beat with a hand mixer or stand mixer with a whisk attachment on a medium-high speed for a minute. The mixture should be creamy and smooth.
- Mix in 2/3 cup of sugar on a medium-low speed until combined. Scrape the sides and bottom of the bowl with a rubber spatula as needed.
- Add in 2 eggs and 1 tsp of vanilla extract. Mix on a medium-low speed until fully incorporated. The batter should be nice and smooth at this point. If you still notice any chunks, continue to mix on a low speed until it is smooth (like in the photo above the recipe card).
- Pour the cheesecake filling on top of the cooled cookie crust.
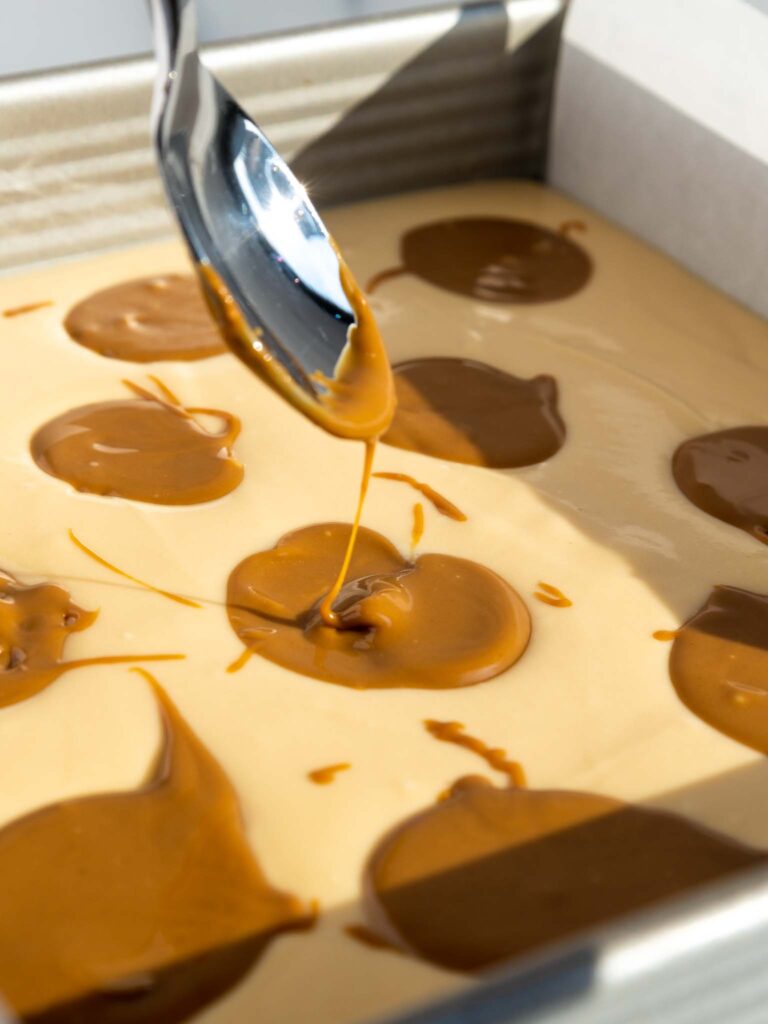
- Heat 1/2 cup of cookie butter in the microwave for 10 seconds then drop small spoonfuls on top of the cheesecake filling. Drag a butter knife or offset spatula through the cookie butter drops to create pretty swirls on top of the cheesecake bars.
- Bake the cheesecake bars at 325 F for 43-48 minutes, placing them on the middle rack in your oven. Fill a large, rimmed baking sheet with an inch of water and place on the rack beneath the bars. If you don't have a pan that size, any pan that can be filled with an inch of water and fit on the lower rack will work. Rotate the cheesecake bars halfway through to help them bake evenly. If you notice the top is browning too much, cover the top with a piece of foil.
- To see if the bars are done baking, do a wiggle test to check to see if they're done. Watch the center and look for a small wiggle. Cheesecake doesn't bake up completely firm the way cake layers do, so the usual toothpick test won't work.
- Let the bars cool completely in the pan on a metal rack. Once they reach room temperature, refrigerate them for an additional 2 hours or overnight. If you put them straight into the fridge from the oven it can cause the top to crack.
- Cut the fully cooled bars with a sharp, warm knife. Clean the knife after each cut to get perfect squares.
- Leftover bars can be kept in the fridge for up to 5 days in an airtight container.
Notes
Making These Biscoff Cheesecake Bars in Advance
These Biscoff cheesecake bars keep in the fridge for up to 5 days. Store them in an airtight container to keep them fresh.
You can also freeze these bars for up to two months! I like to freeze the whole sheet of bars, then cut them once I thaw them. Freeze the bars on a sheet pan until they're firm to the touch, then wrap them in a layer of plastic wrap and then foil.
You can also cut them and wrap them individually before freezing them.
When you want to enjoy the bars, place the bars in the fridge overnight, then unwrap and enjoy the following day.
How to Make the Best Biscoff Cheesecake Bars
- Use cream cheese that is at room temperature. If you forget to set it out ahead of time, cut the blocks into smaller squares and heat it in the microwave in 10 second intervals until it reaches room temperature.
- Beat the cream cheese on a low speed until it's smooth and creamy before adding the other ingredients. This helps to prevent any lumps from forming in the cheesecake batter.
- Place a pan of water on the rack beneath the cheesecake bars in the oven as the bars bake. This will help the bars bake more evenly and prevent the center from sinking.
- Don't use a toothpick to check if your bars are done! Instead, gently shake the pan while it's still in the oven. If only a small circle in the center jiggles a little, it's ready! The center will set as the bars cool.
- Use a warm, sharp knife to get clean slices! Fill a tall cup with hot water and drip a sharp knife into it. Dry the knife fully, then make a slice. Repeat with each cut wiping the blade completely clean each time.
- If you want to make this recipe in a 9 x 13-inch pan, double the recipe and bake at 325 F for 40-50 minutes with a pan of water in the rack beneath the bars.
Nutrition Information
Yield
16Serving Size
1Amount Per Serving Calories 396Total Fat 26gSaturated Fat 11gTrans Fat 0gUnsaturated Fat 12gCholesterol 67mgSodium 263mgCarbohydrates 39gFiber 0gSugar 21gProtein 5g
Jennifer
Sunday 30th of October 2022
These are delicious. It was my first time making any kind of cheesecake, and I was pleasantly surprised how easy they were to make. So far everyone who has tried this batch has loved them.
Chelsweets
Saturday 5th of November 2022
Yay, I'm so happy to hear that Jennifer!! I absolutely love this recipe too :) Thank you for sharing!!
Melissa
Wednesday 26th of October 2022
These are perfect for cookie butter lovers and those who've never heard of cookie butter. Even my picky children said they "didn't not like them" which is a victory.
Only comment I have on the recipe is that it took me more like 25 cookies to get the 1 2/3 cup of crumbs for the crust, which is basically one sleeve of cookies.
Chelsweets
Saturday 29th of October 2022
Hi Melissa,
Omg YES!!! I am so excited to hear that!
I appreciate your feedback, I usually bake based in grams so sometimes my cup measurements are tiny bit off on things like this. I've adjusted the cup measurement down to 1 1/2 cups to match the grams / the amount I used. Thank you for sharing!!