
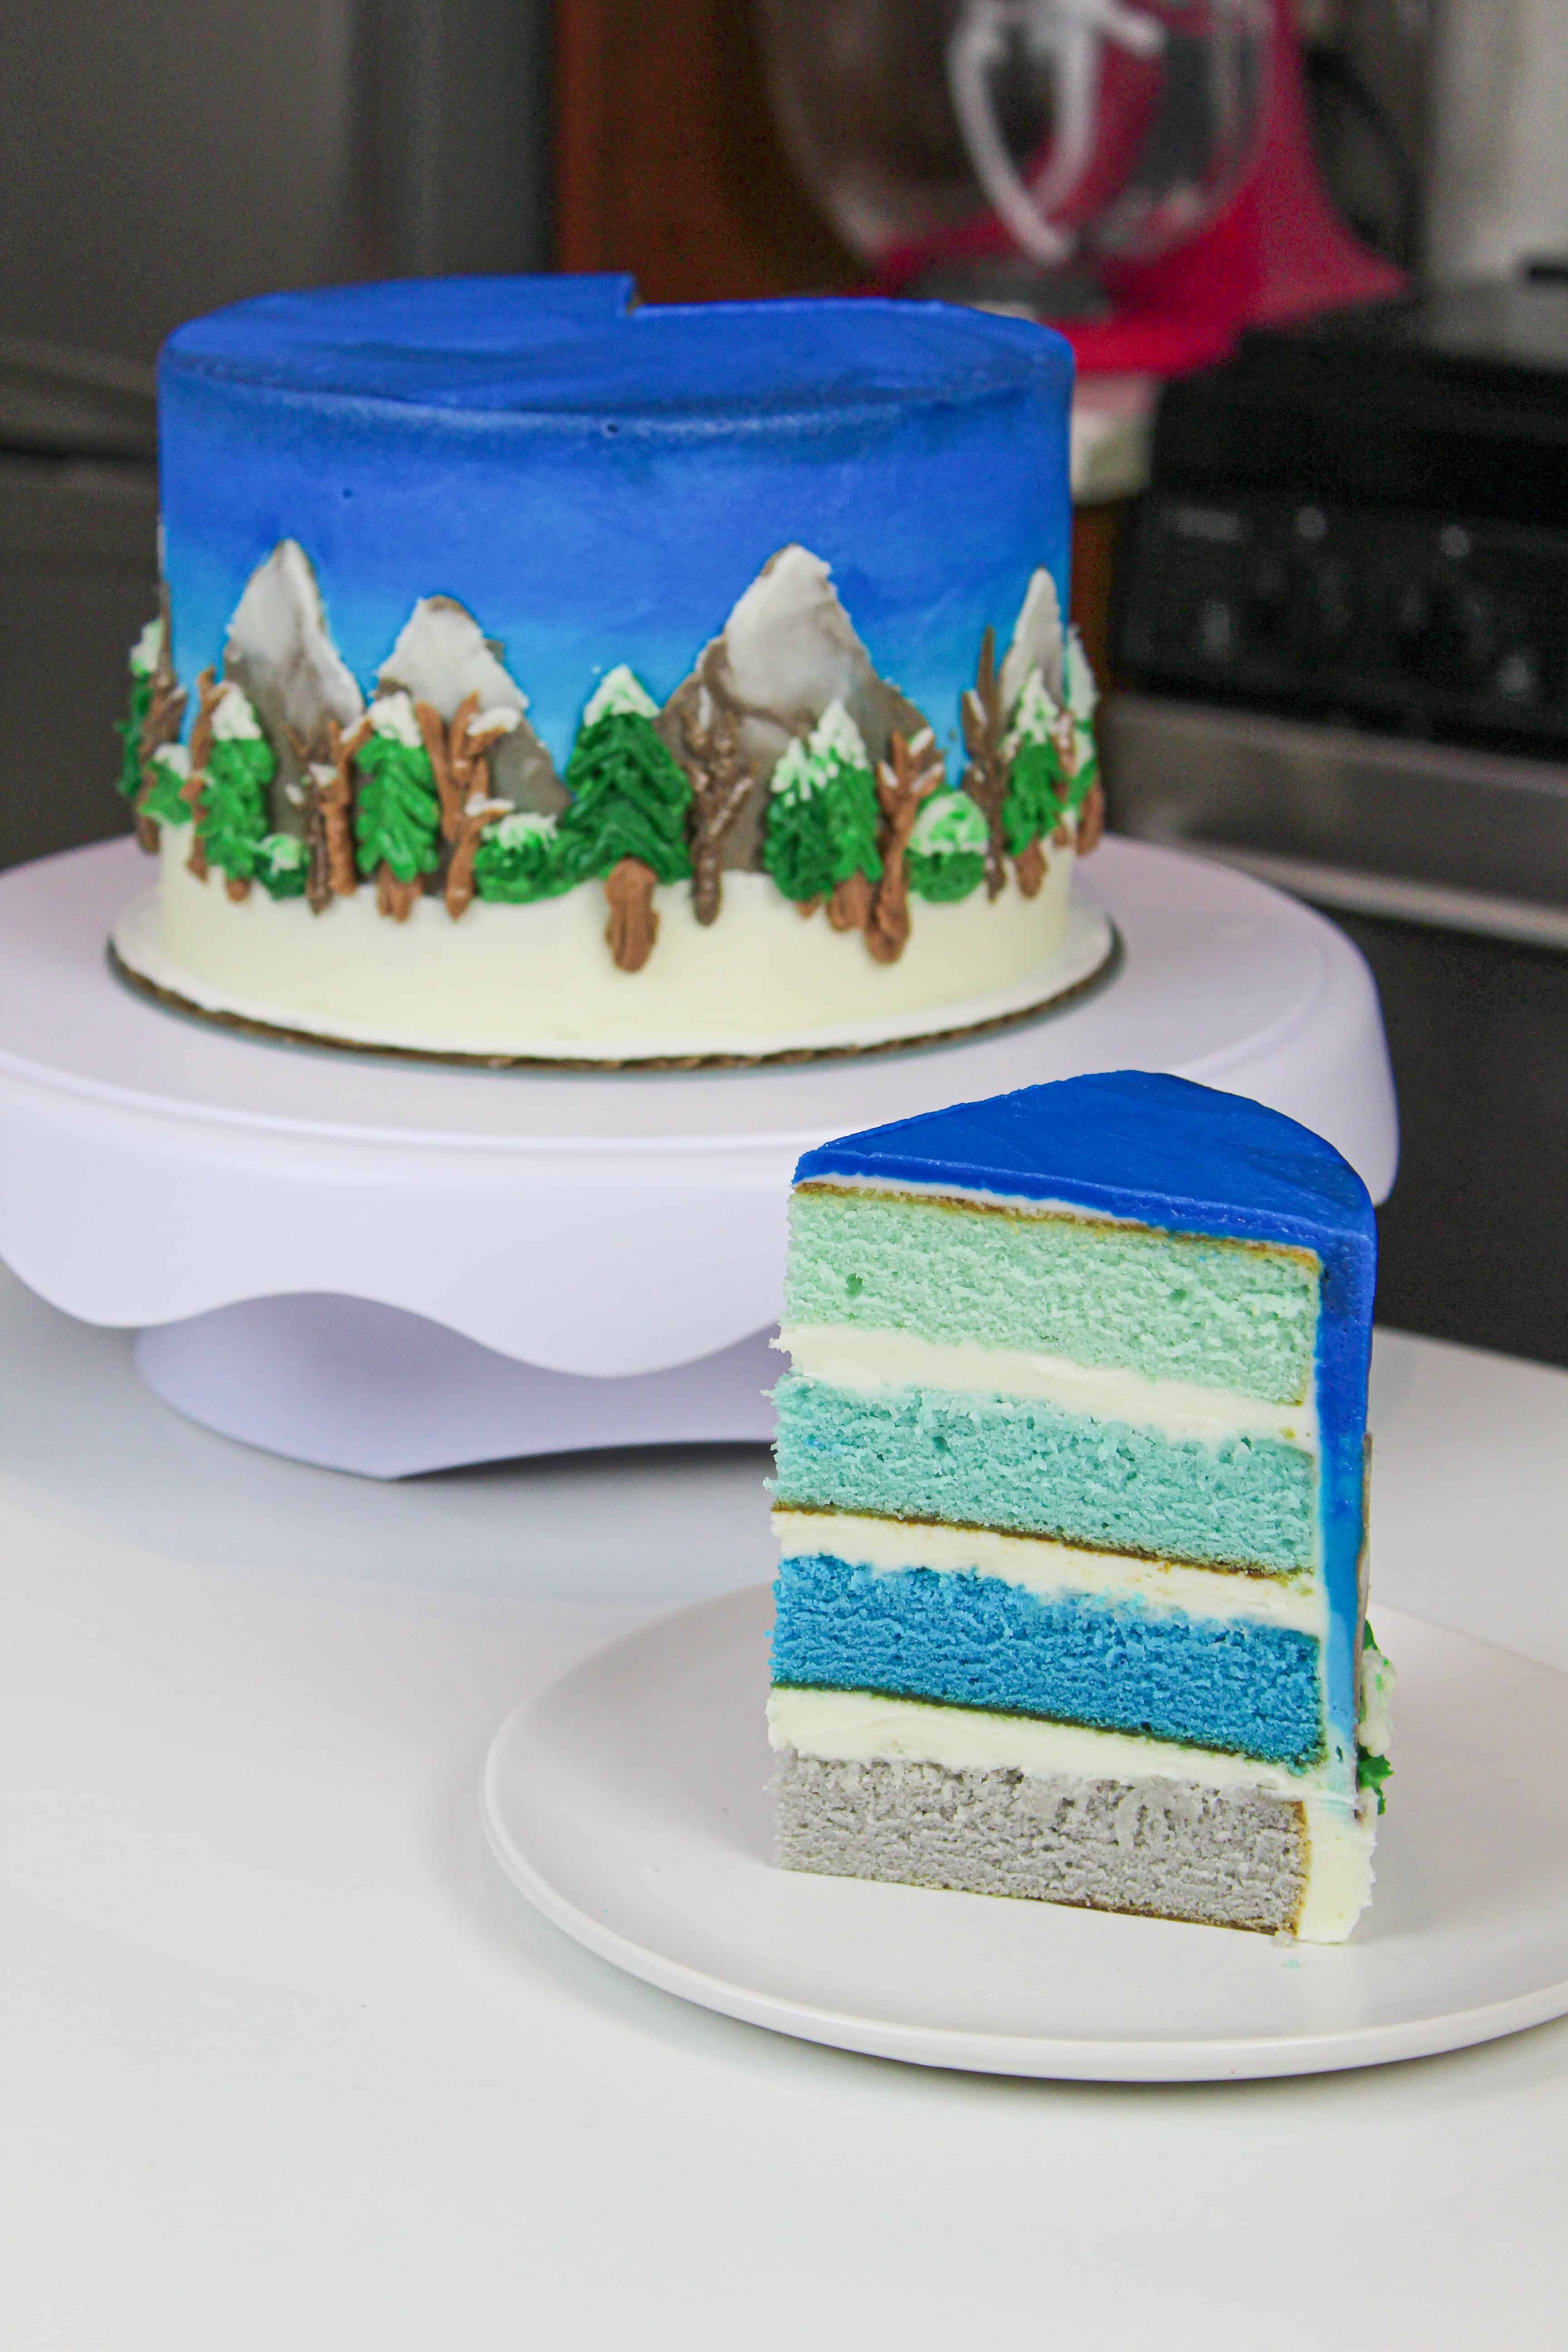
I could not be more excited to take over the Wilton instagram to share this winter wonderland cake design!
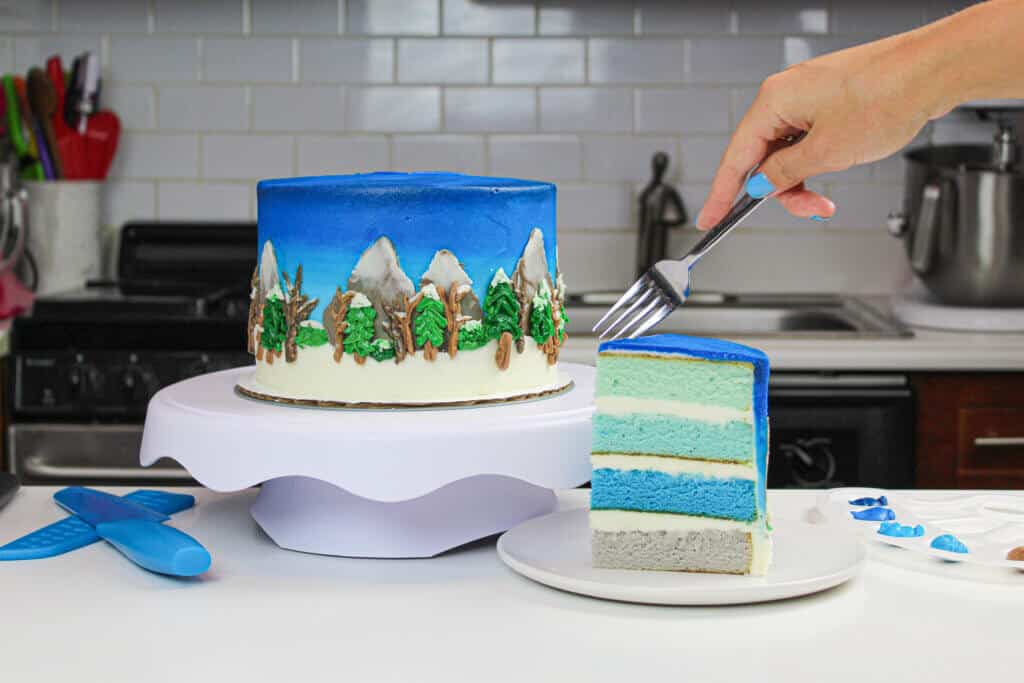
It’s a scenic mountain landscape, studded with snow dusted mountains, and evergreen and deciduous trees.

I made a similar scenic buttercream cake last fall, and loved the technique so much I wanted to make a winter edition of it!
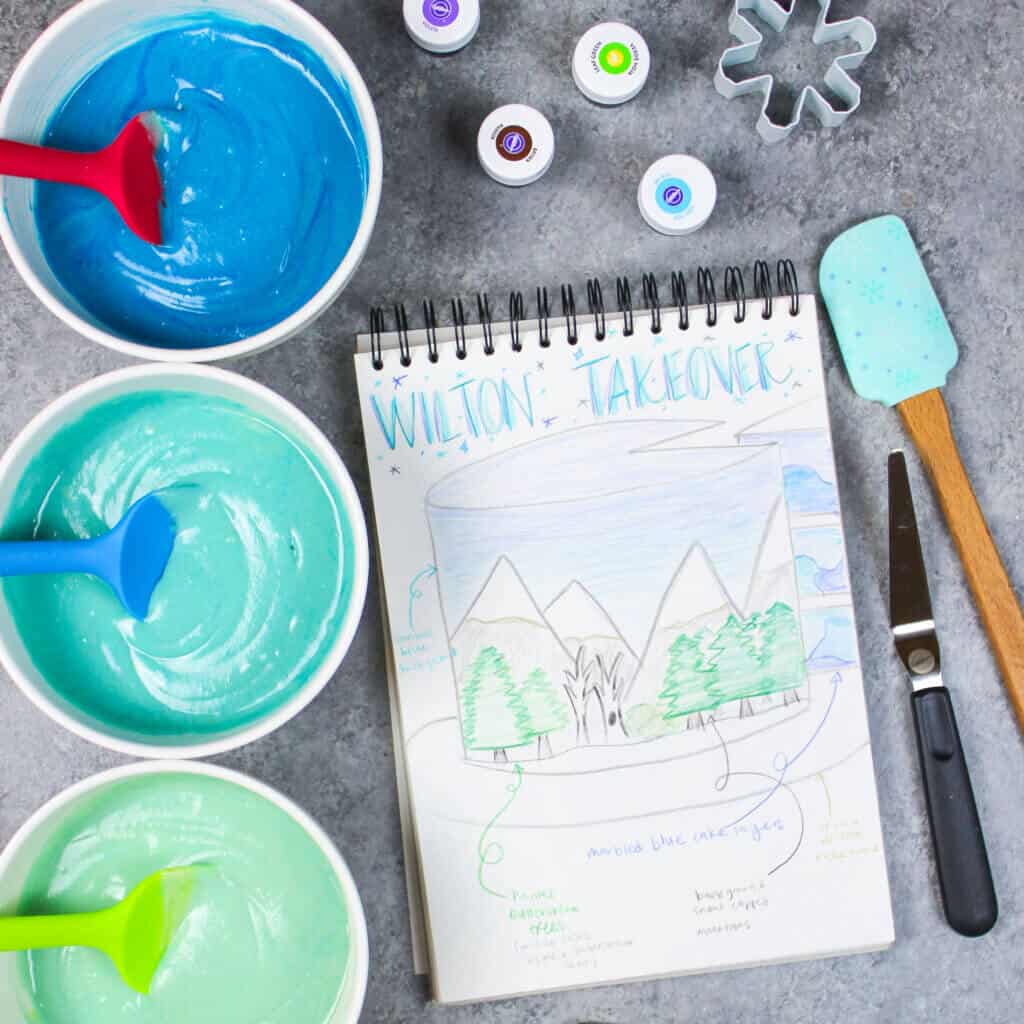
Before I made this cake, I wanted to sketch out the design.
Whenever I’m making a somewhat detailed cake, it really helps me to draw it beforehand. It helps me fully visualize the way I want it to look.

The Tools You’ll Need
I’m not quite sure what to call this technique, but you’ll get to channel your inner artist to create and decorate this look! I always feel like Bob Ross when I make cakes like this.
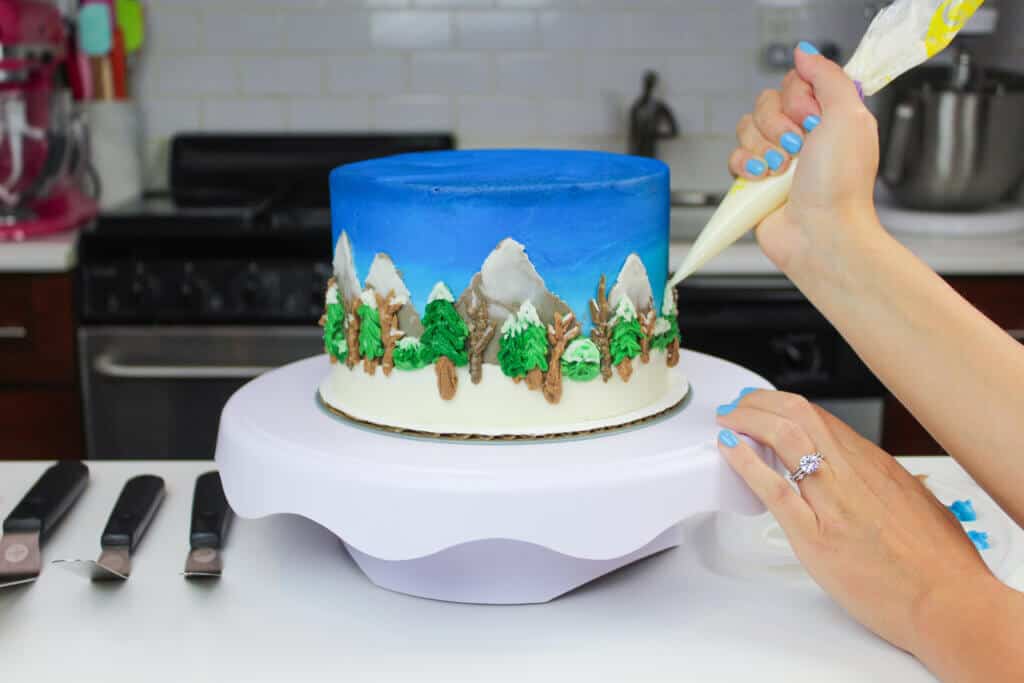
It’s created using a palette knife or tapered offset spatula, and a bit of piping.
To create uniformly spaced and sized mountains, I used a christmas tree cookie cutter to help outline where I’d add each mountain. I find it super helpful to mark where they should go before I start adding buttercream onto the cake.
Another key to success when creating a buttercream landscape cake like this is properly chilling the cake throughout the process of decorating it.

This means you’ll need to have adequate space in your fridge, or better yet, your freezer.
The Buttercream Paint
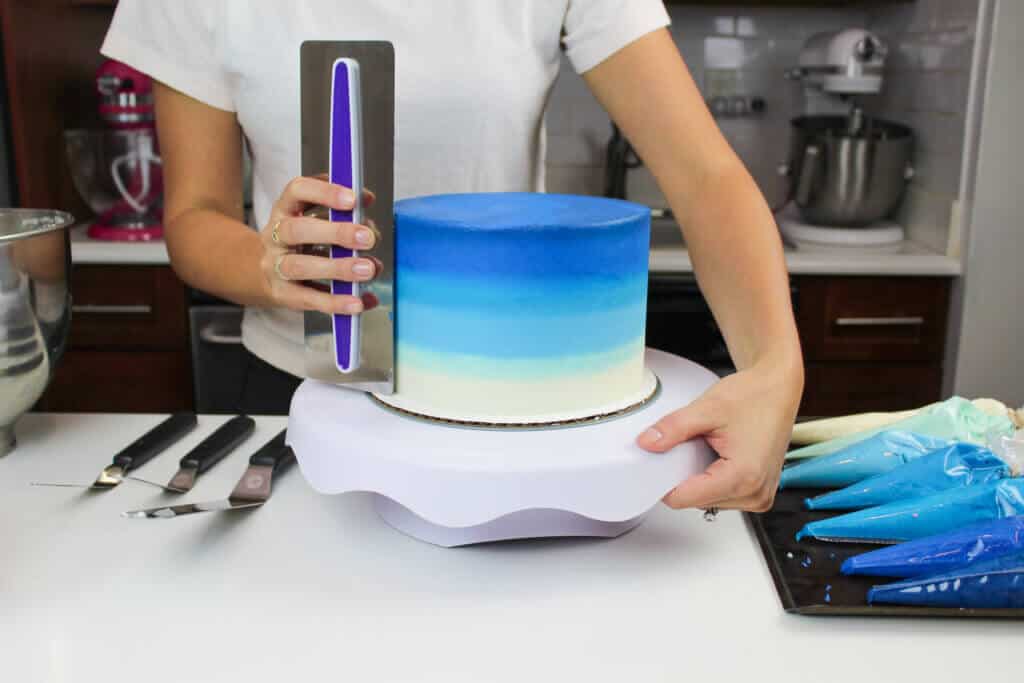
The “paint” for this piece of art is buttercream! Or more specifically, my american buttercream. The second layer of frosting on this cake uses different shades of blue to create the background of the landscape.
I used varying amounts of navy blue, royal blue, and sky blue gel food coloring to achieve these shades.
I chose to fade them from lightest to darkest, to look a bit like a wintery sunset.

There also is a line of white buttercream around the base of the cake. This will act as the foreground, and will eventually be turned into rolling snowbanks!
The mountains in the background are made with a grey buttercream, creating using a bit of black cocoa.
For the trees and bushes, I made a variety of green and brown buttercream. I placed each color in a piping bag, to allow me to easily pipe the little trees on top of the buttercream snow.
What Flavor is Winter Wonderland??
This was a hard question for me. What flavor should a winter wonderland cake be?! When I was thinking about winter flavors, the first flavors that popped into my head were peppermint, eggnog, and cranberry. But none of those really felt right.
So then I tried to think about the forest in this landscape, and that’s when it hit me. MAPLE! It seemed so fitting, a cake covered in wintery trees, flavored with a bit of maple extract.

Maple is definitely one of the more underrated flavors in baking. It is absolutely delicious!! The taste reminds you of the best pancakes you’ve ever had, but in cake form.
Whole foods has a wonderful maple extract (it’s super concentrated and thick), but you can also order maple extract online if your grocery store doesn’t have it.
Tips for Painting with Buttercream on a Cake:
- Be sure the cake is fully chilled, and that the frosting is firm to the touch
- As you paint the cake, the frosting may begin to soften overtime. The second you notice the frosting start to soften, pop the cake back into the fridge for 15 minutes to chill.
- Leave yourself plenty of time to decorate this cake. The process itself isn’t that time consuming, but it has to be done in stages to allow the different layers of buttercream to firm up in the freezer.

Let Me Know What You Think!
If you try this winter wonderland cake, I’d love to hear what think of it! Please leave a rating, and let me know your thoughts in the comments section.
Winter Wonderland Cake
This winter wonderland cake is stunning! It uses maple buttercream to create a beautiful landscape studded with snow-dusted mountains, and evergreen and deciduous trees.
Ingredients
Maple Cake
- 3 cups all-purpose flour (390 grams)
- 3 cups granulated sugar (600 grams)
- 2 1/2 tsp baking powder (10 grams)
- 1 tsp salt (6 grams)
- 1 cup unsalted butter, room temperature (226 grams) - 2 sticks
- 2 tsp. vanilla extract (8 grams)
- 2 tsp maple extract (8 grams)
- 1 cup pasteurized egg whites from a carton (or about 7 egg whites) (235 grams)
- 1 1/2 cups buttermilk, room temperature (345 grams)
- 1/8 cup vegetable oil (28 grams)
- gel food coloring (if desired)
Maple Buttercream Frosting
- 3 cups unsalted butter, room temperature (678 grams)
- 11 cups powdered sugar (1375 grams) - or about 1.5 lbs
- 1 tsp salt (6 grams)
- 1/3 cup heavy cream (or whipping cream) (75 grams)
- 1 tsp vanilla extract (4 grams)
- 2 tsp maple extract (8 grams)
- gel food coloring (blue, black, brown, and green)
Instructions
Maple Cake Layers:
- Preheat oven to 350°F. Line four 7 inch pans round pans with parchment rounds, and grease with non-stick cooking spray.
- Mix together all dry ingredients (flour, baking powder, sugar, and salt) in a stand mixer with a paddle attachment until fully combined.
- Mix chunks of room-temperature butter slowly into the dry mix, on a low speed. Continue to mix until no large chunks of butter remain, and the mixture becomes crumbly.
- Pour in egg whites, and mix on low until just incorporated. Mix in the buttermilk in two installments, on a low speed.
- Add in vanilla extract, maple extract, and oil, and mix at a low speed until fully incorporated. Scrape down the sides of the bowl with a spatula, then beat on low speed for about 15 seconds (the key is to mix until the ingredients are JUST incorporated, so that the batter isn't over mixed).
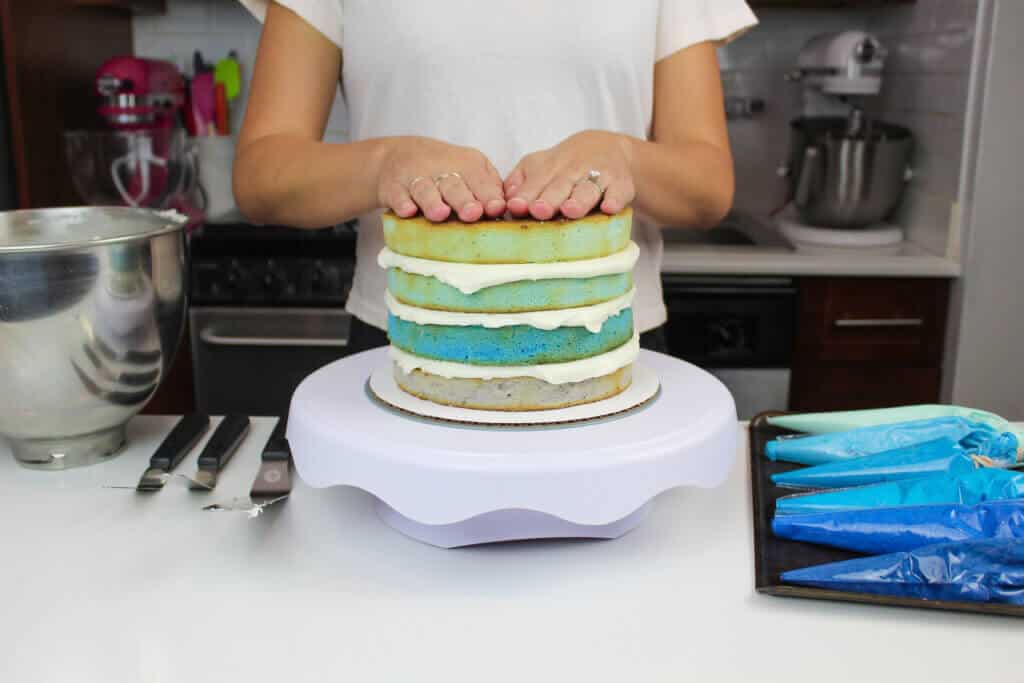
- Divide the batter evenly between four bowls. I like to use a digital kitchen scale to weigh my pans, to make sure the layers are the same height.
- Use gel food coloring to color one bowl gray, and the rest deepening shades of blue. Mix the color in by hand using a rubber spatula, until the batter is evenly colored.
- Pour the colored batter in the prepared cake pans.
- Bake for 34-35 minutes, or until a toothpick comes out clean. Allow the pans to cool for 10 minutes, then run an offset spatula around perimeter of the pan to separate the cake from the pan.
- Place cake layers into the freezer for 45 minutes, to accelerate the cooling process. Once the layers are fully cooled, carefully flip the pans and remove the layers from the pans.
- Use a serrated knife to level the tops of the layers, and then frost as desired.
Maple Buttercream Frosting:
- While the cake layers bake and cool, make the vanilla buttercream frosting.
- Beat the butter on a medium speed for 30 seconds with a paddle attachment, until smooth. Slowly add in the powdered sugar, 1 cup at a time. Alternate with small splashes of cream.
- Once fully mixed, add in the vanilla extract, maple extract, and salt, and beat on low until the ingredients are fully incorporated, and the desired consistency is reached.
- If the frosting is too thick, add in additional cream (1 TBSP at a time). If the frosting is too thin, add in more powdered sugar (quarter of a cup at a time).
- If you plan to color the buttercream, add in the gel food coloring once the frosting is fully made, and beat on low until it reaches the desired color
To Assemble The Cake:
- Stack and frost cake layers on a greaseproof cake board, using a dab of frosting to help stick the first cake layer to the board.
- Add an even layer of buttercream between each cake layer.
- Apply a thin coat of frosting around the cake, to fully cover the cake layers. Smooth using a bench scraper, then chill the cake in the fridge (20 minutes) or freezer (5 minutes) until the frosting is firm to the touch.
- Color 3/4 of the remaining frosting deepening shades of blue, and place each color into its own piping bag.
- Leave 1/2 cup of frosting uncolored, and place into piping bags.
- Divide the rest of the frosting between 4 bowls, and color them brown, grey, and two shades of green.
- For the second layer of frosting, pipe a ring of white buttercream around the base of the cake.
- Continue to pipe frosting up the cake, starting with your lightest shade of blue, and finishing at the top of the cake with your darkest shade of blue.
- Smooth using a bench scraper, and chill in the freezer for 10 minutes (until the frosting is firm to the touch)
- Use a tapered offset spatula to spread some grey frosting in the shape of triangles on the middle of the cake to look like mountains (use a tree cookie cutter as an outline, if needed).
- Pipe additional white frosting around the base in a slightly wavy line, to add make it look like snow banks. Chill the cake again for 10 minutes in the freezer.
- Spread white frosting on top of the mountains to give them snowcaps, then pipe trees and bushes on the snow banks using the brown and green frosting.
- If desired, very carefully pipe white frosting on top of the trees to look like snow.
Notes
One batch of cake batter makes about 1800 grams, so when I'm making a cake with four layer, I add 450 grams of batter into each pan.
Once the layers have fully cooled, I like to trim the caramelized bits from the sides of the layers using a serrated knife.
These cake layers can be made in advance!! Learn more about how far in advance they can be made, and how to properly wrap them in my post on how to make cake layers ahead of time.
Since this frosting will be used to decorate a cake, it is important to mix the buttercream on the lowest speed at the end of the process for a couple minutes, to get out any extra air that might have be incorporated during the mixing process.
Nutrition Information
Yield
24Serving Size
1Amount Per Serving Calories 569Total Fat 33gSaturated Fat 20gTrans Fat 0gUnsaturated Fat 11gCholesterol 86mgSodium 297mgCarbohydrates 66gFiber 0gSugar 54gProtein 4g
Nakia
Thursday 4th of June 2020
Thank you this happened once with the vanilla cake, but I know what was wrong. I had ordered wax rounds by mistake instead of parchment rounds, but since I froze for 45 mins I was able to hurry and frost without compromising the look
Stanciu sabina
Wednesday 8th of April 2020
Hi, the dough made from the amount of ingredients in the recipe is enough for all the tops made or just for one?
Chelsweets
Monday 13th of April 2020
Hi Stanciu,
I'm not sure I understand your question, but this recipe makes enough frosting to cover and stack all the cake layers <3
Moore or Less Cooking
Tuesday 21st of January 2020
Thank you for contributing! The parade post is live! I appreciate any shares and comments on the post. https://parade.com/980710/nettiemoore/best-winter-wonderland-cakes/
Zainab
Wednesday 11th of December 2019
Am interested in baking and I want to learn am in Kenya and baking courses are expensive how can you help as you are self taught
Chelsweets
Sunday 15th of December 2019
Hi Zainab,
I learned by watching lots of youtube videos, reading loads of baking blogs, and practicing a ton! I hope that helps <3
Heather Dettore Bueker
Wednesday 11th of December 2019
Ok so I’ve tried your recipe a few times now and it’s always been awesome! One annoying problem I’m having is getting the cake unstuck from the pan ????? I’ve tried with paper and without. I use Pam and I ordered the 8in cake pan you recommended. Any idea what might be going on?
Chelsweets
Sunday 15th of December 2019
Hi Heather!
So happy you've been enjoying my recipes, but sticky cake layers are no fun!!
A few things I do to help ensure my cake layers pop out easier: -line the bottom with parchment paper -spray sides of the pan with PAM (or non-stick baking spray) -once I take the layers out of the oven, I run an offset spatula around the rim of the pan, to separate the cake layer from the pan while it's still hot and flexible - let the cakes cool fully (sometimes I even chill them in the freezer) before trying to pop them out of the pan
Doing that, my cake layers usually pop right out of my pans. I usually flip my pans, and gently tap on edge of the rim on the counter until the cake releases.
I hope that one of the tips will help you going forward / help prevent you from having that issue in the future. Happy baking!