
Colorful drips are such a simple and gorgeous way to decorate a cake. It’s one of my favorite decorating techniques, and that’s why I’m sharing this tutorial on how to make a drip cake!
As an added bonus, colored drip cakes are super versatile! This colorful drip can be made in any color, different lengths and thicknesses, and added either fully around a cake or to just a small portion of a cake as an accent. The sky’s the limit!!
With that in mind, there are a few things that are super helpful to know when making a drip cake. I share everything you need to know below, and walk you through each step of the process.
How Do I Make Drips for a Cake?
My colorful drip recipe is made with white chocolate ganache, and is primarily made with heavy cream, white chocolate and gel food coloring.
To make these colorful ganache drips, all you have to do heat your heavy cream until it’s steaming, then pour it over the white chocolate.
After letting it sit for a couple minutes, the white chocolate softens. Then you just add in a squirt of gel food coloring and give it a good stir until it’s smooth.
It’s a pretty straightforward and quick process! The somewhat challenging part of making a drip cake is actually adding the drips to the cake.
How to Color this White Chocolate Ganache Drip
This drip cake recipe is made with white chocolate, which allows you to color it using gel food coloring!
I really recommend using gel food coloring instead of liquid food coloring. It allows you to get super vibrant colors, without changing the consistency of the white chocolate ganache.
But don’t worry, if you want to make a chocolate drip cake, I’ve got you covered. The process and tips shared in the post are exactly the same, but you don’t have to worry about coloring the ganache.
I like to use milk chocolate chips to make my chocolate drip recipe. However, you can also use dark chocolate if you prefer!
How Do I Add Drips to a Cake?
There are two common ways to add drips to cake. Most people use either a spoon or a plastic squirt bottle.
Some people prefer one method over the other, and I recommend using whatever method you feel most comfortable with.
Adding Drips Using a Spoon
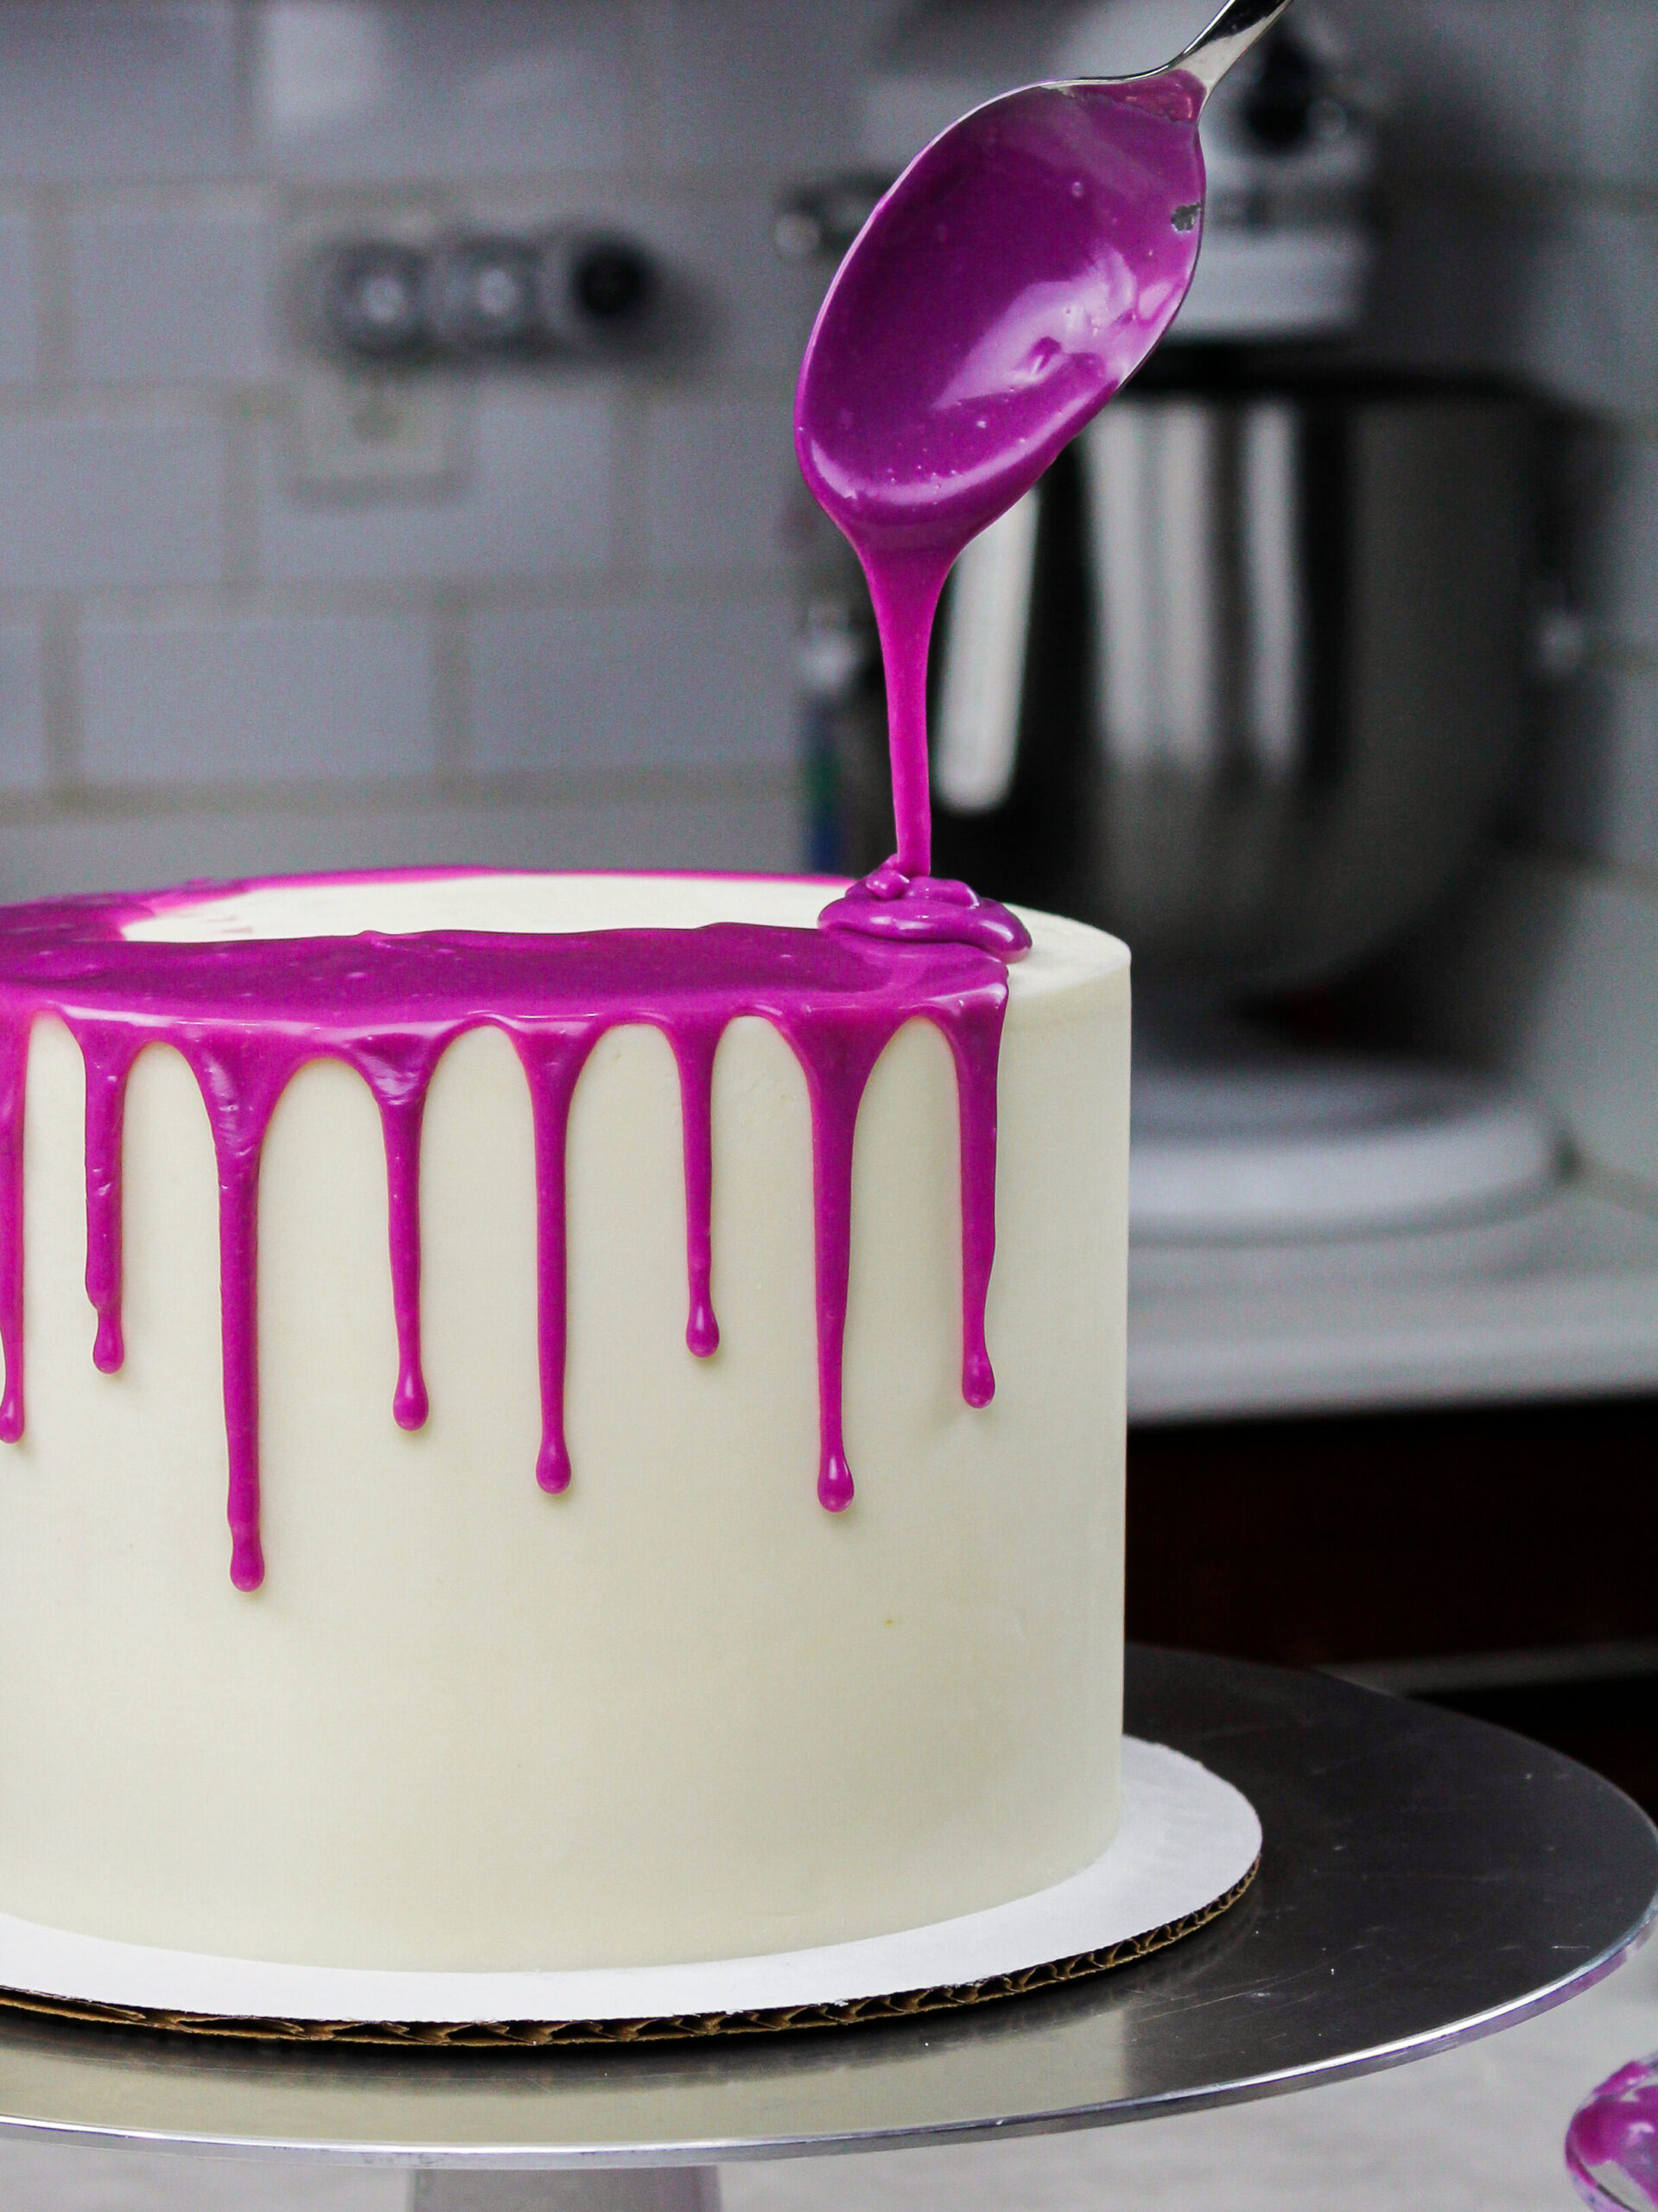
One way you can add drips to cake is with a spoon. The best thing about this method is that you don’t need any special tools. I think everyone has a spoon in their kitchen!!
You simply take 1-2 teaspoons of ganache in your spoon and carefully pour it over the edge of a chilled buttercream cake.
I recommend scraping the bottom of your spoon against the bowl each time you scoop up a bit ganache.
This will prevent rouge bits of ganache from dripping off the bottom of your spoon all over your counter and your cake.
Adding Drips Using a Squirt Bottle
The second way you can add drips to a cake is with a plastic bottle. Once the ganache is made, carefully pour it into a plastic squirt bottle.
Not everyone has these on hand, but they’re pretty cheap to buy! You can find them at Target, Walmart, or on Amazon (that’s where I get mine).
I like using a squirt bottle because it helps you add drips to a cake a lot faster than a spoon. In my opinion, it also is a lot easier and cleaner! If you have leftover ganache, you can simply pop the cap on your bottle and throw it in the fridge.
Leftover ganache can last in the fridge for up to a month. I have a little shelf in my fridge door dedicated to bottles of leftover ganache!
To reuse leftover ganache, pop the bottle into the microwave and reheat in 10 second intervals until it’s fluid again and looks like it’s the right consistency.
What Should My Drips Look Like?
There’s a spectrum of ganache drips, and I always say no two drip cakes are alike. They’re all unique and beautiful in their own way.
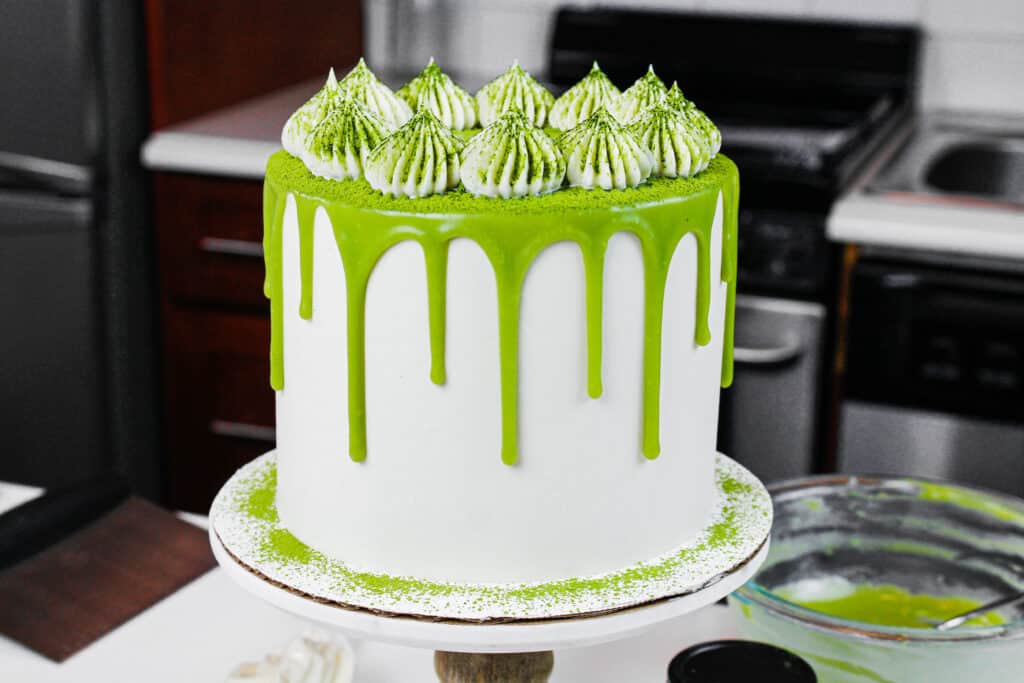
There is no right or wrong here, just drips of all shapes and sizes! Different types of drips can help you achieve different looks for your cakes.
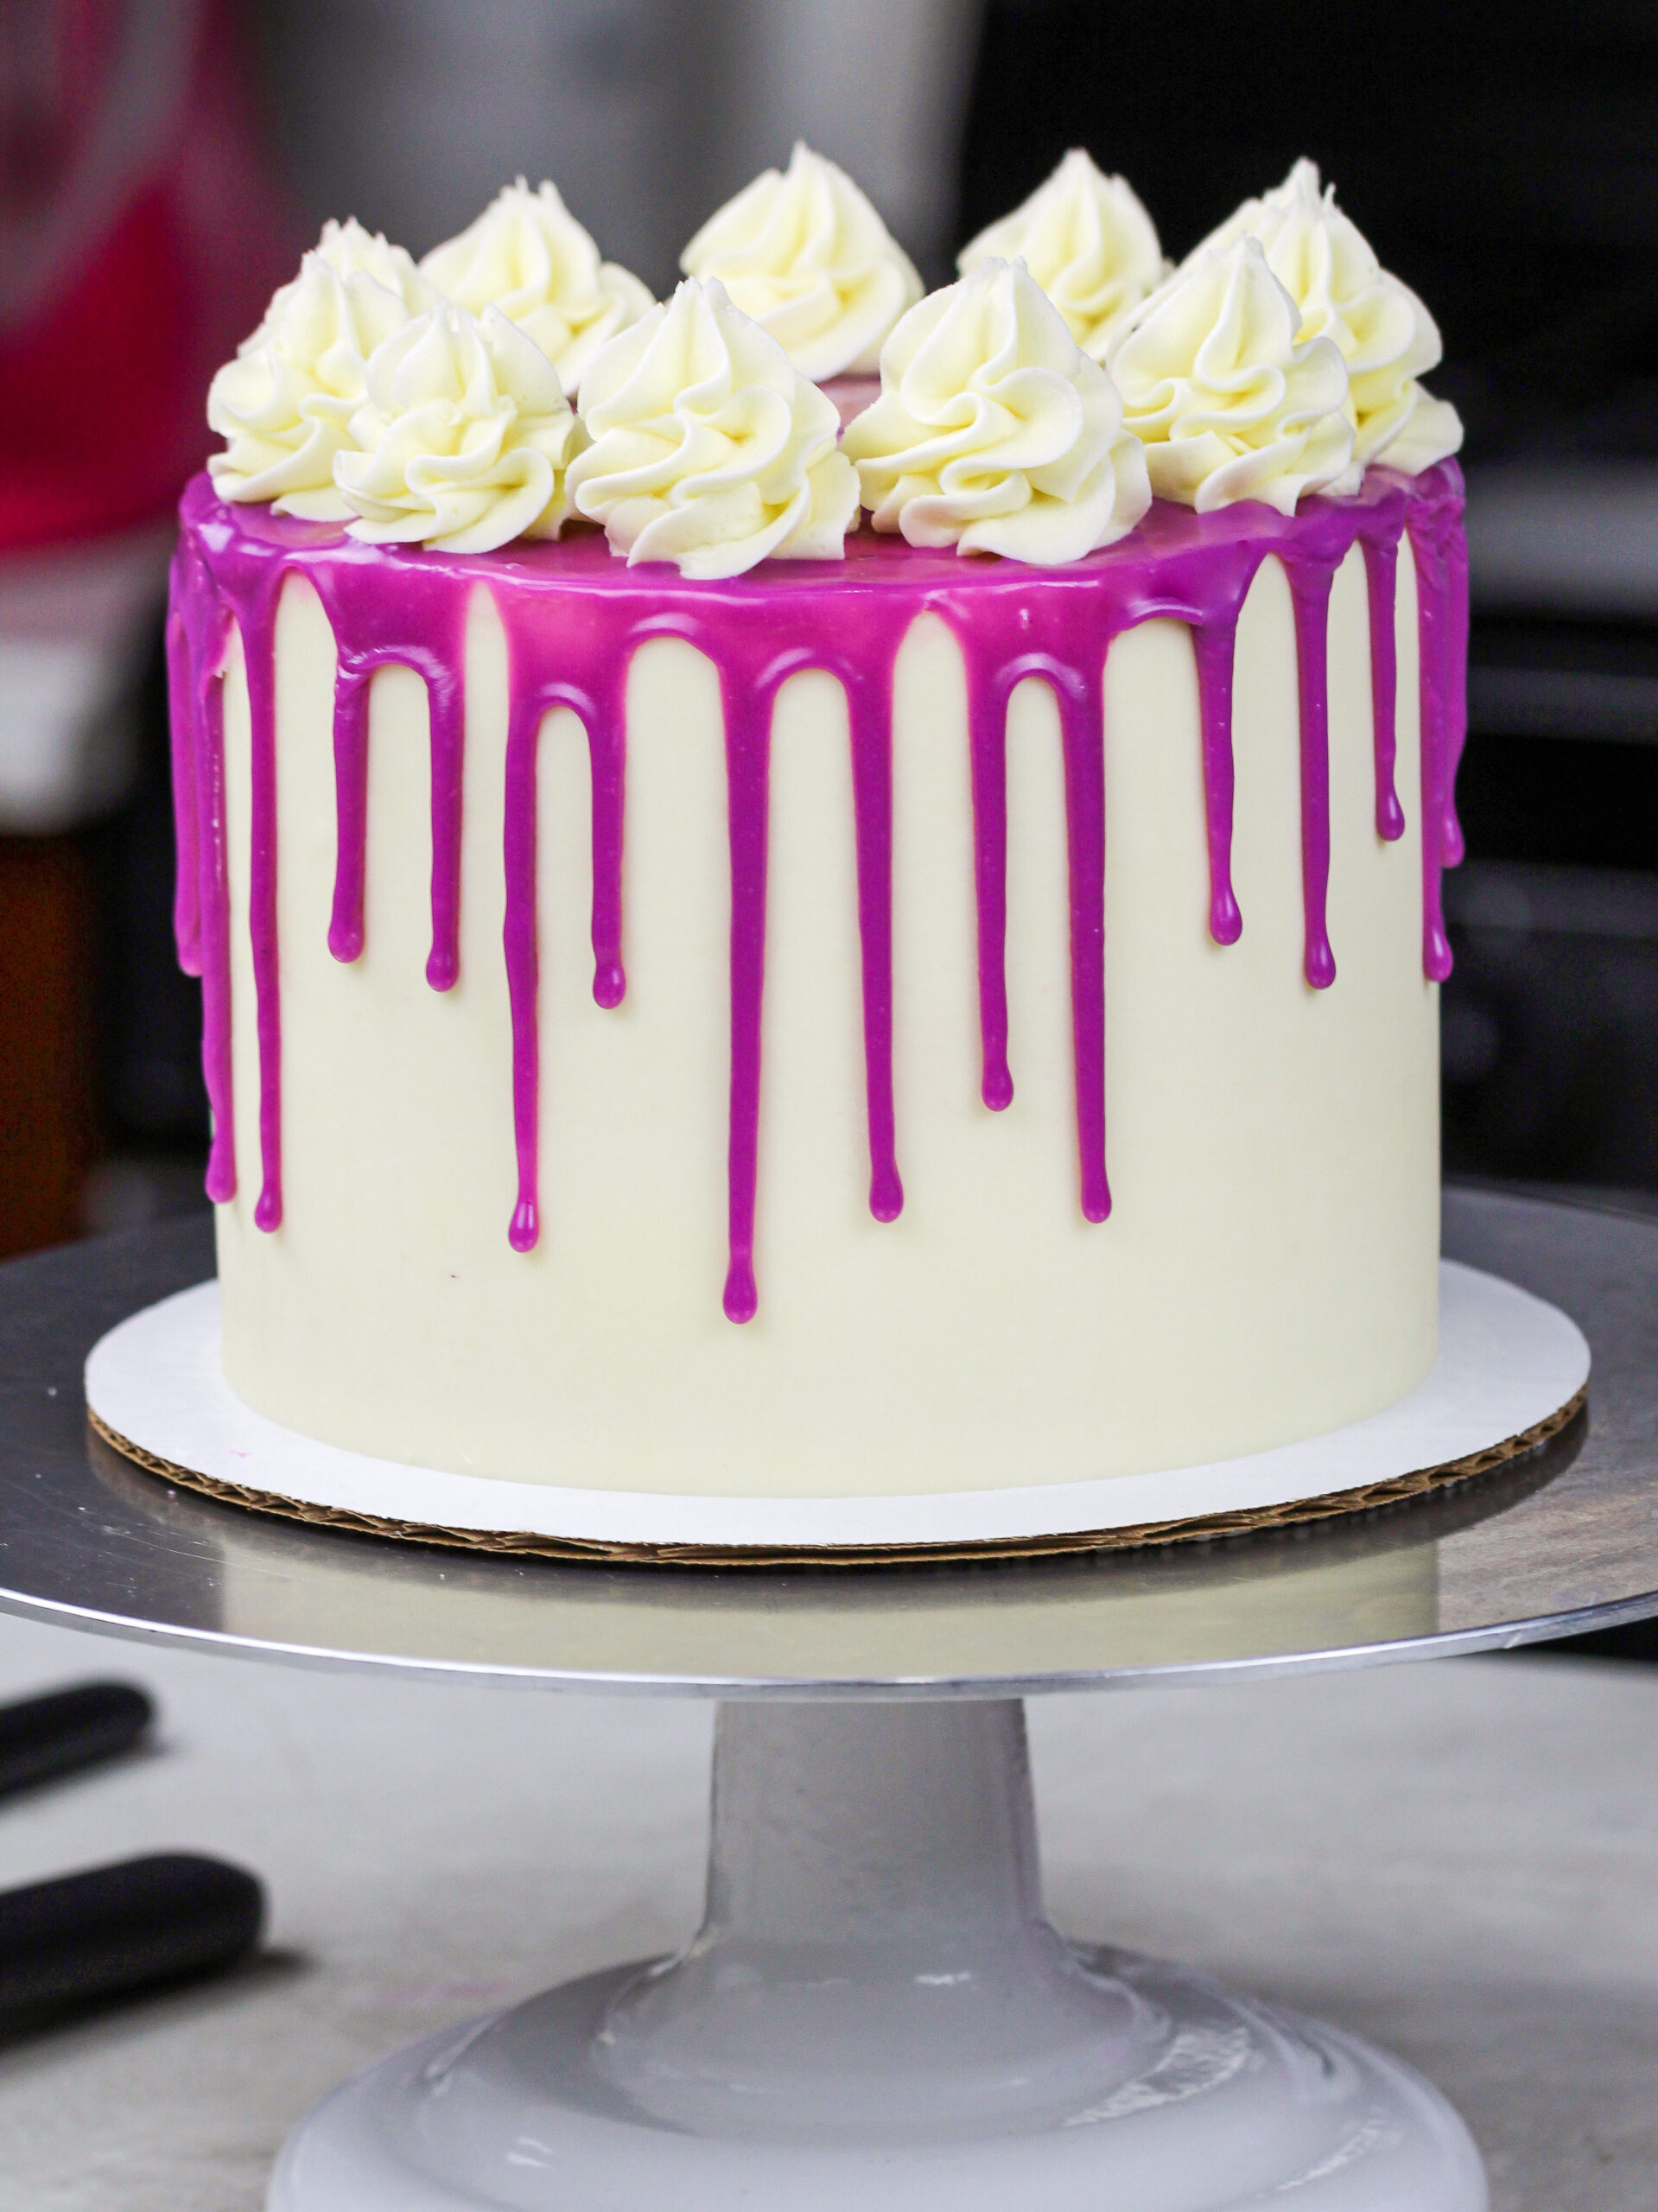
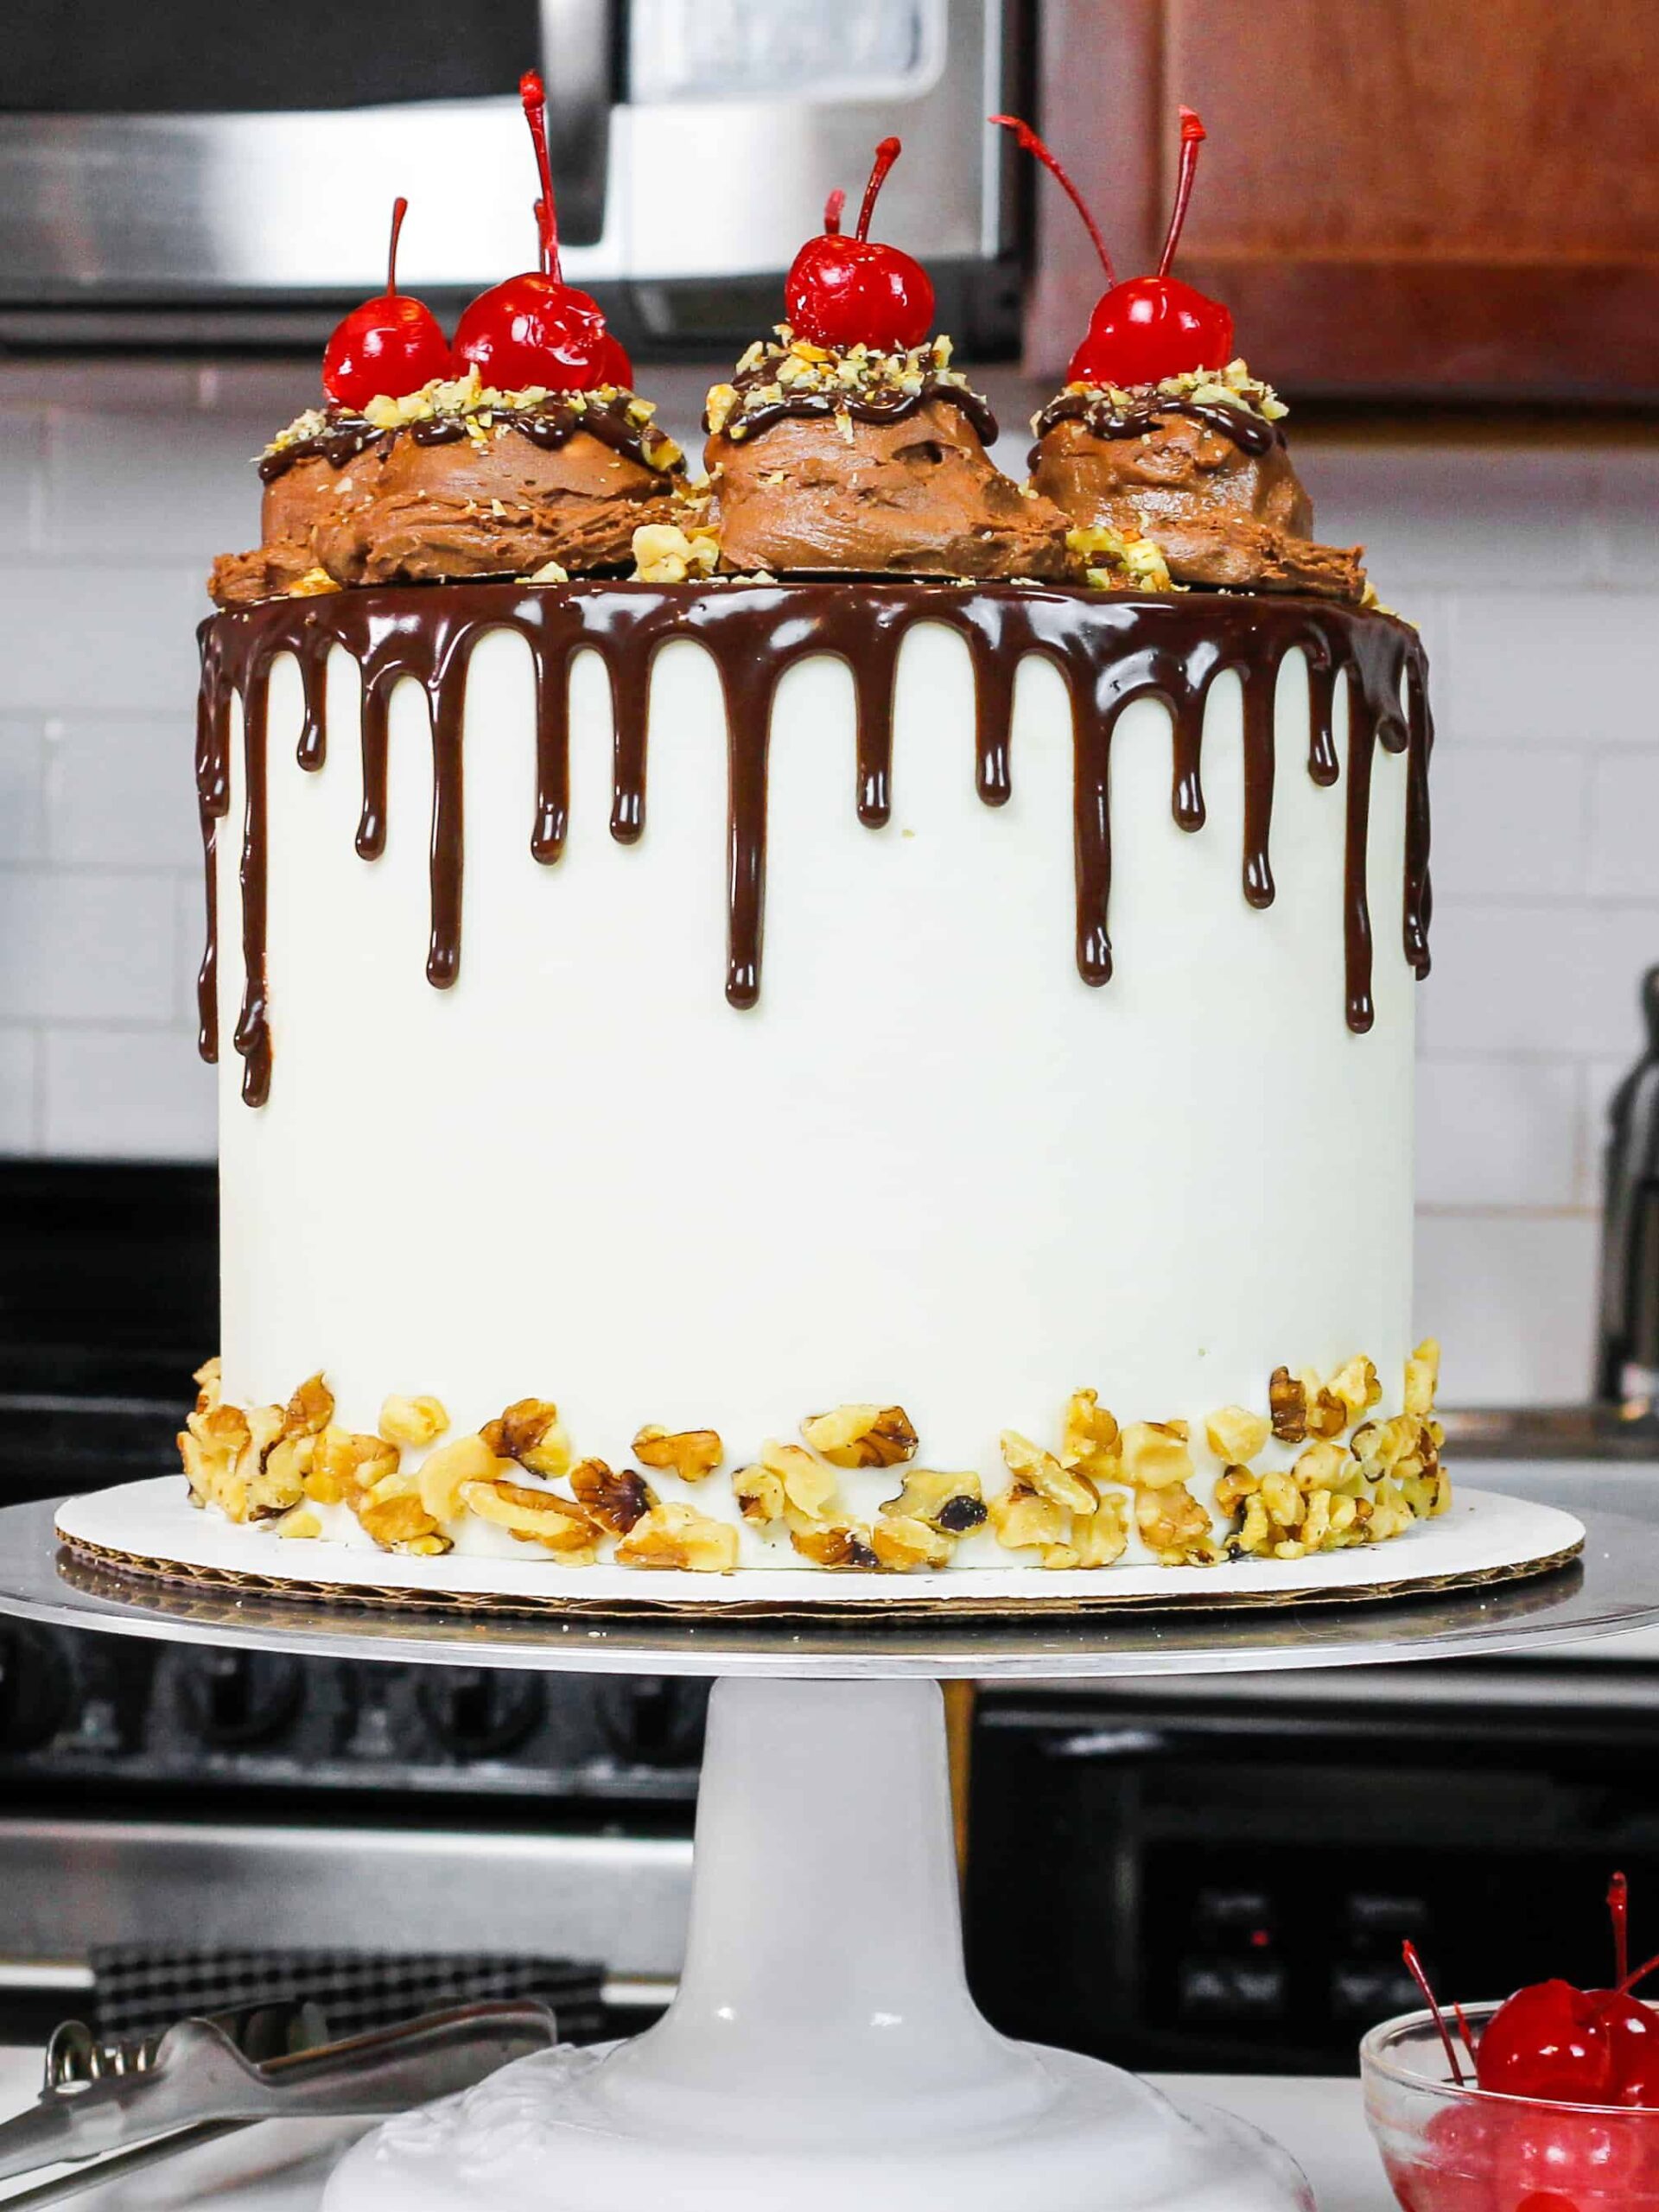
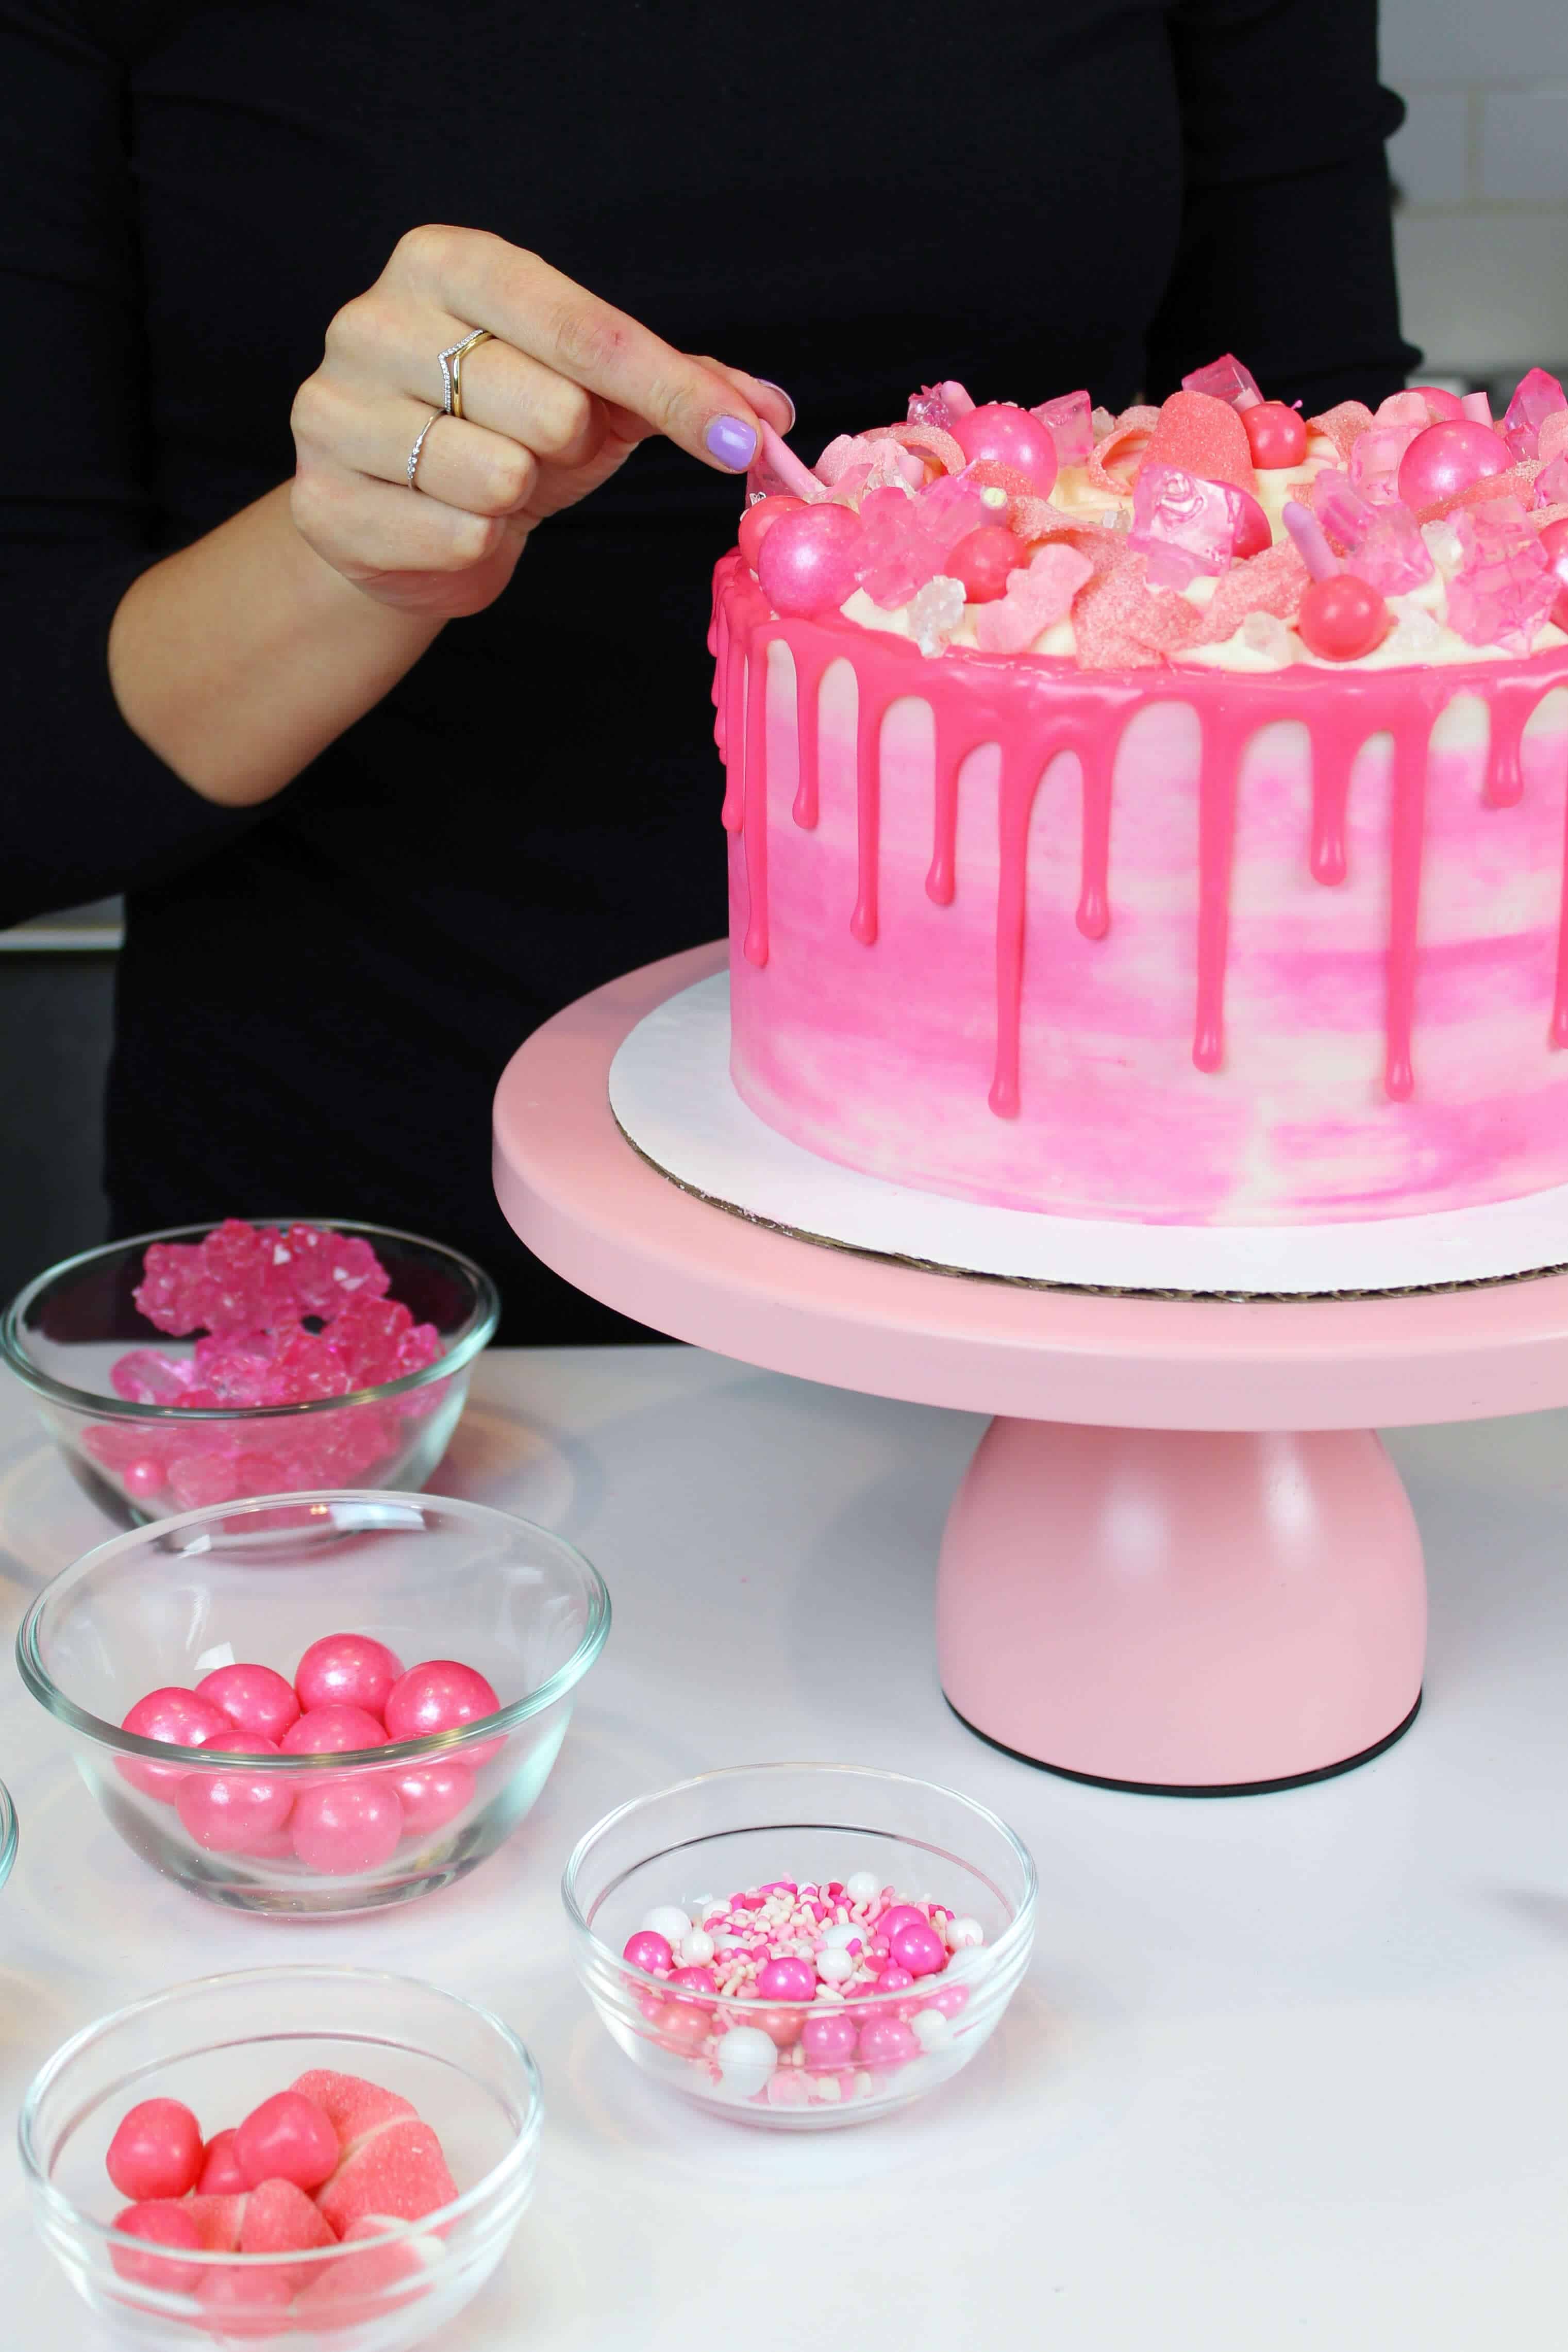
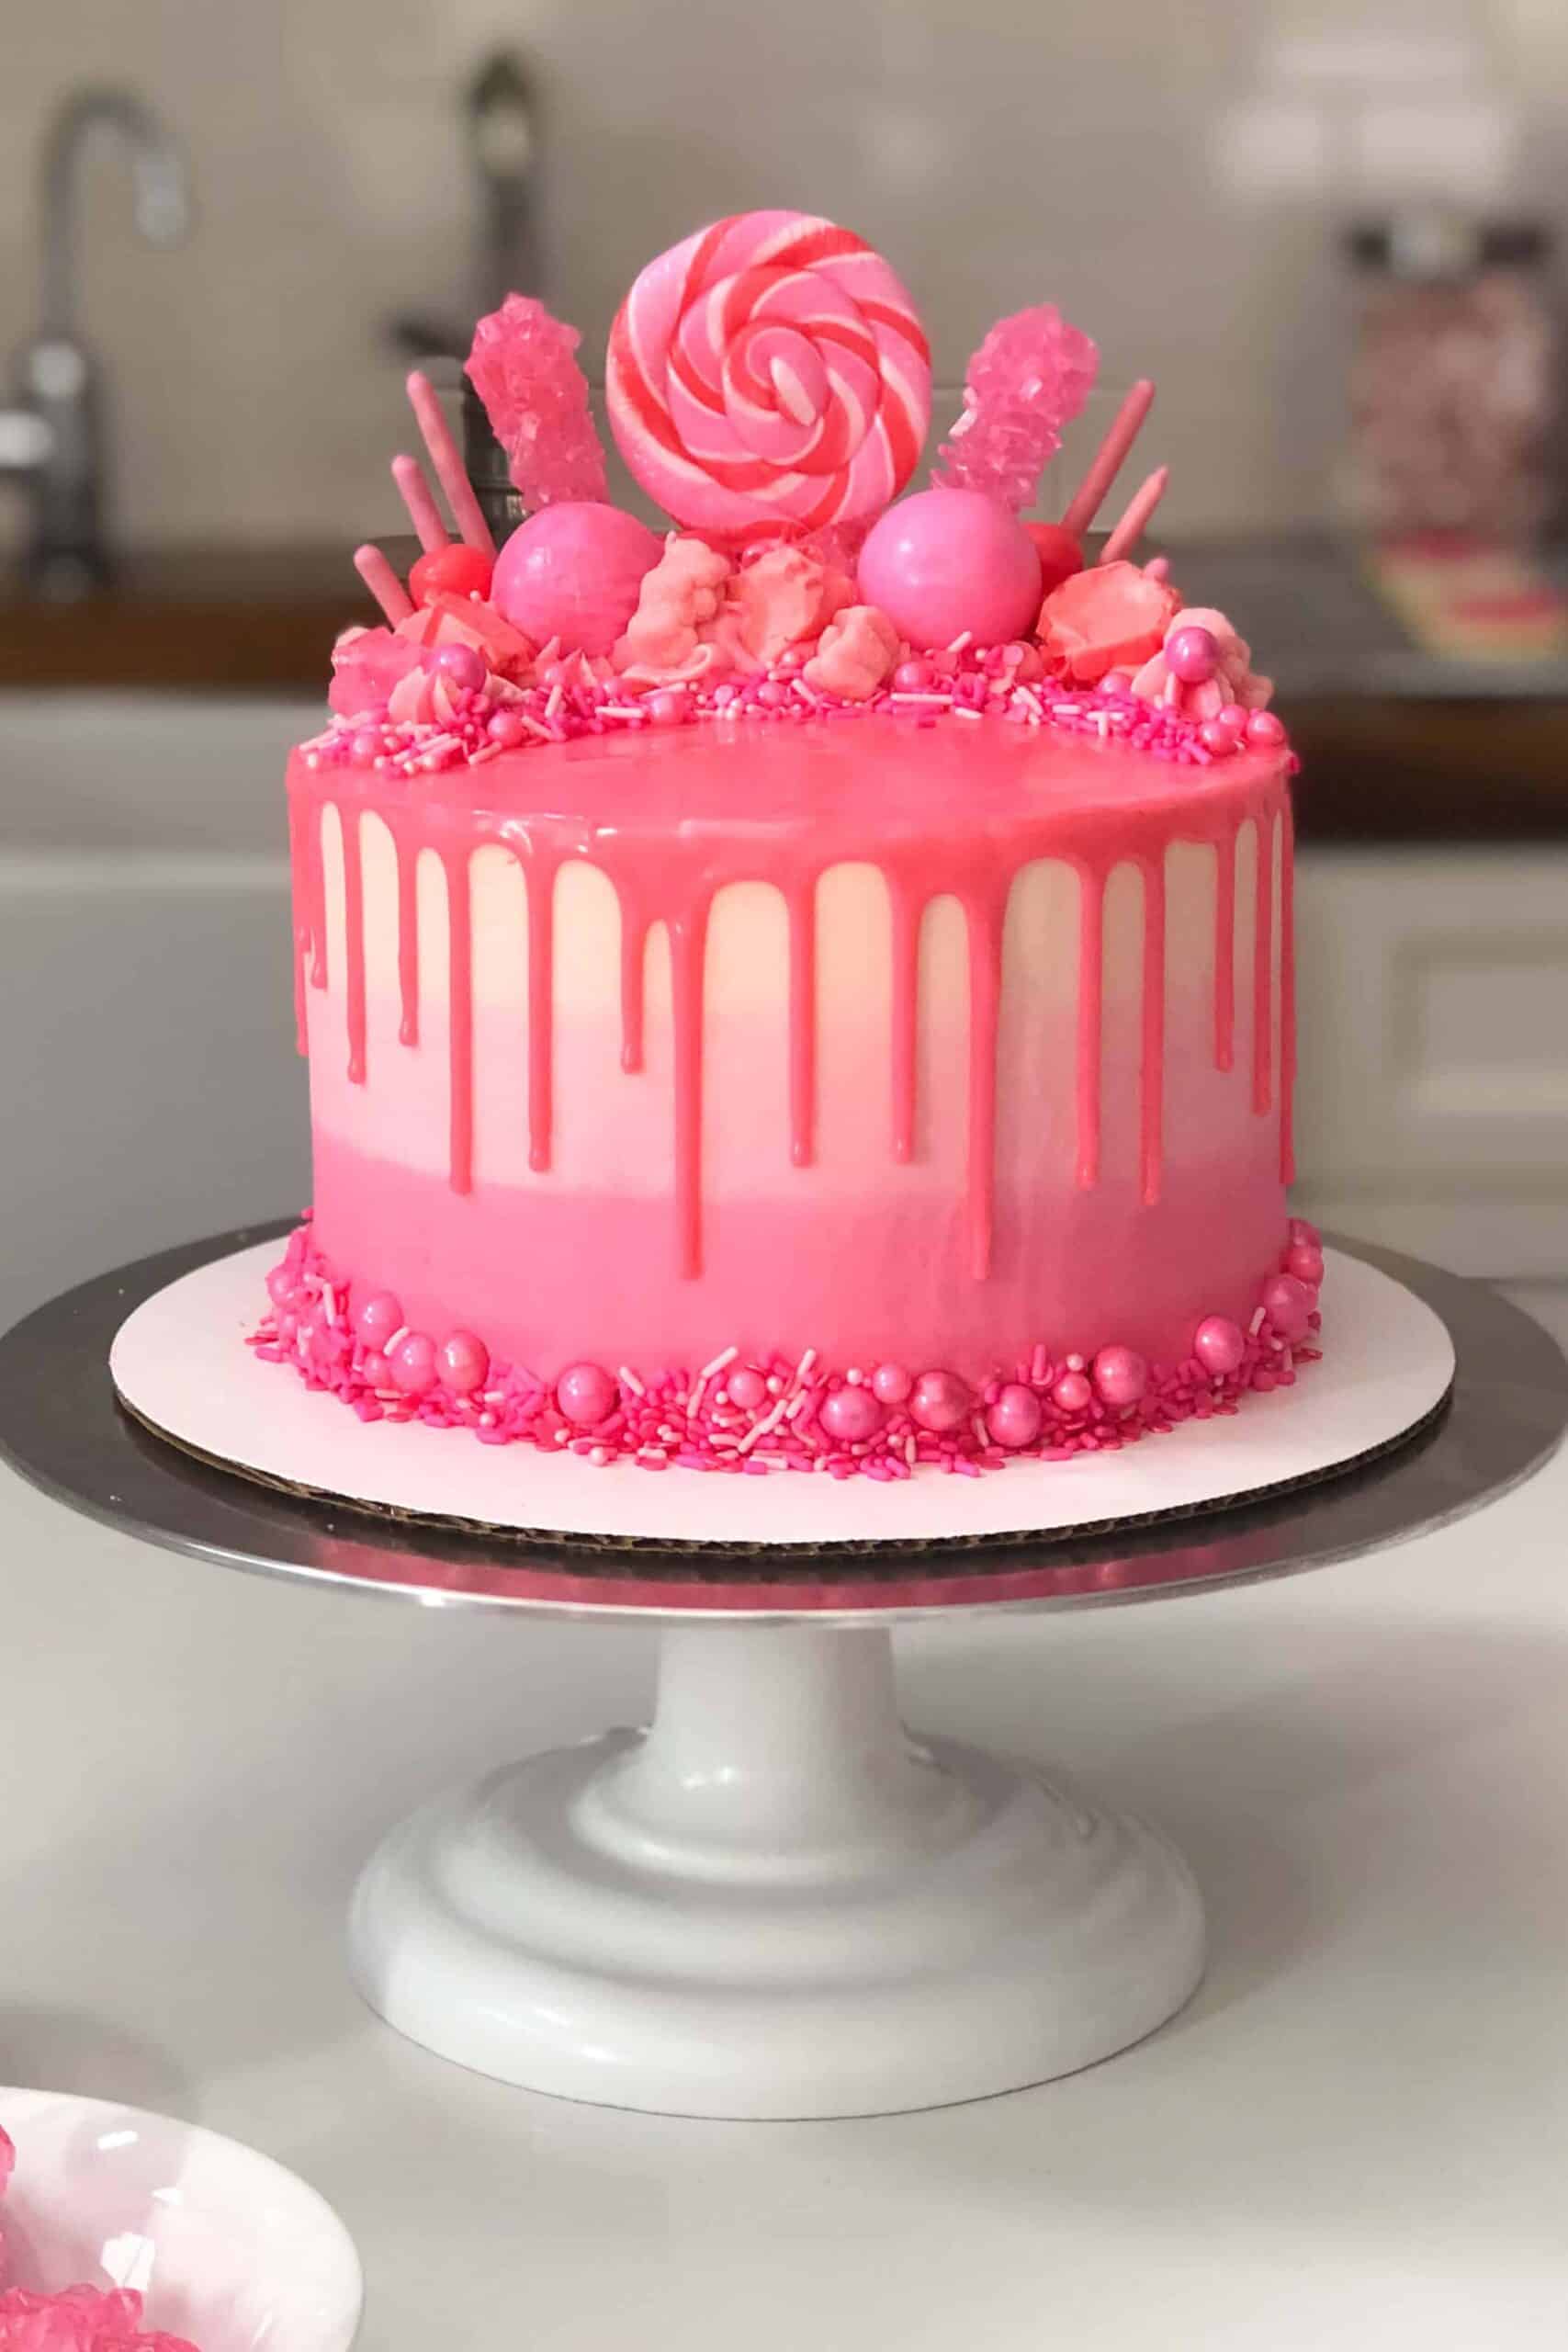
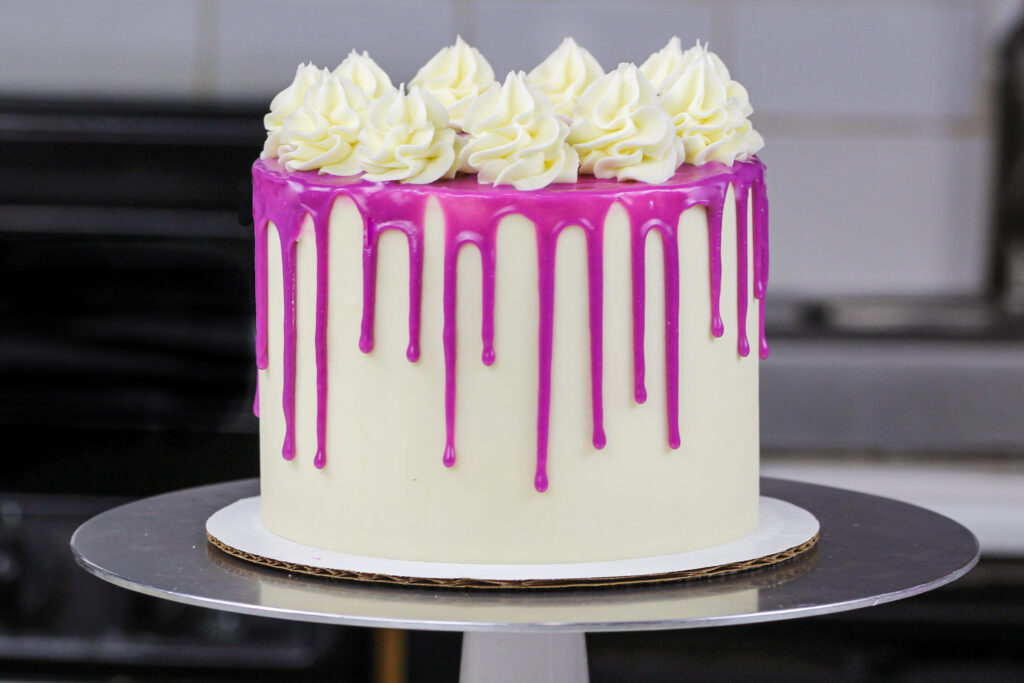
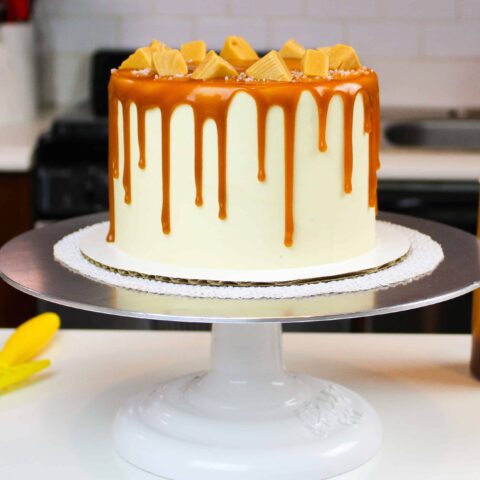
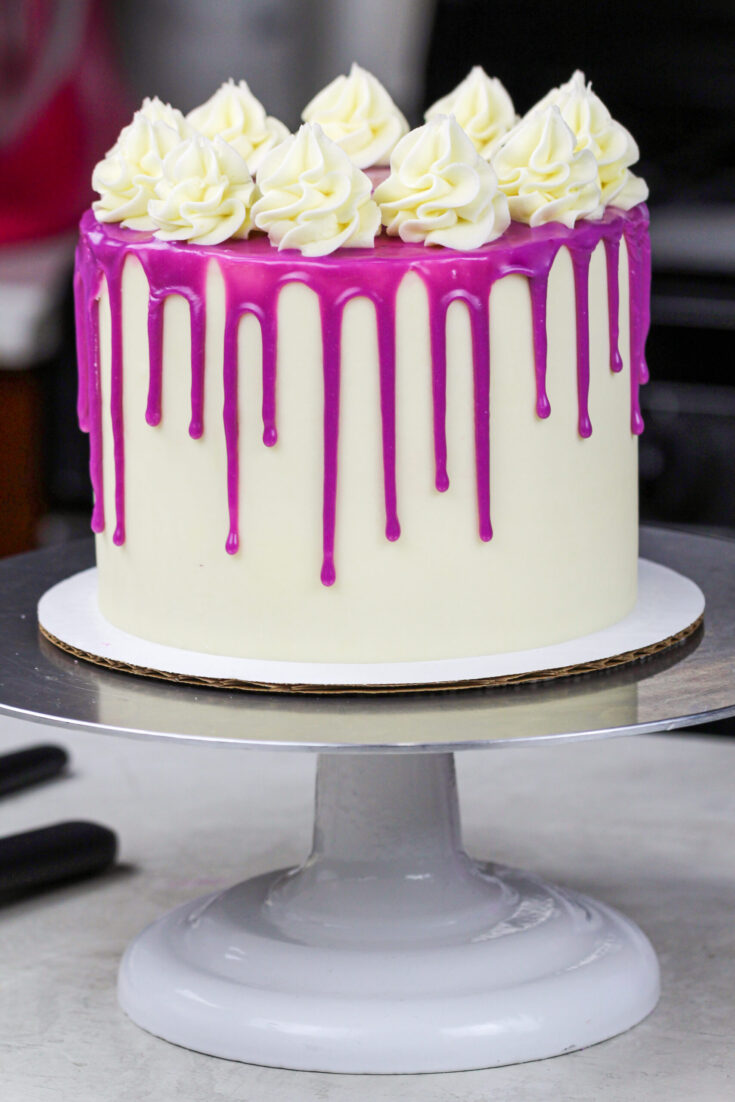
Sometimes I want a chunkier drip, that’s super defined. It makes cakes feel almost cartoonish to me, and I think they’re fun. I went for this look with my pink drip cake, and loved the finished look.
Other times I want thin little drips, that look just like tiny raindrops coming from the sky.
That’s not me being whimsical, I really did make an April showers drip cake with thin blue drips to emulate raindrops
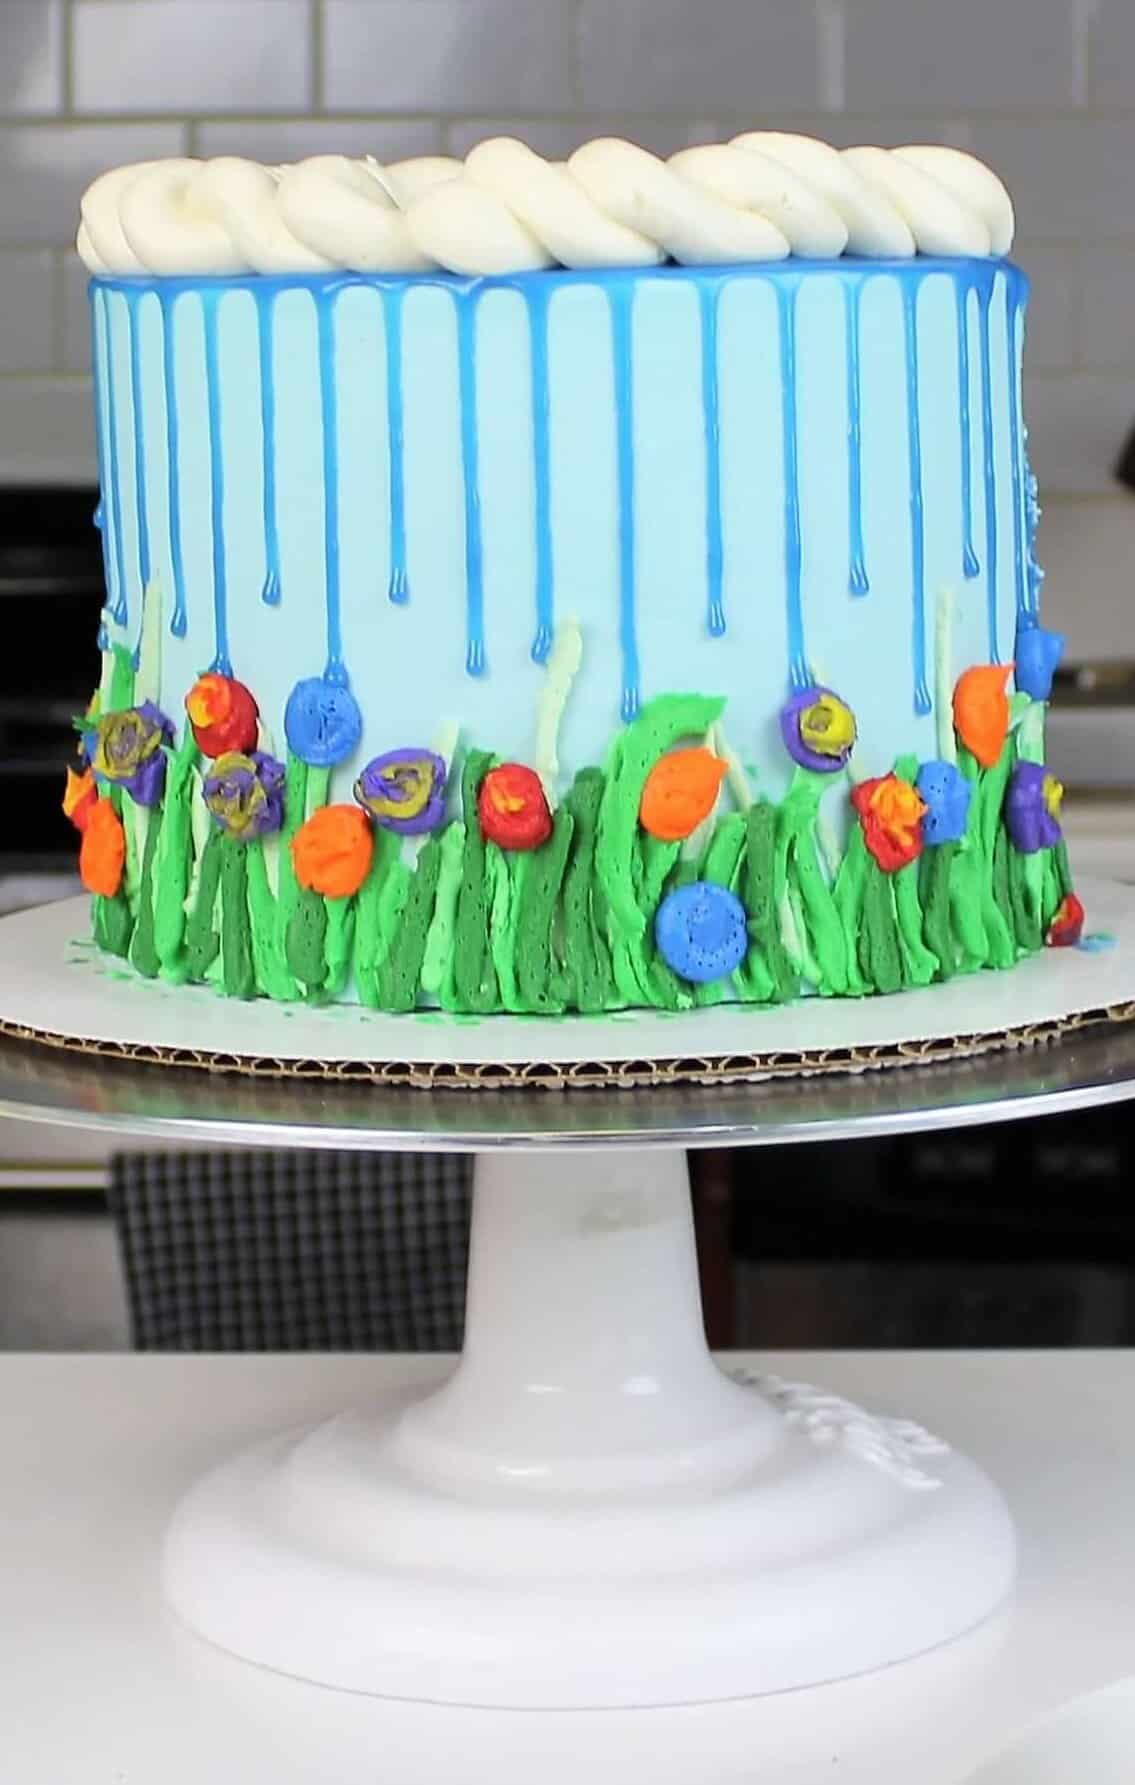
And then there’s drip length. Do you want your drips run all the way to the cake board? Should they vary in length, or have a uniform look? You tell me!!
I’ve done them all. I generally like drips that vary in length a bit, but there’s nothing with drips that are all the same length.
Shorter drips can be great if you’re planning to add decoration around the base of the cake. Longer drips can be fun if you’re going for an over the top or dramatic look, like my red wine drip cake.
Tips for Adding Drips to a Cake
Whatever look you chose fo your drip cake, I have two very important tips to ensure you get the look you’re after.
Tip #1: Chill Your Cake
My first tip is to only add drips to a chilled cake! I mean THOROUGHLY chilled. Your second coat of buttercream should be firm to the touch.
This can take up to 30 minutes in the fridge, or about 10 minutes in the freezer.
Chilling your cake will help your drips stay in place once they’re added and help prevent them from running down too far.
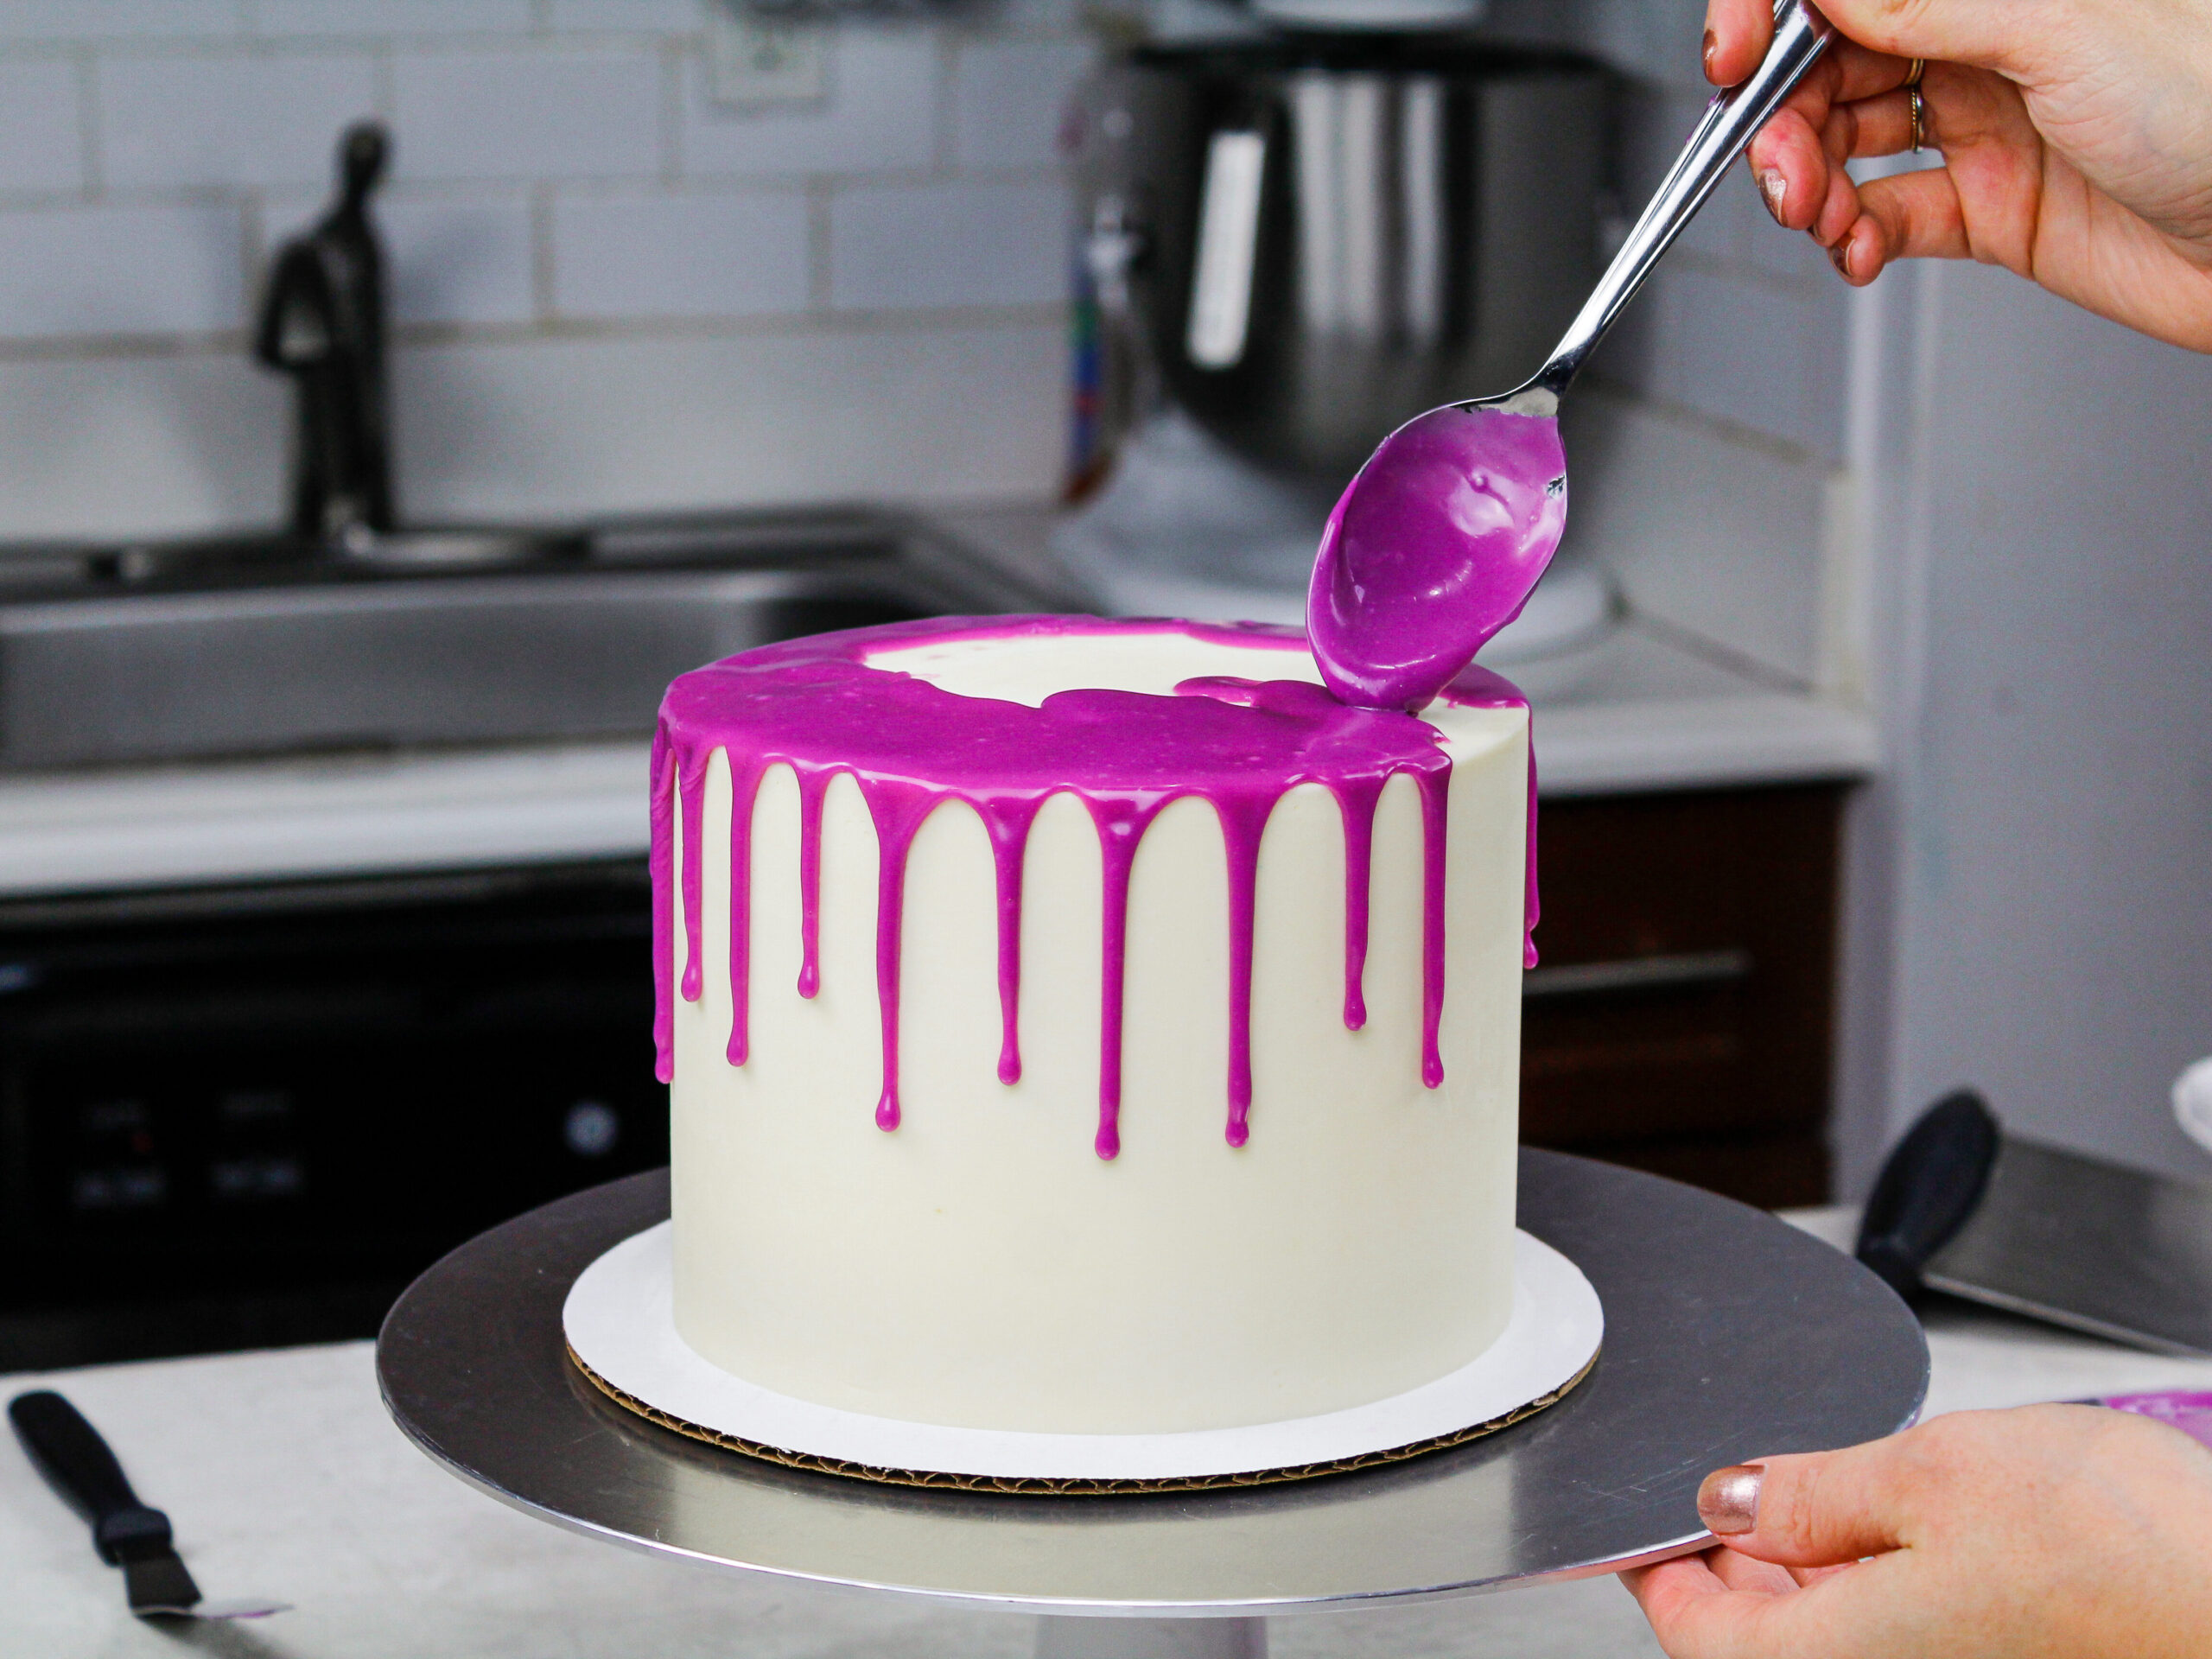
Tip #2: Make A Test Drip
My second tip is to make a test drip. Take your ganache and make a single drip on your cake. Let if flow and sit for a couple minutes. See what it looks like and how far it runs down the side of the cake.
Are you happy with how it looks? This is your time to make changes to get it just right. Is it too thin? Did the drip run too far down the cake? Maybe you need to let your ganache cool more, or melt in a bit more chocolate.
Is your drip too thick or short? You might need to pop it in the microwave for a couple seconds (seriously, don’t heat it for more than 5 seconds). Or maybe you want to add in a tiny bit more heavy cream.
This is the point in the process where my eagerness can get the best of me. I think I’ve made the necessary adjustments and dive right into adding all my drips.
But for all you know, you may have overcorrected! You may have actually heated or cooled your ganache too much.
After each adjustment to your ganache, you need to do another test drip. It’s worth taking the extra few minutes to make sure your ganache is the perfect temperature.
My Tips for Making the Best Colorful Drip Cakes
- Use this drip recipe on any type of buttercream cake as long as it’s chilled.
- Don’t use this colored drip recipe on fondant – it can do weird things to the fondant, and create a goopy mess.
- For the white chocolate, I love using the whole foods mini white chocolate chips, because they melt so easily!
- You can also use regular white chocolate chips, white chocolate wafers, or even a chopped up white chocolate bar for the chocolate this recipe calls for.
- The ratio of heavy cream is different if you white candy melts. Candy melts cannot be swapped for the white chocolate in this recipe! They are not interchangeable.
- Be sure to use heavy cream or heavy whipping cream! You need the high fat content to create the right consistency in this recipe. Milk cannot be used in place of the cream.
Making a Drip Cake in Advance & Storage Tips
- Make this ganache drip recipe ahead of time or save leftovers! Once it’s made, wrap the bowl with plastic wrap or cover the top of the plastic bottle and store in the fridge for up to 3 weeks.
- To use chilled ganache, heat the bottle or bowl in to the microwave for 10 second intervals until it reaches the right consistency.
- Use leftover ganache to top cupcakes, cookies, or even ice cream!
Share Your Creations With Me!
If you try this drip cake recipe, please tag me @chelsweets and use #chelsweets so that I can see your amazing creations!
Other Recipes You Might Like:
How to Make a Drip Cake
Want to learn how to make a drip cake? This recipe and tutorial walk you through everything you need to know about drip cakes!
Ingredients
Vanilla Cake Recipe
- 3 cups all-purpose flour (390 grams)
- 3 cups granulated sugar (600 grams)
- 2 1/2 tsp baking powder (10 grams)
- 1 tsp salt (5 grams)
- 1 cup unsalted butter, room temperature (226 grams) - 2 sticks
- 1 cup egg whites (or about 7 egg whites) (244 grams)
- 1 1/2 cups buttermilk, room temperature (360 grams)
- 1/8 cup vegetable oil (28 grams)
- 2 tsp. vanilla extract (9 grams)
Vanilla Buttercream Frosting
- 2 cups unsalted butter, room temperature (434 grams)
- 1/2 tsp salt (3 grams)
- 1 Tbsp vanilla extract or vanilla bean paste (12 grams)
- 7 cups powdered sugar (907 grams) - or a 2lb bag
- 2 Tbsp heavy cream (or whipping cream) (30 grams)
Colorful Drip Recipe
- 1/4 cup heavy cream (60 grams)
- 1 cup white chocolate chips (175 grams)
- gel food coloring
Instructions
Vanilla Cake Layers:
- Preheat oven to 350°F. Line three eight-inch pans with parchment rounds, and grease with non-stick baking spray.
- Mix together all dry ingredients (flour, baking powder, sugar, and salt) in a stand mixer with a paddle until fully combined.
- Mix chunks of room-temperature butter slowly into the dry mix, on a low speed. Continue to mix until no large chunks of butter remain, and the mixture becomes crumbly.
- Pour in egg whites, and mix on low until just incorporated. Mix in the buttermilk in two installments, on a low speed.
- Add in oil and vanilla and mix at a low speed until fully incorporated. Scrape down the sides of the bowl with a spatula, then beat on low speed for about 15 seconds.
- Mix the batter on a low speed, scraping the sides and bottom of the bowl part way through to evenly color the batter.
- Divide batter evenly between the prepared cake pans.
- Bake for 34-35 minutes (or until a skewer comes out with a few moist crumbs).
- Allow to cool for 10 minutes, then run a small offset spatula around perimeter of the pan to separate the cake from the pan.
- Place cake layers into the freezer for 45 minutes, to accelerate the cooling process.
Vanilla Buttercream Frosting:
- Beat the butter on a medium speed for 30 seconds with a paddle attachment or hand mixer until smooth.
- Mix in the vanilla extract and salt on a low speed.
- Slowly add in the powdered sugar, 1 cup at a time. Alternate with small splashes of cream.
- Mix on low for a couple extra minutes to make the frosting super smooth, and to get it to the desired consistency.
- If the frosting is too thick, add in additional cream (1 Tablespoon at a time). If the frosting is too thin, add in more powdered sugar (quarter of a cup at a time).
White Chocolate Ganache Drips:
- Heat heavy cream in a heat proof bowl in the microwave for 45 seconds, until it's steaming and just beginning to bubble.
- Gently pour white chocolate chips into the heavy cream, making sure they are fully covered with cream. Allow mixture to sit for 1 minute.
- Stir slowly until the cream and white chocolate are combined. Some bits of chocolate may not be fully melted yet. Heat the mixture again for 20 seconds, and stir. Repeat as necessary until all the chocolate bits are fully melted and incorporated.
- Once the ganache is smooth, mix in the gel food coloring until the ganache is evenly colored. If you plan to use a plastic bottle to add your drips, pour the mixture into a plastic bottle.
- Allow the mixture to cool until the desired viscosity is reached (barely warm to the touch).
- If it seems too thin or thick, you can add a touch more chocolate chips or heavy cream! The type of cream and white chocolate that you use can affect the consistency, so feel free to adjust as needed.
To Assemble The Cake:
- Stack and frost cake layers on a greaseproof cake board, using a dab of frosting to help stick the first cake layer to the board.
- Add an even layer of buttercream between each cake layer with a large offset spatula.
- Spread a thin coat of frosting around the the cake, to fully cover the cake layers.
- Smooth using a bench scraper, then chill the cake in the fridge (20 minutes) or freezer (10 minutes) until the frosting is firm to the touch.
- Add a second, thicker layer of frosting to the cake, and smooth using a bench scraper.
- Chill the cake again in the fridge (20 minutes) or freezer (10 minutes) until the frosting is firm to the touch.
- Make a test drip with your ganache to see if it's the right consistency (more detail on that in the post above).
- Once it's the right consistency, add the drips to the chilled cake using a plastic squirt bottle or spoon. After covering the sides of the cake with ganache, chill the cake in the freezer for 5 minutes to help the drips set.
- Add some of the remaining ganache on top of the cake and carefully spread it over the top of the chilled cake.
- Then decorate as desired! I like to use the leftover buttercream to pipe swirls on top of the cake with a wilton 1M frosting tip.
Notes
Dairy free alternative: coconut cream (canned) can be used in place of the heavy cream in this recipe to make it dairy free.
Make this ganache drip recipe ahead of time or save leftovers! Once it's made, wrap the bowl with plastic wrap or cover the top of the plastic bottle and store in the fridge for up to 3 weeks.
To use chilled ganache, heat the bottle or bowl in to the microwave for 10 second intervals until it reaches the right consistency.
Use leftover ganache to top cupcakes, cookies, or even ice cream!
Nutrition Information
Yield
24Serving Size
1Amount Per Serving Calories 581Total Fat 28gSaturated Fat 17gTrans Fat 0gUnsaturated Fat 10gCholesterol 68mgSodium 254mgCarbohydrates 80gFiber 0gSugar 67gProtein 4g
Tracy
Thursday 6th of October 2022
I only have 9 inch pans. Should I make 1 1/2 batter?
Chelsweets
Thursday 6th of October 2022
Hi Tracy,
That is exactly what I'd recommend doing! 1 1/2 batches of this recipe should work great for 9 inch pans, and I'd recommend making 3 or 4 layers (depending on how tall you want the layers to be).
Mary Howicz
Thursday 7th of July 2022
I loved the drip cake, but I want to know if I decorate on the bottom of the sides should I do it before I do the drip of after??
Chelsweets
Tuesday 12th of July 2022
I usually decorate the bottom (like adding sprinkles or something) then add the drips, but mostly just because I have to chill the cake before I can add the drips and that firms up the frosting! However, if you're piping on the sides or something, I'd recommend doing it after adding the drips! That way you can align the decorations with however far the drips run down the cake :) Hope that makes sense, happy baking!
Jake
Monday 7th of February 2022
Kinda hard to even read the recipe without being bombarded by constant ads on this site, just awful
Dawn
Friday 4th of February 2022
Hi! This is beautiful! My niece wold love that color on her sweet 16 cake. What gel color did you use to make that vibrant pinkish color on the white cake? Thanks!
Grace
Tuesday 16th of November 2021
Thanks ma'am for your receipe..
My problems over the month with buttercream frosting is that once its out if the fridge it starts wearing off with dome ice bubbles on it.
Meanwhile I've seen cakes stored on the shelf for days and are still intact and beautiful..
Please what am I not getting right