
Mirror glaze cakes have taken the internet by storm, and I decided it was time to master this stunning technique!!
While some of us might think using a mirror glaze is a new technique, traditional pastry chefs have been using it to decorate cakes and pastries for decades. It’s an old-school french technique that has been around for about 40 years.
What Is Mirror Glaze?
Traditional mirror glaze recipes can seem complicated! I’ve seen recipes with ingredients I’ve never heard of. However, at the base of every mirror glaze recipe, sugar and gelatin are the key ingredients.
Most recipes heat the mixture to allow the gelatin to dissolve and combine with the other ingredients. The glaze is then poured over a chilled dessert.
A lot of what gives mirror glaze its shine is it being poured at the right temperature, which is around 110 F / 43 C.
Most mirror glaze recipes set at 90 F / 32 C, so they have to be warmer than that when they’re poured.
My easy mirror glaze recipe is a bit different and sets at a slightly lower temperature, so I actually find it’s best to pour my glaze when it’s around 90 F / 32 C!
My recipe uses a couple different ingredients that make it unique and change the temperature it sets at.

How Is This Easy Mirror Glaze Recipe Different from A Classic Mirror Glaze?
The biggest difference? White chocolate. I don’t know if you’ve ever tasted plain gelatin (or even smelled it), but it is simply disgusting.
Every time I mix plain gelatin with water to let it bloom, my gag reflex kicks in. However, it is an indispensable ingredient in mirror glaze recipes to help them set properly.
With that being said, I wanted to add something to this recipe to cover that flavor! I ended up settling on white chocolate and sweetened condensed milk. These are the primary flavor of this mirror glaze.
Adding these ingredients gives this glaze a bright white base, which will make it easier to color.
These ingredients also make the mirror glaze a tiny bit thicker and more forgiving. It covers the cake in a thicker layer of glaze than a traditional mirror glaze.
The only downside is that the white chocolate does make the glaze a tiny bit less shiny!!
This mirror glaze will reflect everything when it’s poured, but overtime it can lose some of its shine.
Why Is This Recipe Easier Than a Normal Mirror Glaze?
Traditional mirror glaze recipes involve more ingredients and additional equipment. This easy, five ingredient recipe makes the technique way more approachable.
Another bonus?! It can be made just using your microwave!! If you don’t have a microwave, you can use a stovetop/double boiler to heat the mixture and melt the chocolate.
While this all seems insanely simple, it does help to have a digital thermometer so you know exactly when your glaze is ready to be poured (90 F / 32 C).
I was shocked by how quickly I was able to make this and how easy it was to pour over a cake.
Traditionally, mirror glaze cakes involve pouring the glaze over a perfectly smooth, mousse-covered cake.
I experimented and found that it can also easily be poured it over a classic buttercream cake!
The key to pouring it over buttercream is to make sure the cake is thoroughly chilled and that the frosting is super smooth.
When I say thoroughly chilled, I mean that the cakes must be fully chilled and firm to the touch. This means at least 20 minutes in the freezer, or at least an hour in the fridge.
How Much Mirror Glaze Does One Batch Make?
This easy mirror glaze recipe makes enough glaze to covered two, six-inch layer cakes. It would also definitely be enough to cover an eight-inch layer cake.
While this style of cake is beautiful to make, they involve pouring tons of glaze over the cake. This is necessary to make sure the cake is fully covered in glaze.
You can try to salvage the glaze that runs off, but it can be more difficult to reuse if your colors combine.
Leftover glaze can be stored in an airtight container and refrigerated.
Reheat the mixture in 10-15 second intervals until it reaches 90 F / 32 C, the use as desired.
How To Color This Mirror Glaze Recipe
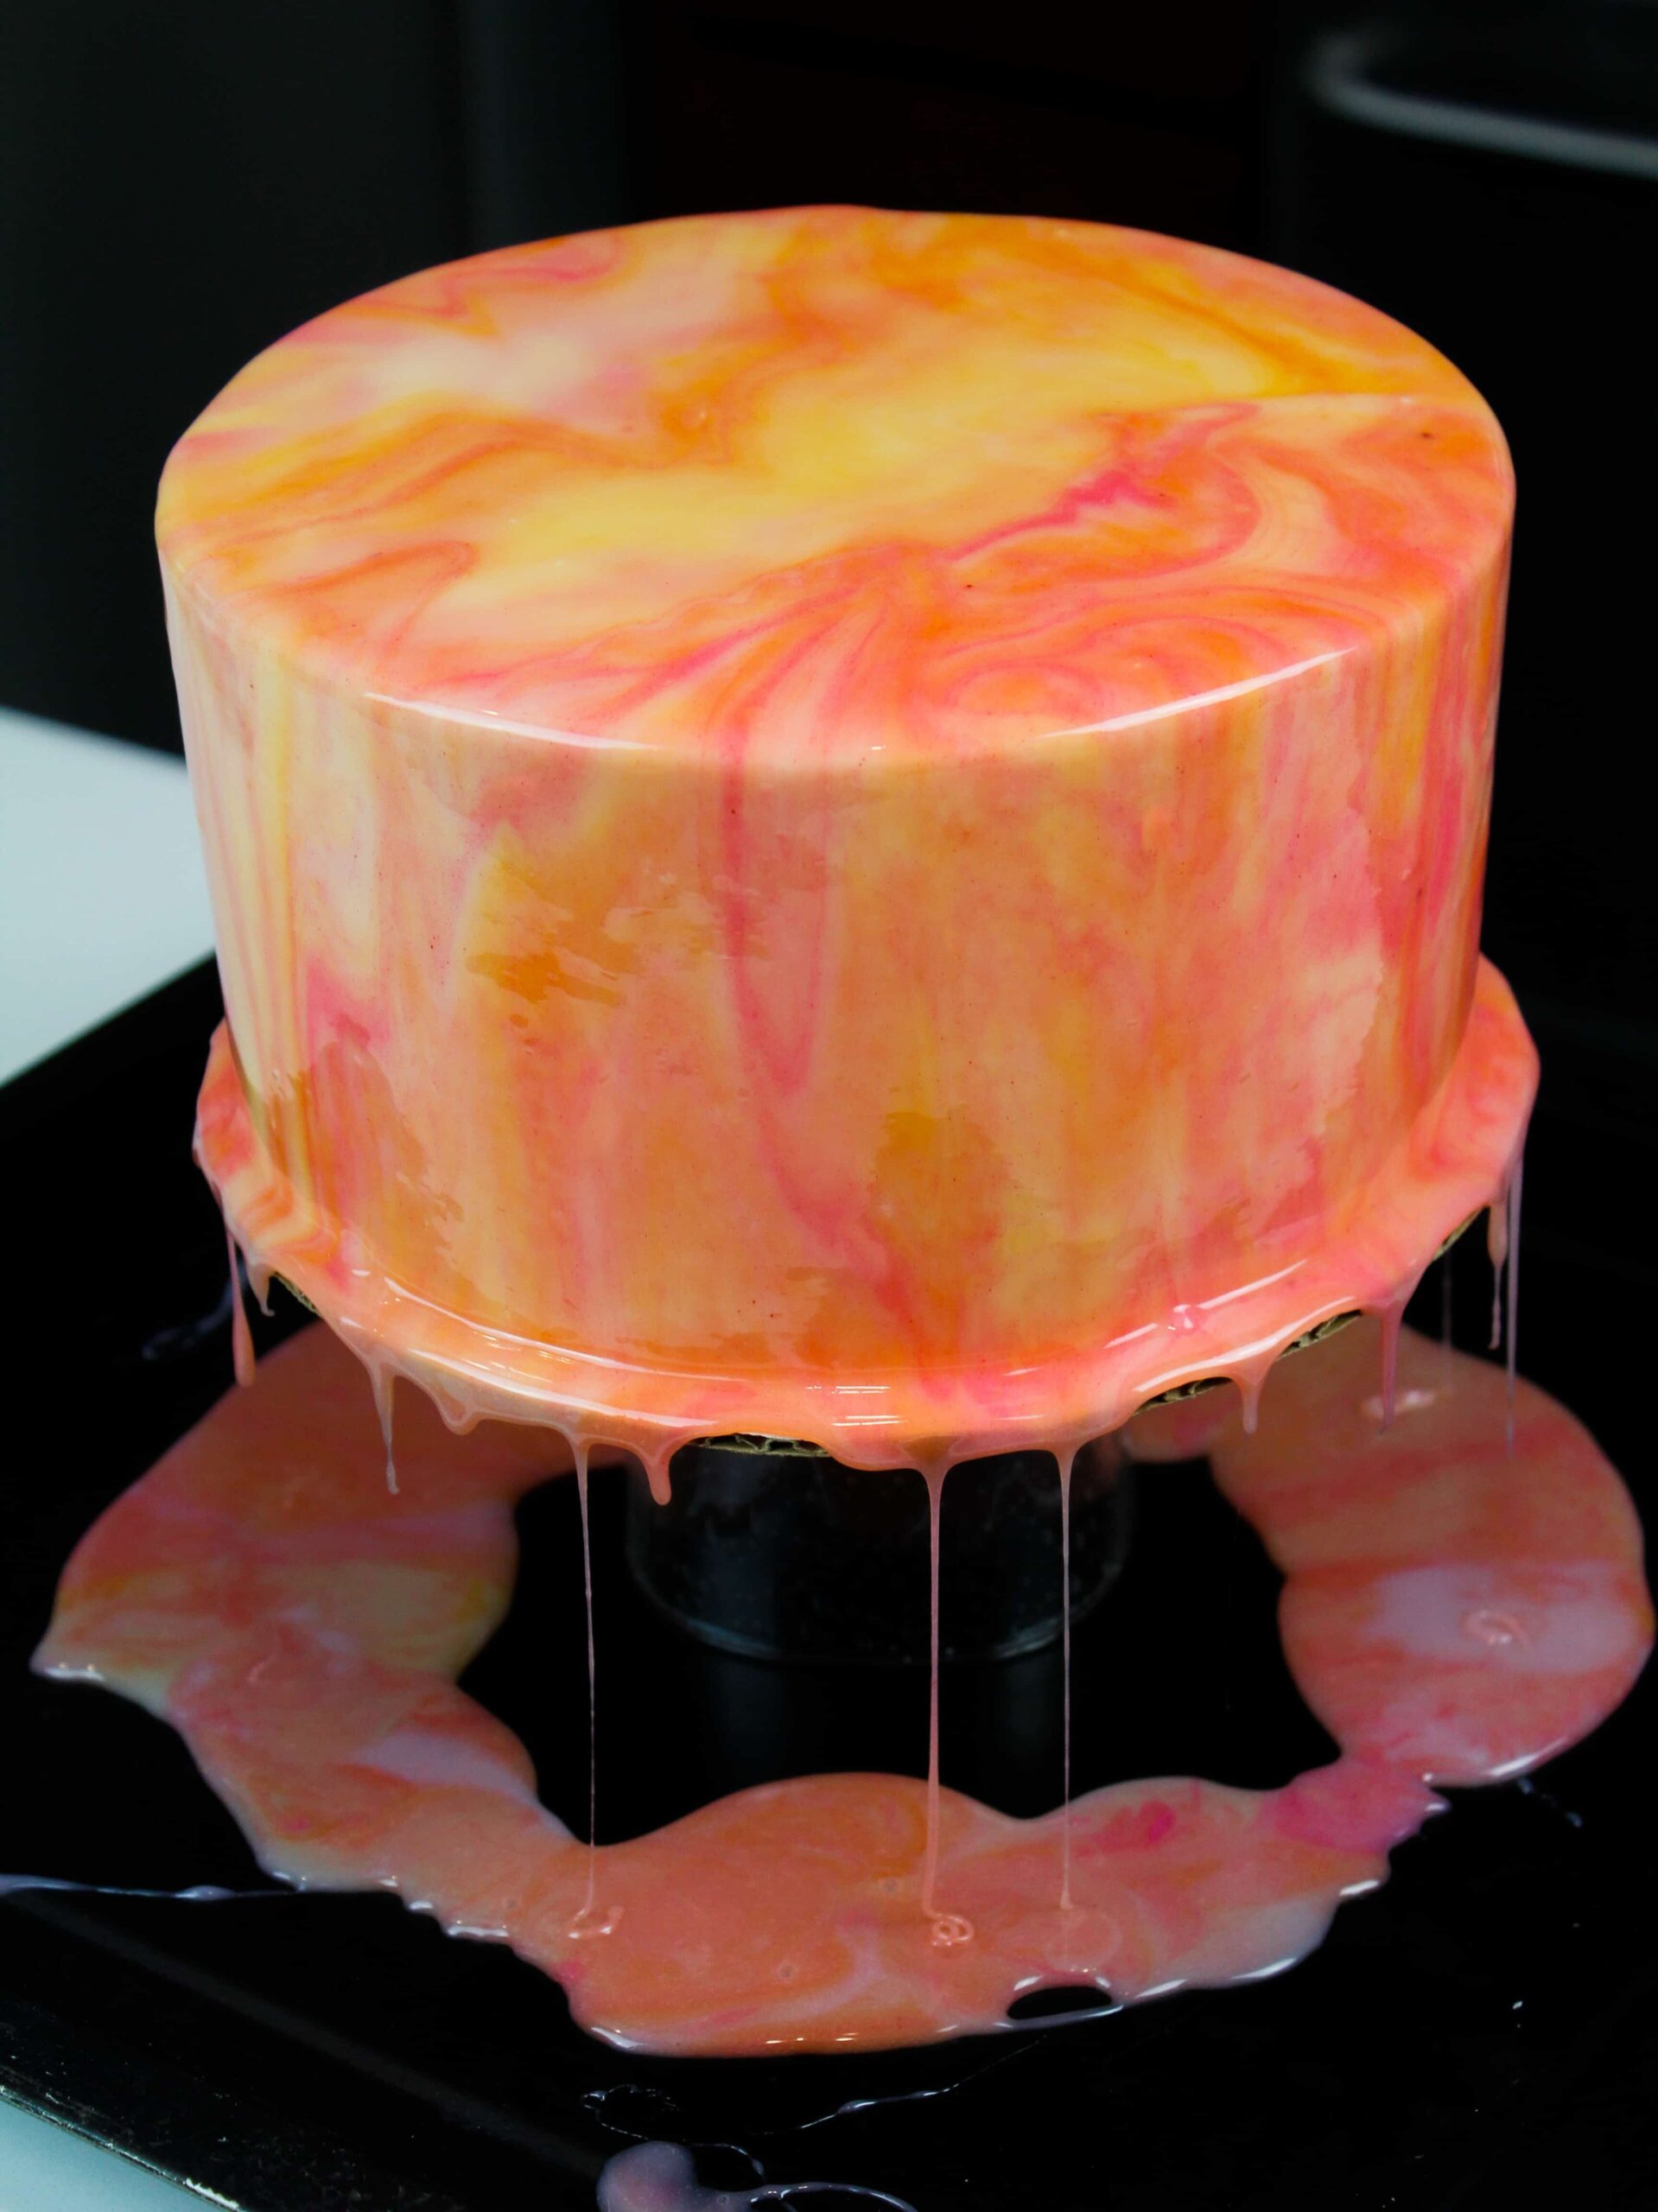
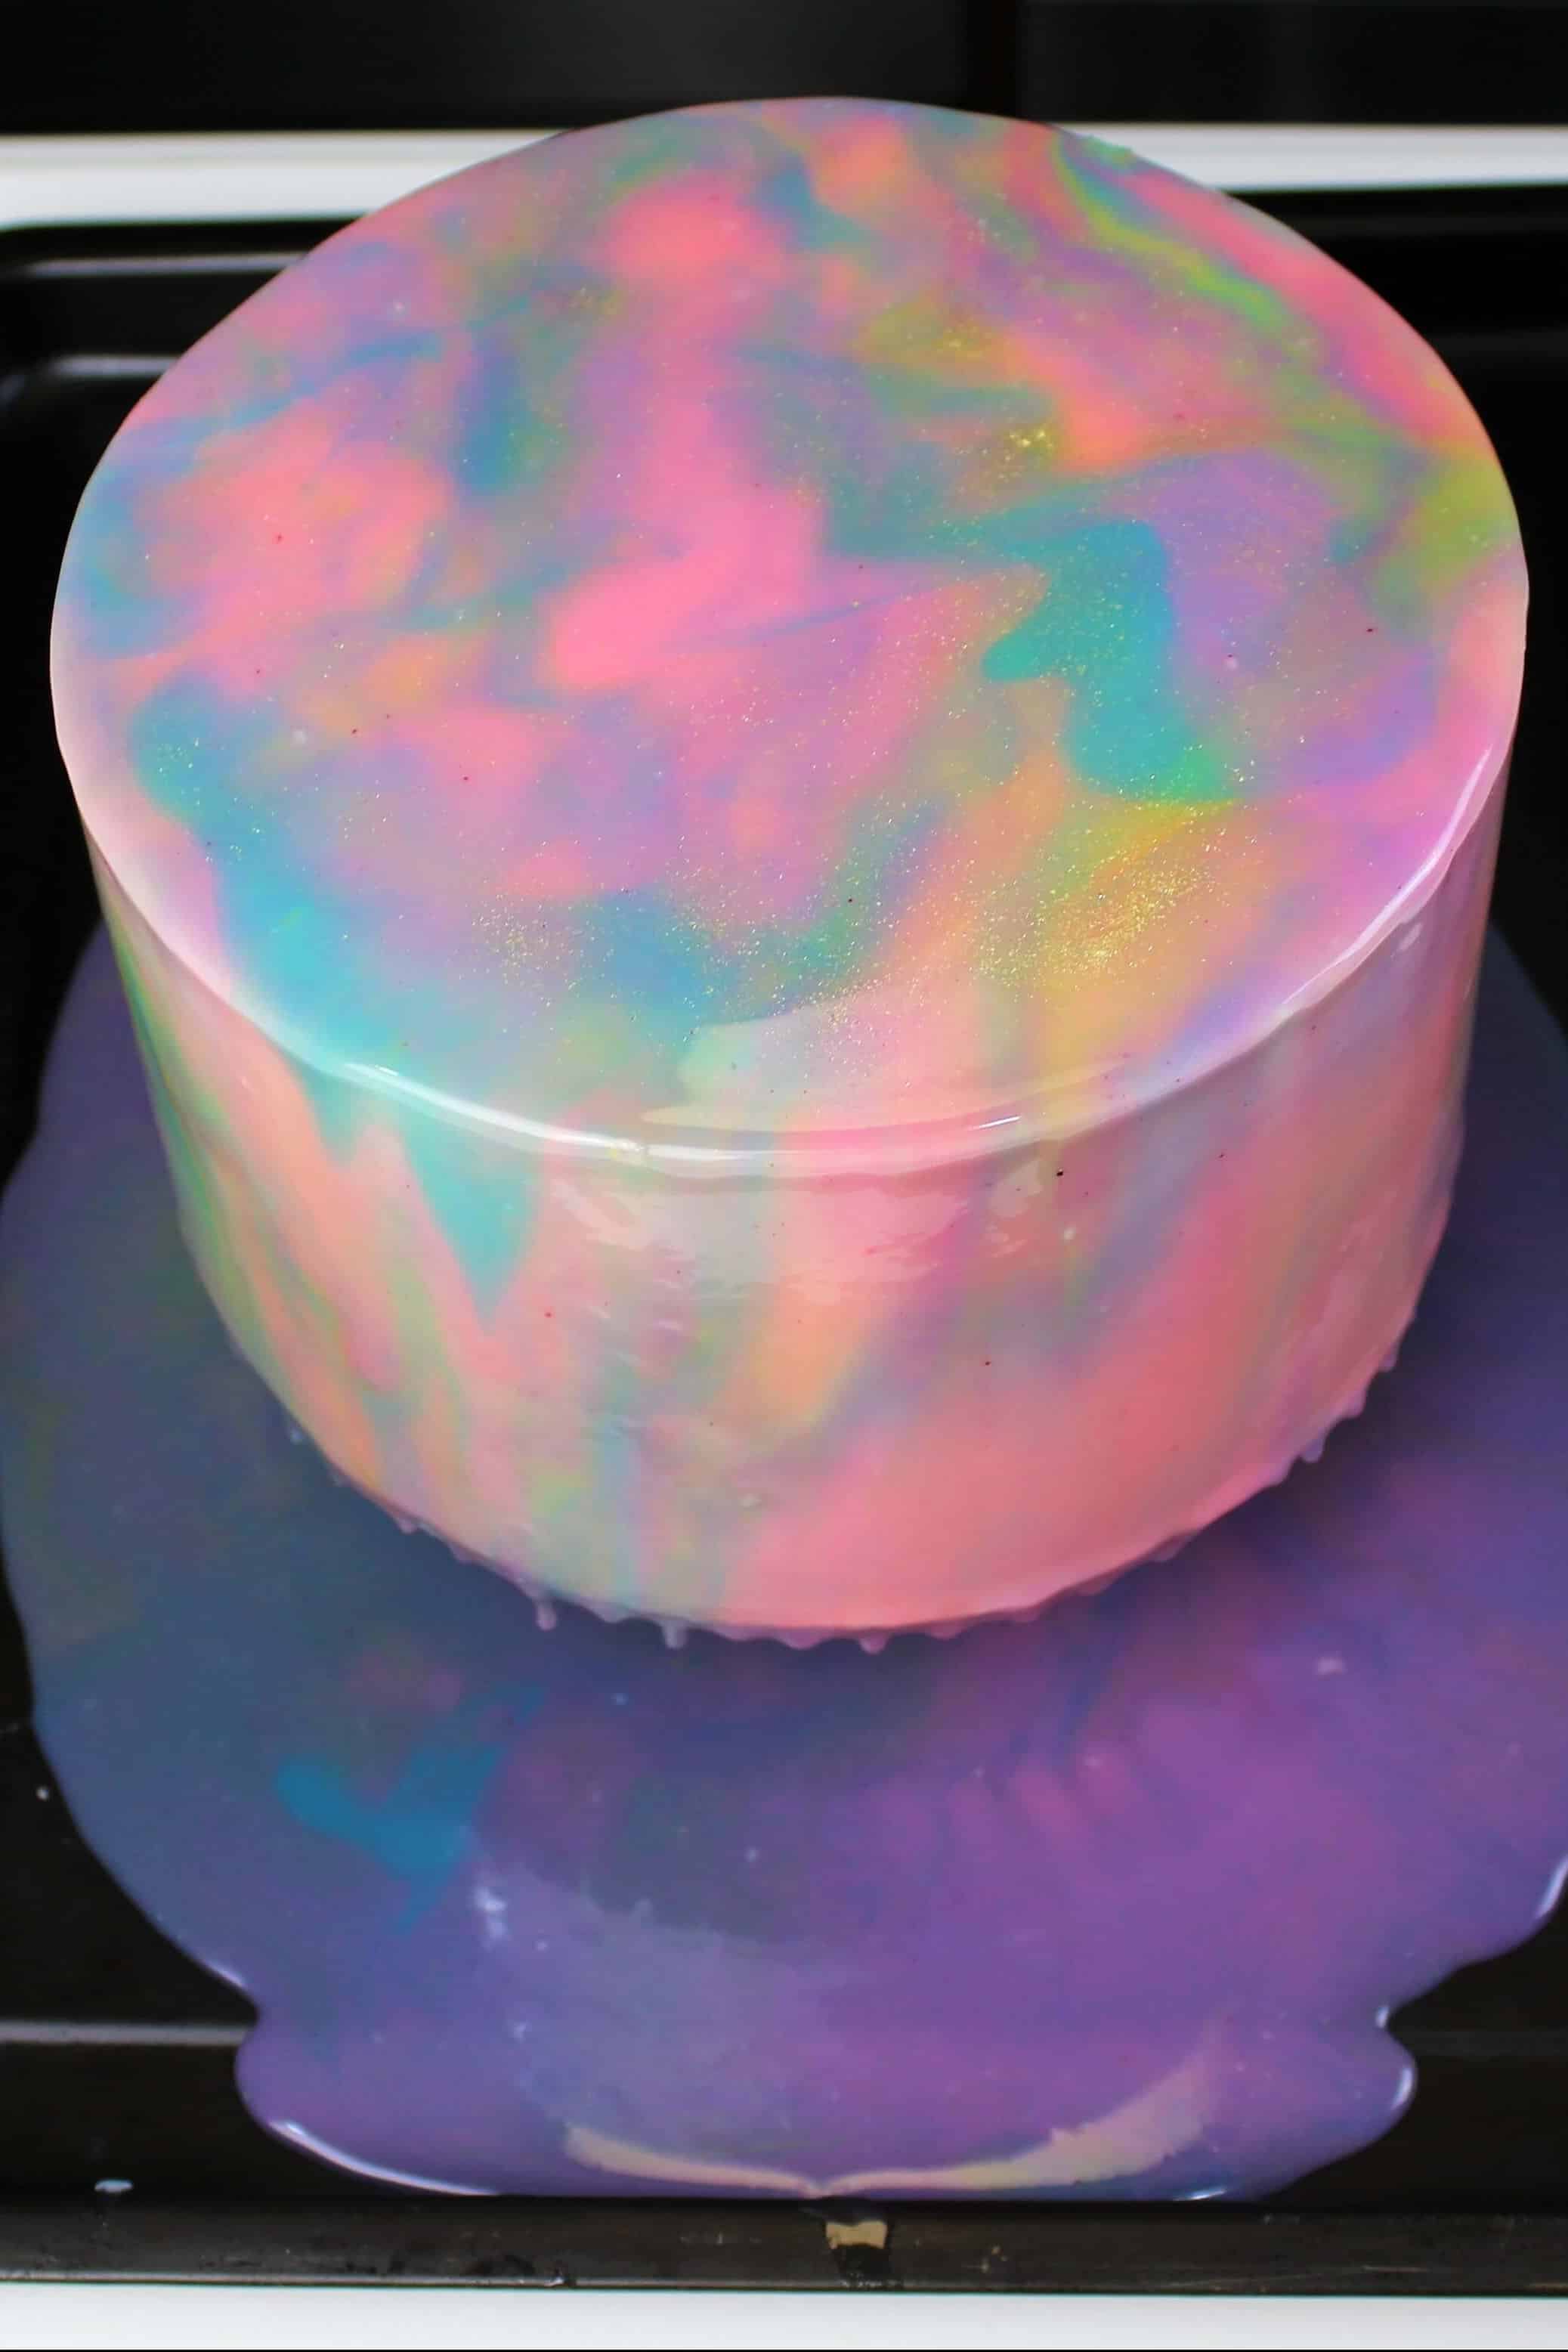
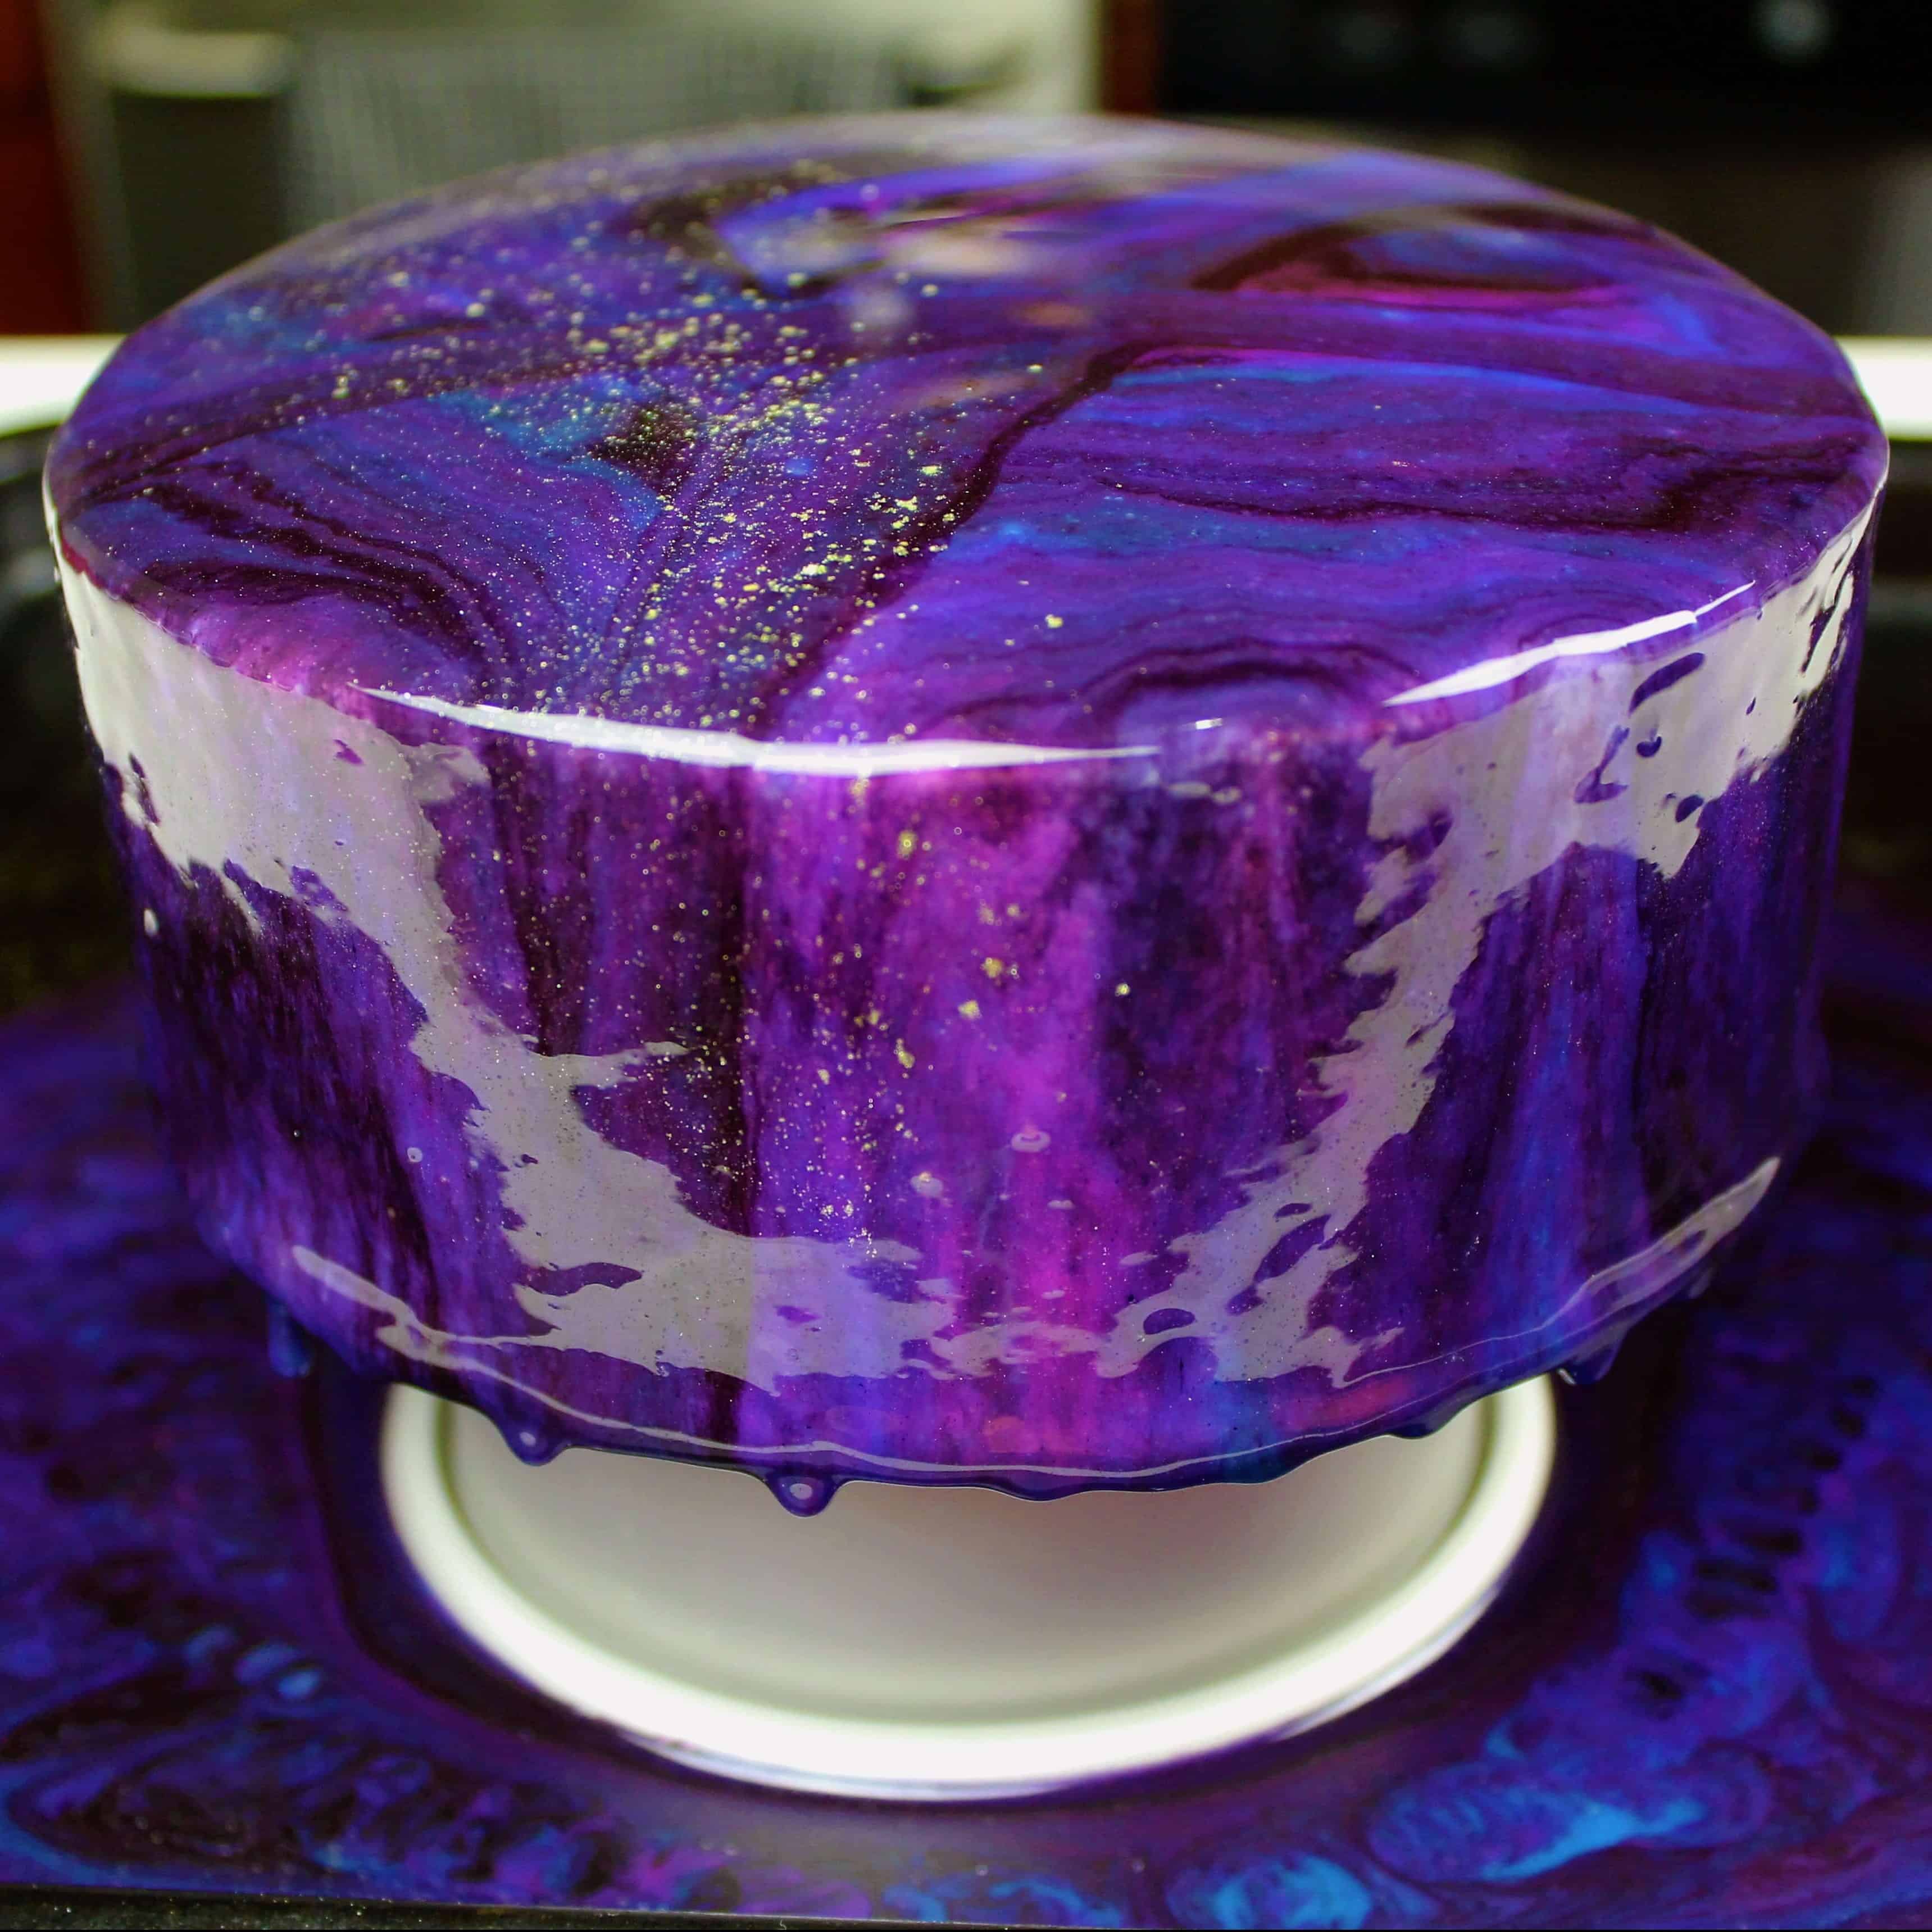
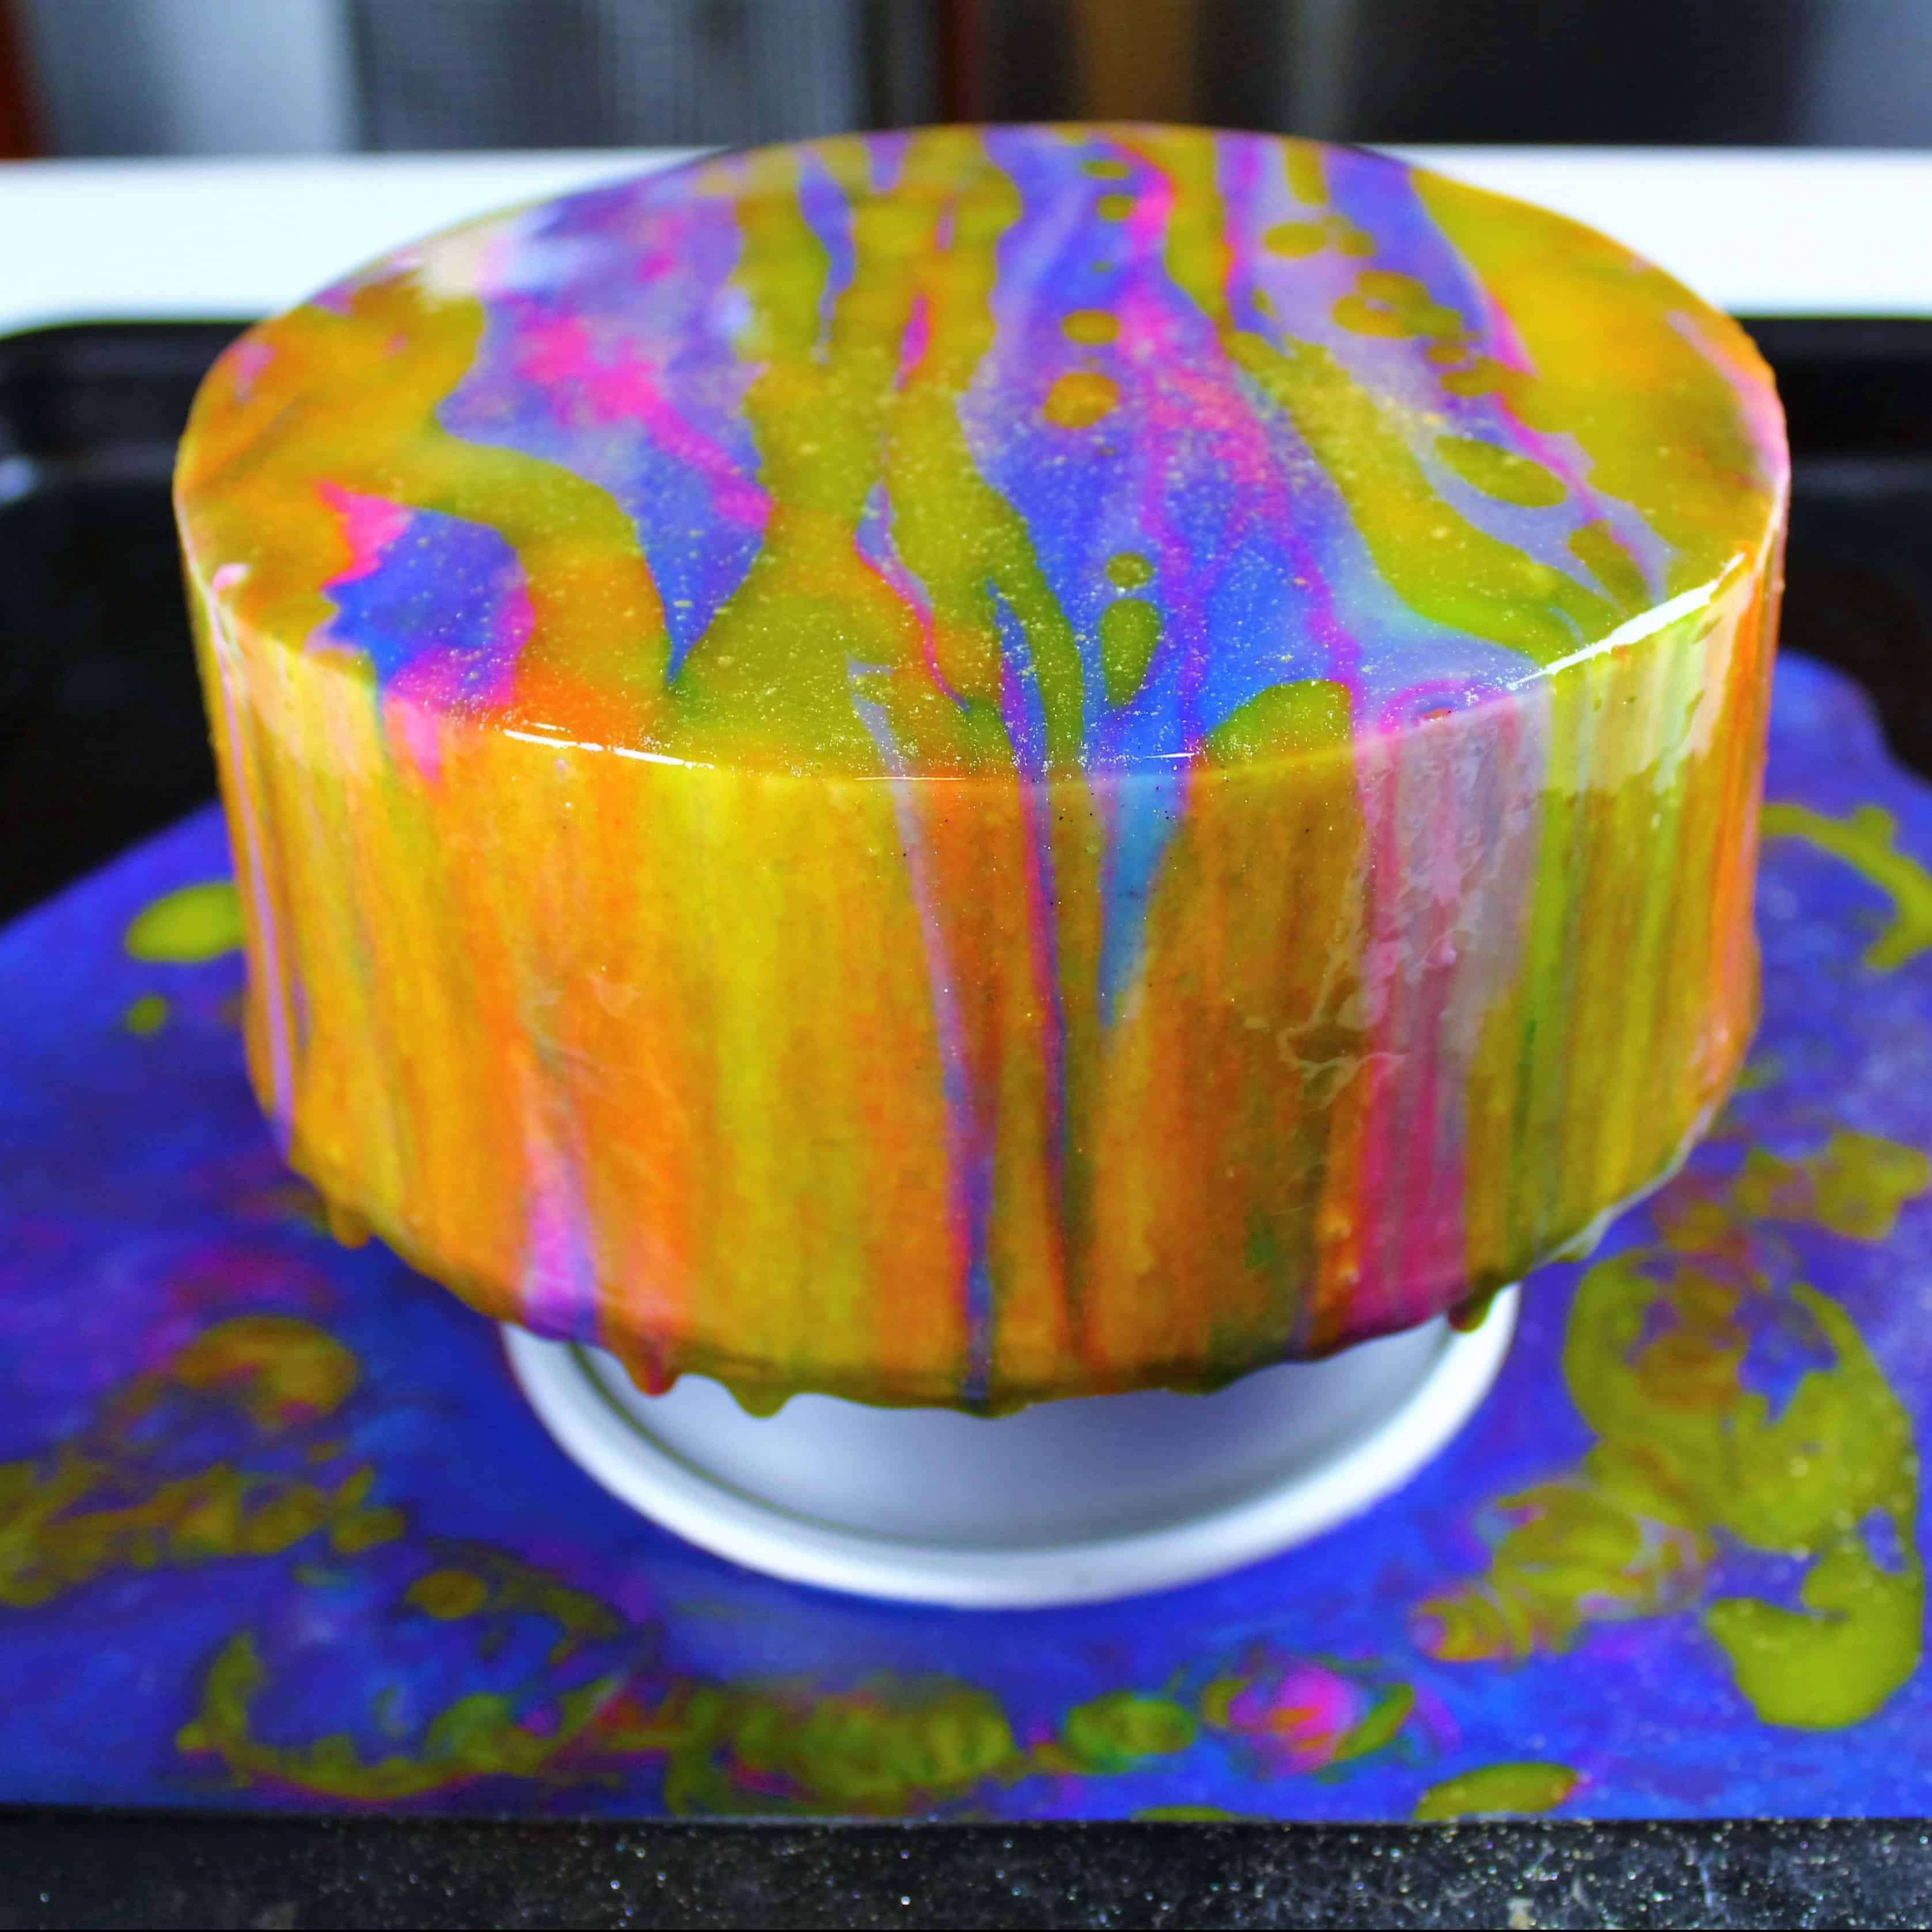
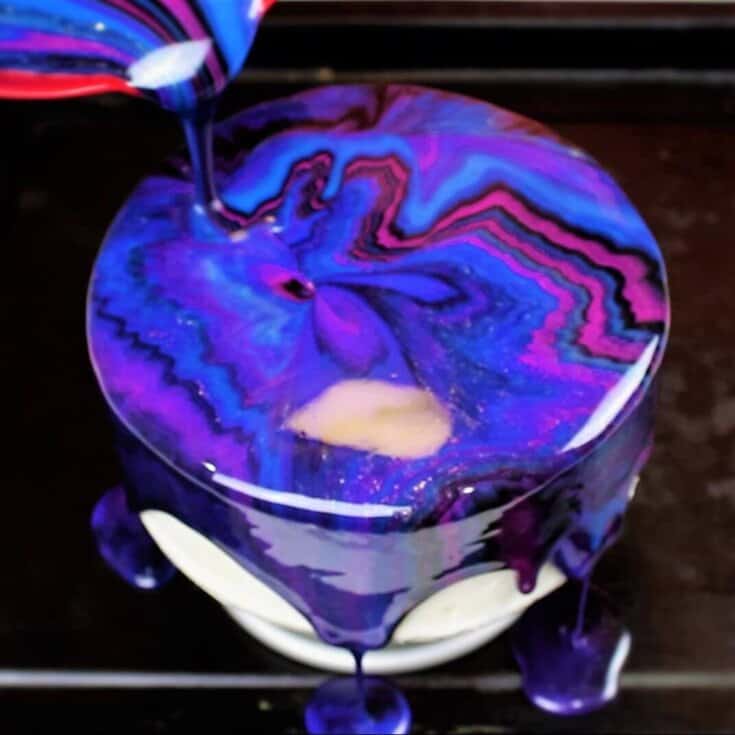
While my original mirror glaze cake was galaxy themed, you can create so many different looks with different colors.
Whatever colors you end up making, it’s super important that you use gel food coloring to color this glaze.
Gel food coloring creates vibrant shades because it is more concentrated than liquid food coloring.
This also means you don’t have to use much to get the color you’re after.
If you try to use liquid food coloring, you will have to use a ton to get bright colors, and this can throw off the consistency of the glaze.
How to Properly Pour Mirror Glaze Over a Cake
After trying a few different methods, this is definitely the best way to pour mirror glaze over a cake.
Remove the chilled buttercream cake from the fridge or freezer (the frosting should be completely firm to the touch) and place it on a circular object that is slightly smaller than the base of the cake. I like to rest the cake on a small cake pan or a wide, short bowl.
Place the pan and cake top of a large, rimmed baking sheet to catch the run-off glaze.
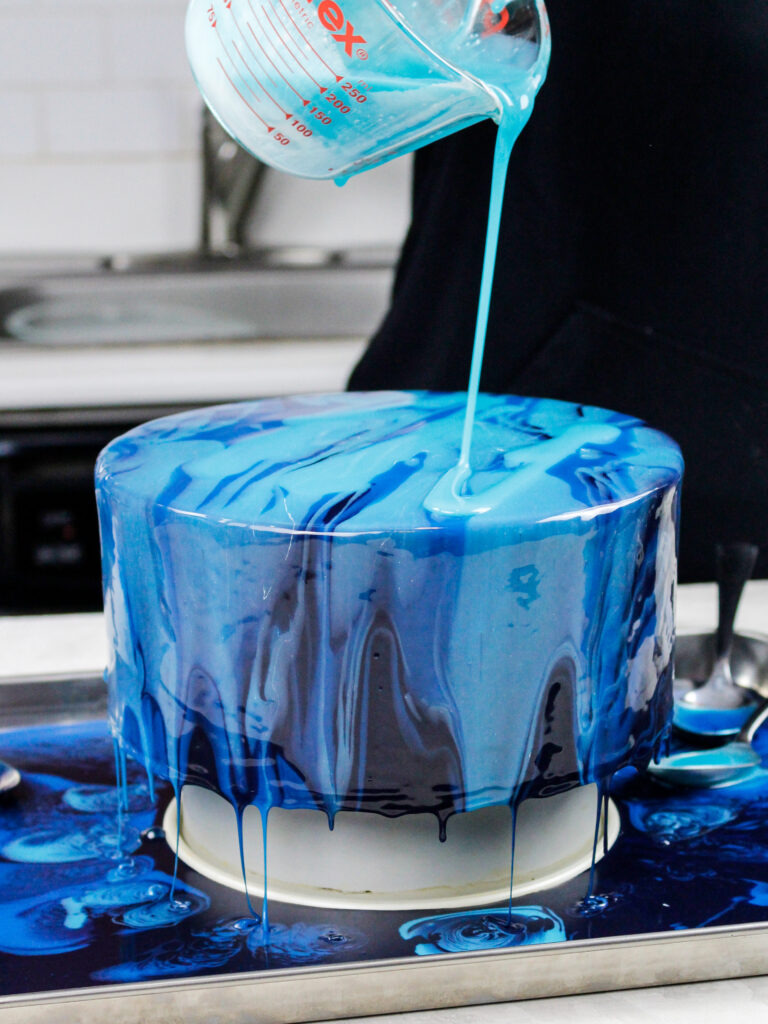
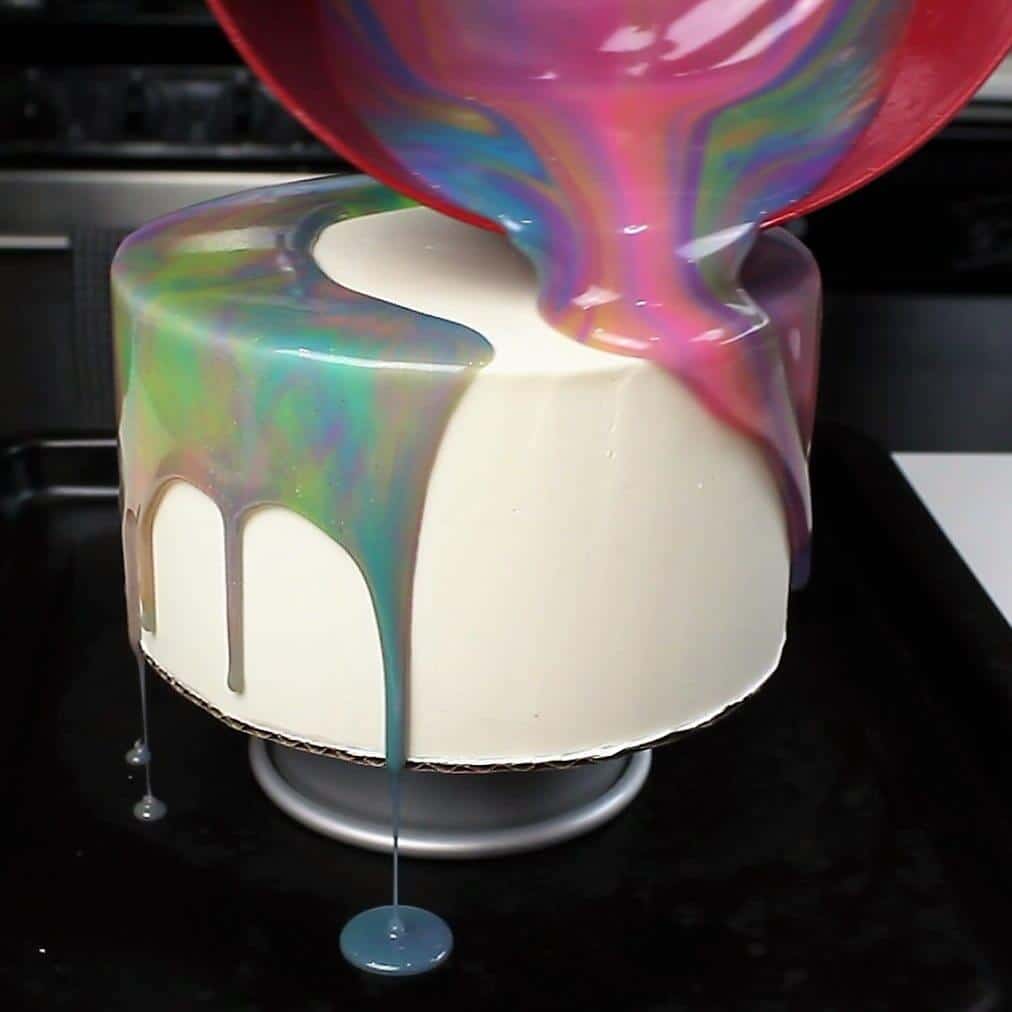
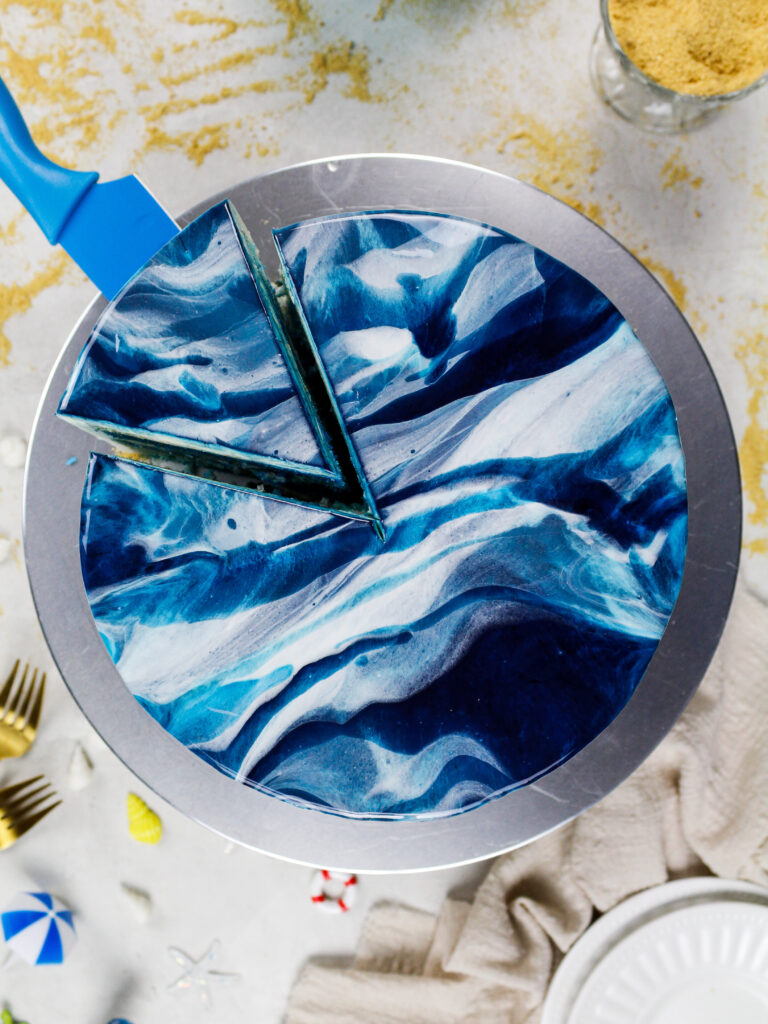
Begin pouring the mirror glaze over the center of the cake, then slowly work your way out to the edges. Drizzle additional colors over the base glaze to create a beautiful, marbled look. Once the cake is fully covered, sprinkle a bit of edible glitter over the top.
Let the glazed cake sit for about 10 minutes, then use a small offset spatula to scrape away any drips from the cake board.
The glaze should be mostly set at this point. Place the cake in the fridge if you don’t plan to eat it within a few hours.
Tips for Making the Best Mirror Glaze Cake
- This recipe can be used on any type of buttercream cake that is properly chilled. I do not recommend pouring it over a cake covered in whipped cream.
- Make the cake on a cake board that is the same size as the cake layers. It allows the glaze to drip directly off the bottom of the cake and makes it easier to get a clean, finished look.
- Don’t use this mirror glaze recipe on fondant. It can do weird things to the fondant and create a goopy mess.
- I prefer using mini white chocolate chips in this recipe, but any good-quality white chocolate chip or finely chopped white chocolate bar will work.
- The glaze should be thin enough to pour over the cake, but thick enough that it is opaque and has a vibrant color. If you start to pour and it seems too thick or thin, adjust the temperature as needed to get it to the consistency.
- Do not use flavored Jello in place of the unflavored gelatin in this recipe.
Making This Recipe in Advance & Storage Tips
If you plan to eat the cake within a few hours after pouring the glaze, leave it out at room temperature.
If you pour the glaze in advance, store the cake in the fridge. Remove the cake from the fridge a couple hours before you plan to cut into it.
Make this mirror glaze ahead of time or save leftovers! Once it’s made, wrap the bowl or container with plastic wrap and store in the fridge for up to a week.
To use chilled glaze, heat the bowl into the microwave for 15-20 second intervals until it reaches 90 F / 32 C and is the right consistency.
Use leftover glaze to top cupcakes, cookies, or even ice cream!
Let Me Know What You Think!
If you try this easy mirror glaze recipe, I’d love to hear what you think of it! Please leave a rating comment below.
Tag me @chelsweets and use #chelsweets so I can see your beautiful creations on social media!
Other Recipes You Might Like:
Easy Mirror Glaze Recipe
Mirror glaze cakes don't have to be hard! This simple recipe only uses 5 ingredients and can be poured over a chilled buttercream cake.
Ingredients
Mirror Glaze Recipe
- 2 1/2 tsp or 1 envelope of powdered unflavored gelatin (7g), bloomed in 1/4 cup of additional water
- 1 1/2 cups granulated sugar (300g)
- 3/4 cup water, room temp (180ml)
- 2/3 cup sweetened condensed milk (170g)
- 2 cups miniature white chocolate chip (350g)
Equipment
- digital thermometer
- gel food coloring
- microwave
Instructions
- Begin by mixing 1 envelope of about 2 1/2 tsp of gelatin in a bowl with 1/4 cup of water. Set aside to let the gelatin bloom while you begin the glaze.
- Pour 1 1/2 cups of granulated sugar, 3/4 cup of water, and 2/3 cup sweetened condensed milk in a heatproof bowl.
- Heat for 90 seconds on high power in the microwave. Remove the mixture from the microwave and give it a good stir. The sugar should be mostly if not fully dissolved at this point. If it isn't, heat the mixture in additional 10 second intervals until it is.
- Add in the bloomed gelatin and whisk until the gelatin is fully dissolved.
- Melt the white chocolate chips in the microwave by heating them in 15 second intervals, stirring between each interval. Once the white chocolate is fully melted, pour the white chocolate into the warm gelatin mixture.
- Carefully whisk mixture until fully combined. Pour through a sieve to remove any bits of unmelted chocolate or stubborn bits of gelatin.
- Divide the glaze evenly between four bowls. Color them different shades using gel food coloring. To create this galaxy mirror glaze, color them blue, purple, black, and pink.
- Continue to stir occasionally (to prevent a skin from forming) until the glaze has reached 90 F / 32 C, or is just slightly warm to the touch.
- Pour each color of glaze back into one large bowl, alternating colors and drizzling the colors together as you pour them.
- Place a chilled buttercream cake (in the freezer at least 10 minutes or the fridge for 1 hour) on top of a circular object smaller than the cake board, and set this on top of large, rimmed baking sheet to catch the run-off glaze.
- Begin pouring the glaze over the center of the cake, then slowly work your way out to the edge of the cake in a circular motion until the cake is fully covered.
- Let the glaze drip for about 10 minutes, then scrape away any excess glaze from the bottom of the cake board using a small offset spatula.
Notes
Yield: One batch of this mirror glaze makes about 4 cups, which is more than enough glaze to cover one, eight-inch layer cake.
Tips for Making the Best Mirror Glaze Cake
- This recipe can be used on any type of buttercream cake that is properly chilled. I do not recommend pouring it over a cake covered in whipped cream.
- Make the cake on a cake board that is the same size as the cake layers. It allows the glaze to drip directly off the bottom of the cake and makes it easier to get a clean, finished look.
- Don't use this mirror glaze recipe on fondant. It can do weird things to the fondant and create a goopy mess.
- I prefer using mini white chocolate chips in this recipe, but any good-quality white chocolate chip or finely chopped white chocolate bar will work.
- The glaze should be thin enough to pour over the cake, but thick enough that it is opaque and has a vibrant color. If you start to pour and it seems too thick or thin, adjust the temperature as needed to get it to the consistency.
- Do not use flavored Jello in place of the unflavored gelatin in this recipe.
Making This Recipe in Advance & Storage Tips
If you plan to eat the cake within a few hours after pouring the glaze, leave it out at room temperature.
If you pour the glaze in advance, store the cake in the fridge. Remove the cake from the fridge a couple hours before you plan to cut into it.
Make this mirror glaze ahead of time or save leftovers! Once it's made, wrap the bowl or container with plastic wrap and store in the fridge for up to a week.
To use chilled glaze, heat the bowl into the microwave for 15-20 second intervals until it reaches 90 F / 32 C and is the right consistency.
Use leftover glaze to top cupcakes, cookies, or even ice cream!
Nutrition Information
Yield
4Serving Size
1Amount Per Serving Calories 919Total Fat 31gSaturated Fat 19gTrans Fat 0gUnsaturated Fat 10gCholesterol 35mgSodium 151mgCarbohydrates 153gFiber 0gSugar 152gProtein 12g
Jackie
Sunday 30th of October 2022
Hi Chelsey! Love this easy recipe! Really very help! Just have one question, my galze seem to be very runny... Almost ran completely off the cake the longer I felt it to stand... Where is my problem?
Thank you! Jackie
Chelsweets
Saturday 5th of November 2022
Hi Jackie,
It could be two things! My first guess is that you might have had some condensation on your cake? Do you live in a warm or humid place? Or was your kitchen quite warm? sometimes frozen cakes can sweat, and this can cause the glaze to kind of slide off the cake!
My second guess would be that the glaze might have been a little bit too warm when you poured it. Hopefully it's one of those, but if not let me know and we'll try to figure it out together <3
Therese
Sunday 16th of October 2022
I just used this recipe over the weekend and it was easy to use and delicious! I have also been using your American Buttercream Recipe since earlier this year and love that one as well!
Chelsweets
Monday 17th of October 2022
Hi Therese,
So happy to hear that!! I'm so glad you loved this recipe too. Thank you for sharing :)
Andy
Wednesday 12th of October 2022
How would I make a black mirror glaze ? I want it to look thick and black, like tar ! Thank you, Andy
Chelsweets
Friday 14th of October 2022
Hi Andy,
I'd recommend using a chocolate mirror glaze base and coloring it with black gel food coloring. I don't have a chocolate mirror glaze recipe, but here is a link to a great one: https://www.recipetineats.com/chocolate-mirror-glaze/
Hope that helps, happy baking!
NT
Monday 10th of October 2022
Hi! Do you have any tips on moving the cake once glazed? Placing it on an upside down mason jar makes sense but in order to move it to a cake stand I'd need to make sure I only touch the bottom? Or do I use a knife or something to lift it off? Thank you!
Chelsweets
Friday 14th of October 2022
Hi Nihara,
Great question! I like to use a large offset spatula to help lift the cake once it's glaze and carefully place it on it's final plate. I do this really carefully and do only touch the bottom cake board. If you let the glaze fully set, it should have an almost jelly texture and it's a lot easier / more forgiving to move. Hope that helps, happy baking!
Emma
Monday 10th of October 2022
Hey!
I wondered if you could clarify the measurement of gelatine please? I've watched your video on youtube of this recipe and on there the recipe in the description uses 2 tablespoons unflavoured gelatine but in the video you use two sachets (14g) where as this blog recipe says 2.5 teaspoons of gelatine with 7g in brackets and all the other ingredients have the same amounts as written in this blog post. Just want to make sure I do it right and it sets. Any help would be greatly appreciated! Thank you in advance and the mirror glaze looks amazing!
Chelsweets
Friday 14th of October 2022
Hi Emma,
The recipe card is the most up to date! The YouTube video is from 6 years ago, and the original recipe made more than twice as much mirror glaze. I've reduced the overall yield of the recipe because I don't think you that much to cover a cake. That is why the recipe card uses less gelatin than the video. Please follow the amounts listed in the recipe :) Happy baking!