
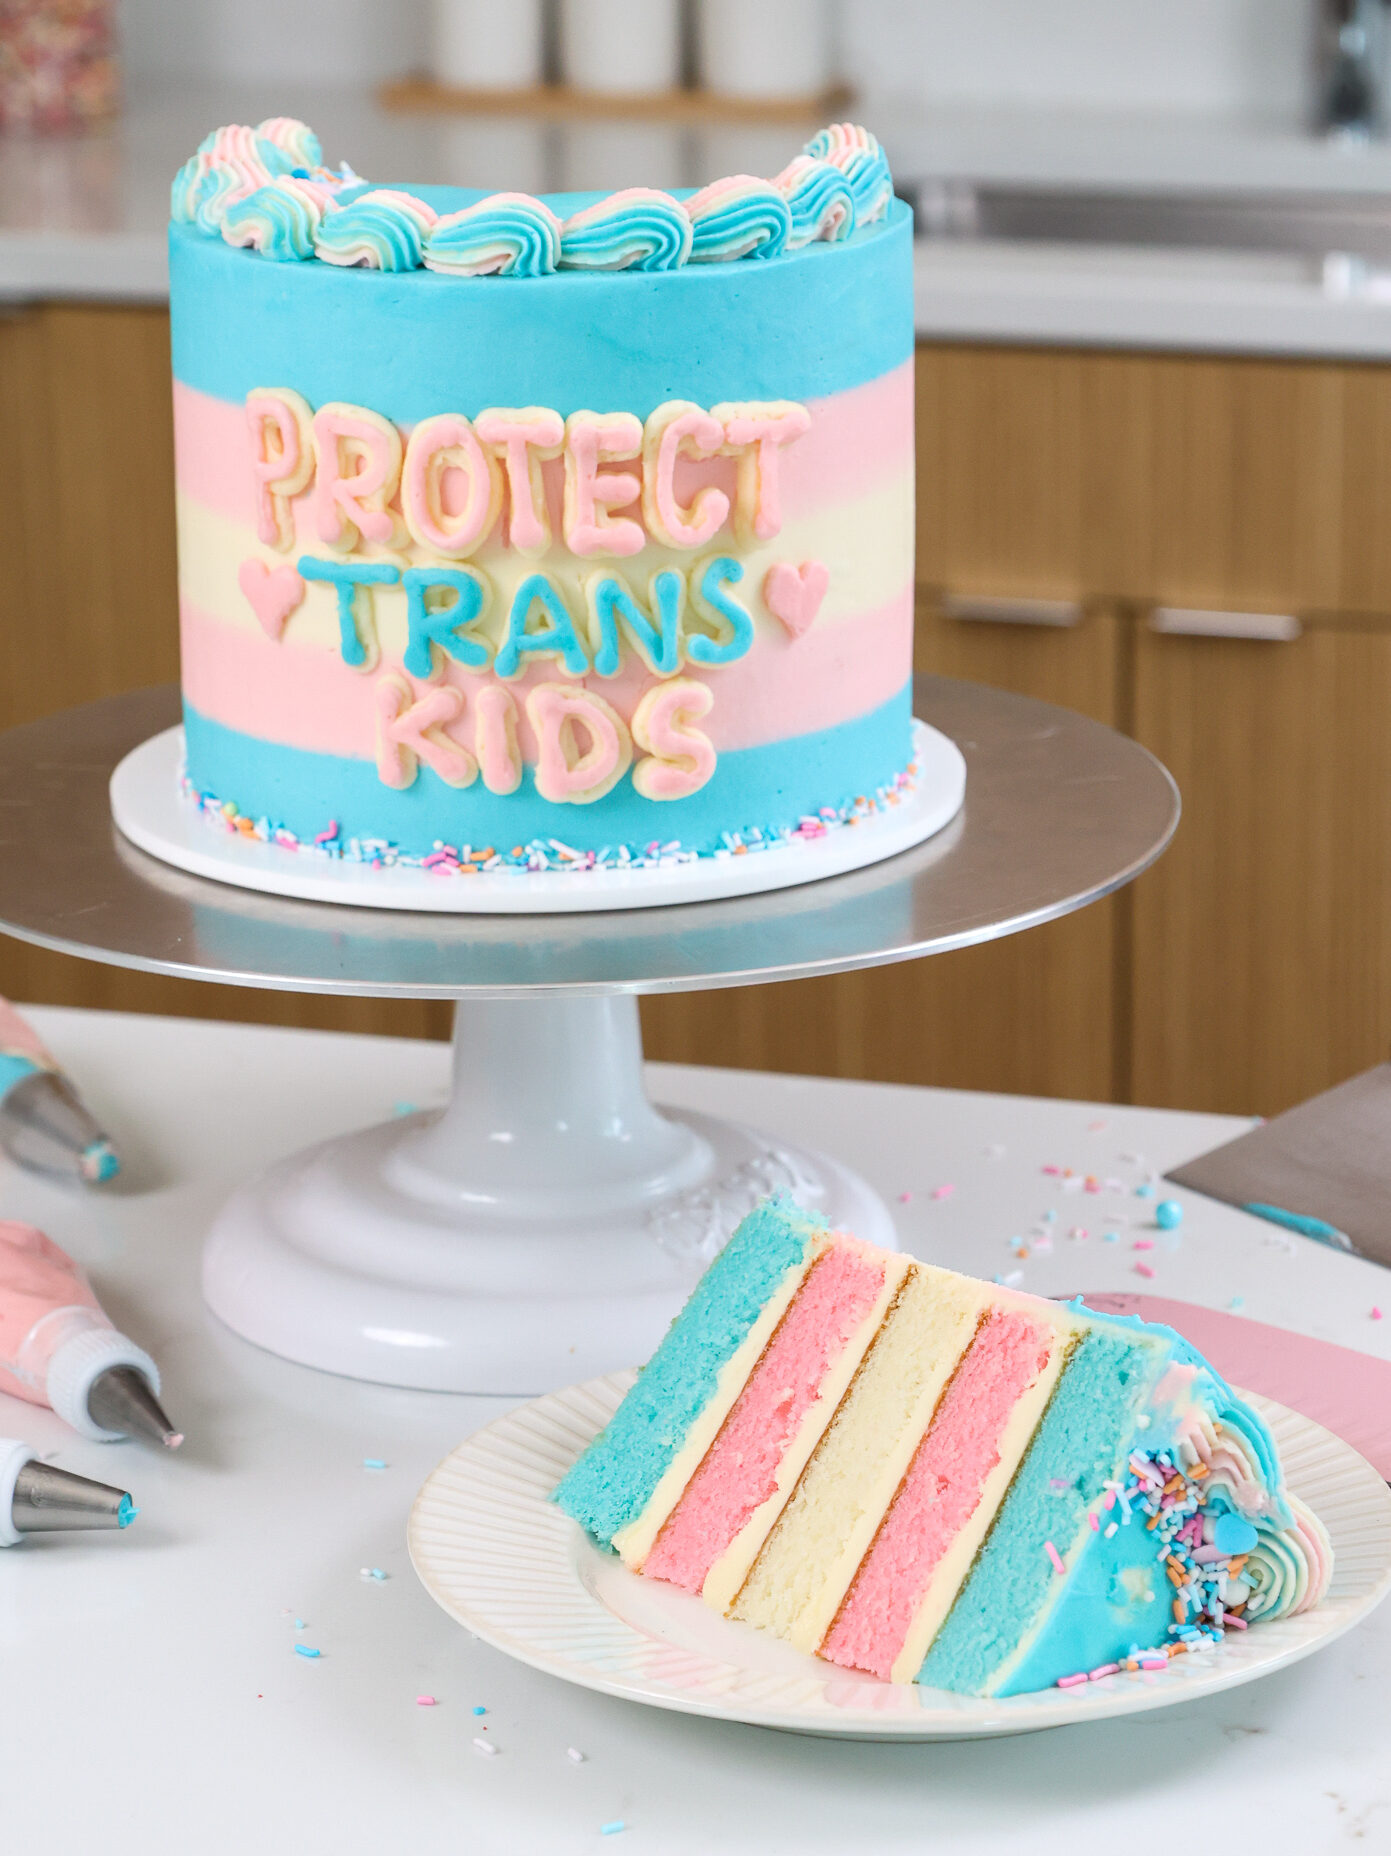
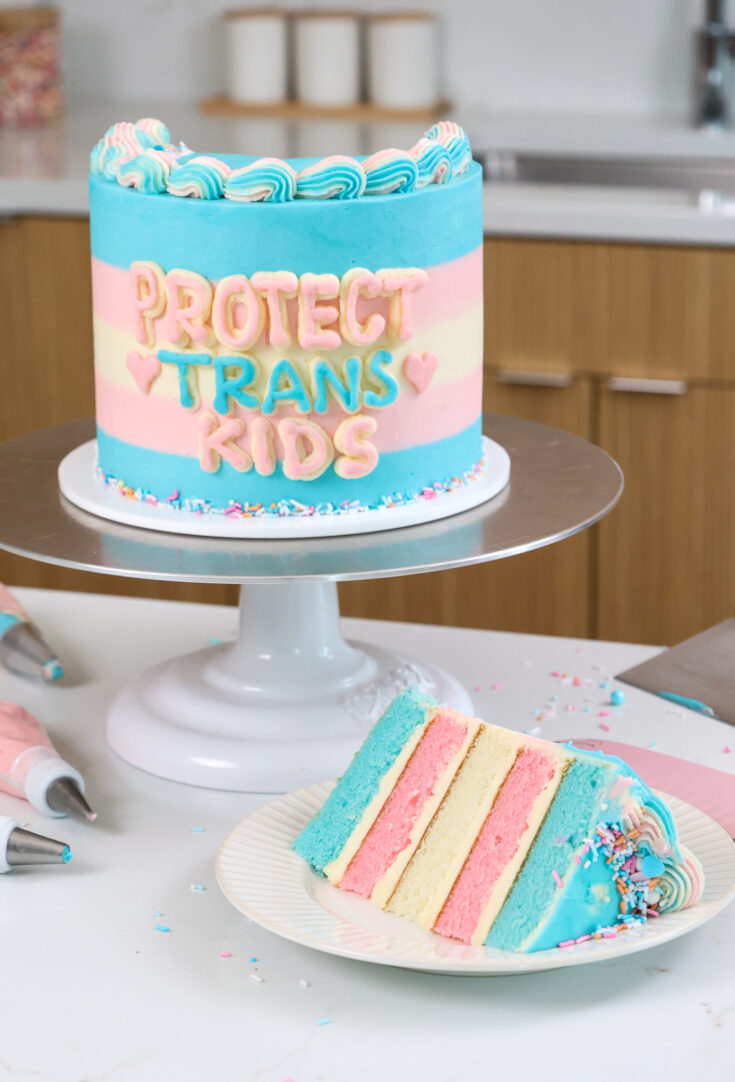
Cakes are one of my favorite ways to celebrate, and this year for Pride I want to celebrate the trans community with this trans flag cake.
Forbes reported that 52% of all transgender and nonbinary young people in the U.S. seriously contemplated suicide in 2020.
Over half thought it would be better to be dead than to live with the rejection, bullying, and hate from politicians and activists pushing anti-trans legislation.
These statistics are heartbreaking. And while I don’t think making a trans flag cake is going to change that, I do think representation matters.
I hope sharing this helps someone out there feel supported and a little less alone.
All proceeds from this post will be donated to the Trans Lifeline, and I highly recommend donating if you can.
Other ways you can support the trans community include calling or writing your local representatives. 26 states are attempting to ban trans girls from playing sports and 17 are attempting to ban gender-affirming healthcare for them.
If your state is not one of those attempting to pass this legislation, you can still call your representatives to find out how they are working to support transgender youth.
The Components of This Trans Flag Cake
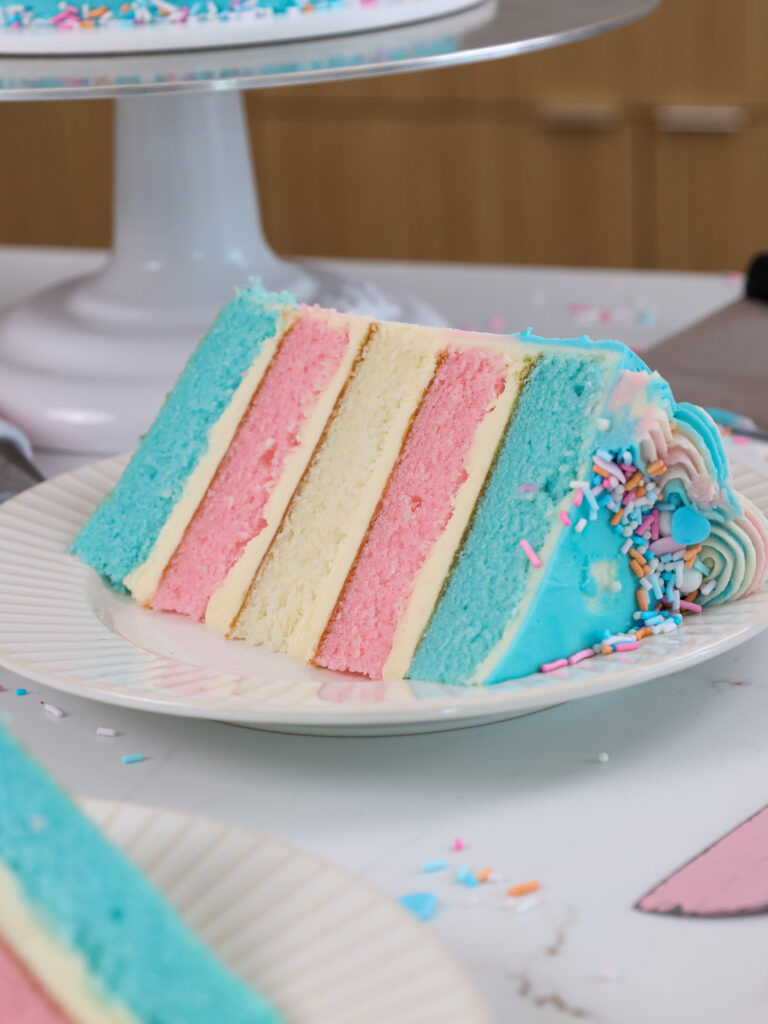
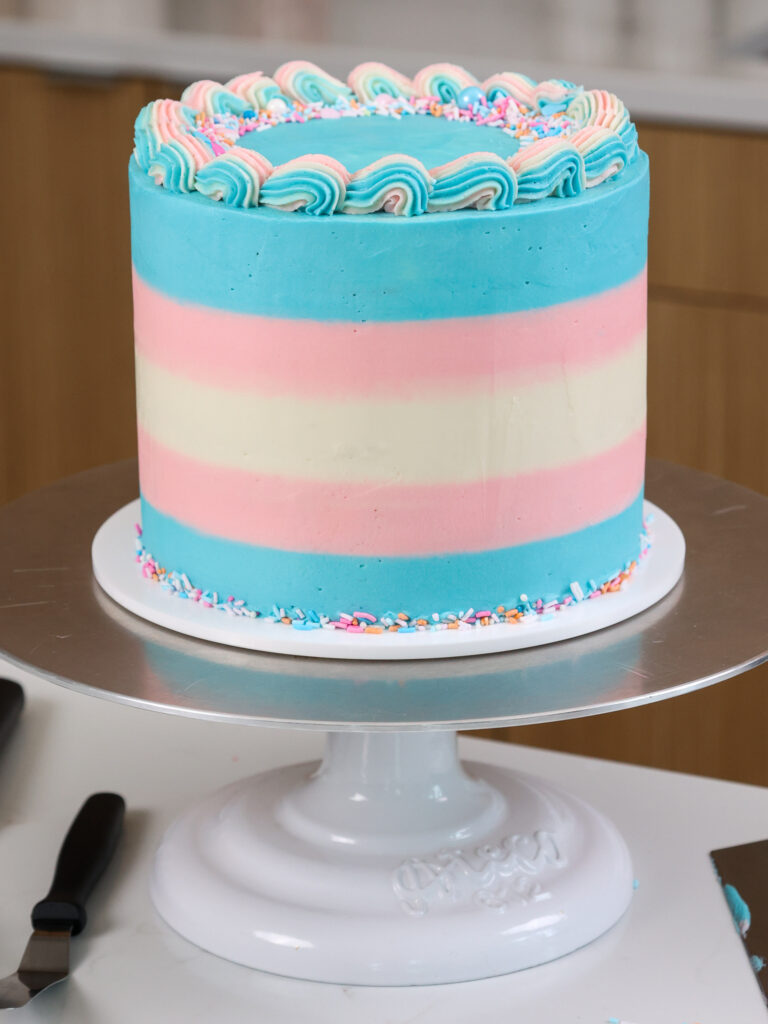
I wanted this cake to look just like the trans flag, so the cake layers and frosting match its mirrored blue, pink, and white stripes.
Both the cake layers and frosting are colored with gel food coloring. Natural coloring can be used as well, but the colors might end up a slightly different shade.
This cake is made with fluffy vanilla cake layers and frosted with my sweet American buttercream.
If you want to use a less sweet frosting, I recommend trying my Swiss meringue buttercream or my condensed milk frosting.
How to Make This Trans Flag Cake
To make sure this cake turns out as amazing as possible, let’s walk through each step together!
I’ve also included a video tutorial of the process below.
Step 1: Make the Fluffy Vanilla Cake Layers
I recommend making the cake layers first! It gives them time to bake and cool before you assemble the cake.
I made these cake layers with 7-inch pans, but you can also use 8-inch cake pans.
We need to make two blue layers, two pink layers, and one white layer. There are two ways to do this:
- Option 1: Divide the batter evenly between five bowls (about 360g per bowl). Color two of the bowls pink, and two of them blue with gel food coloring. Leave one uncolored.
- Option 2: If you have a kitchen scale, fill two, separate bowls with 720g of batter each. Leave the remaining batter in the mixing bowl uncolored. Color one the bowls with 720g of batter a light pink, and the other bowl light blue.
Next, pour the batter into the prepared pans. If you don’t have enough pans, the extra batter can sit at room temperature.
Bake the layers that you can, let them cool, then clean out the pans and use them to bake the remaining layers.
Let the pans cool for 10 minutes, then run an offset spatula around the perimeter of the pan to separate the cake from the pan.
Place cake layers into the freezer for 45 minutes to accelerate the cooling process.
Once the layers are fully cooled, carefully flip the pans and remove the layers from the pans.
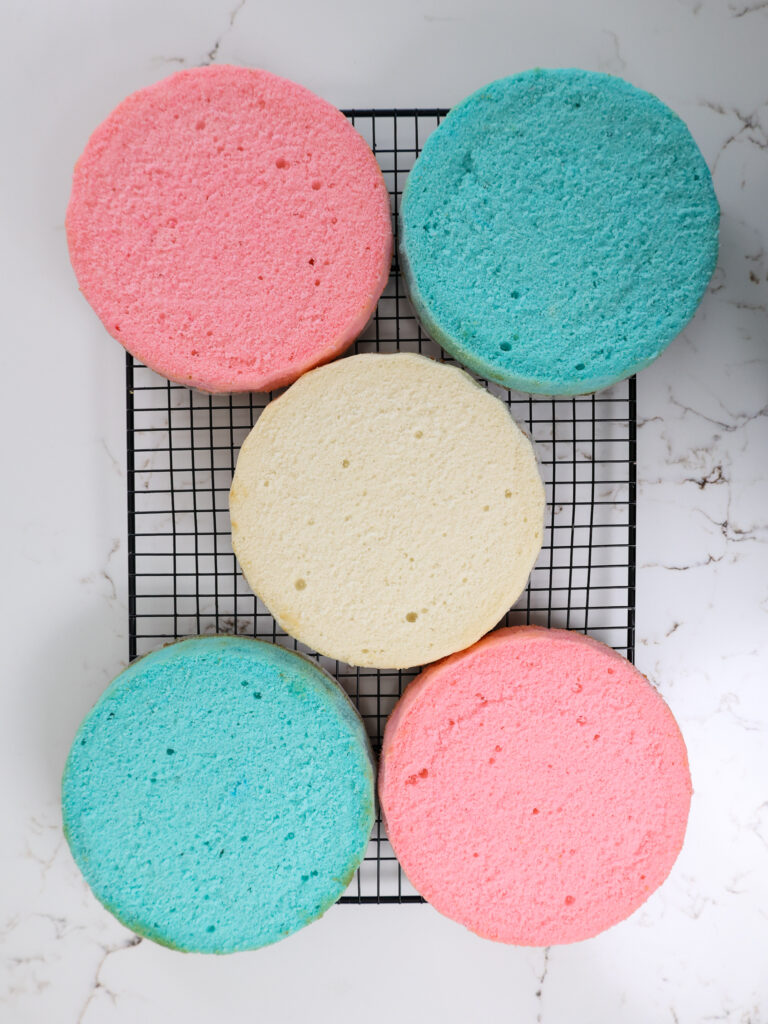
Use a serrated knife to level the top of each cake layer, then set aside. I also trimmed the caramelization from the sides of the cake, but this is optional.
If you make these in advance, wrap and freeze them at this point.
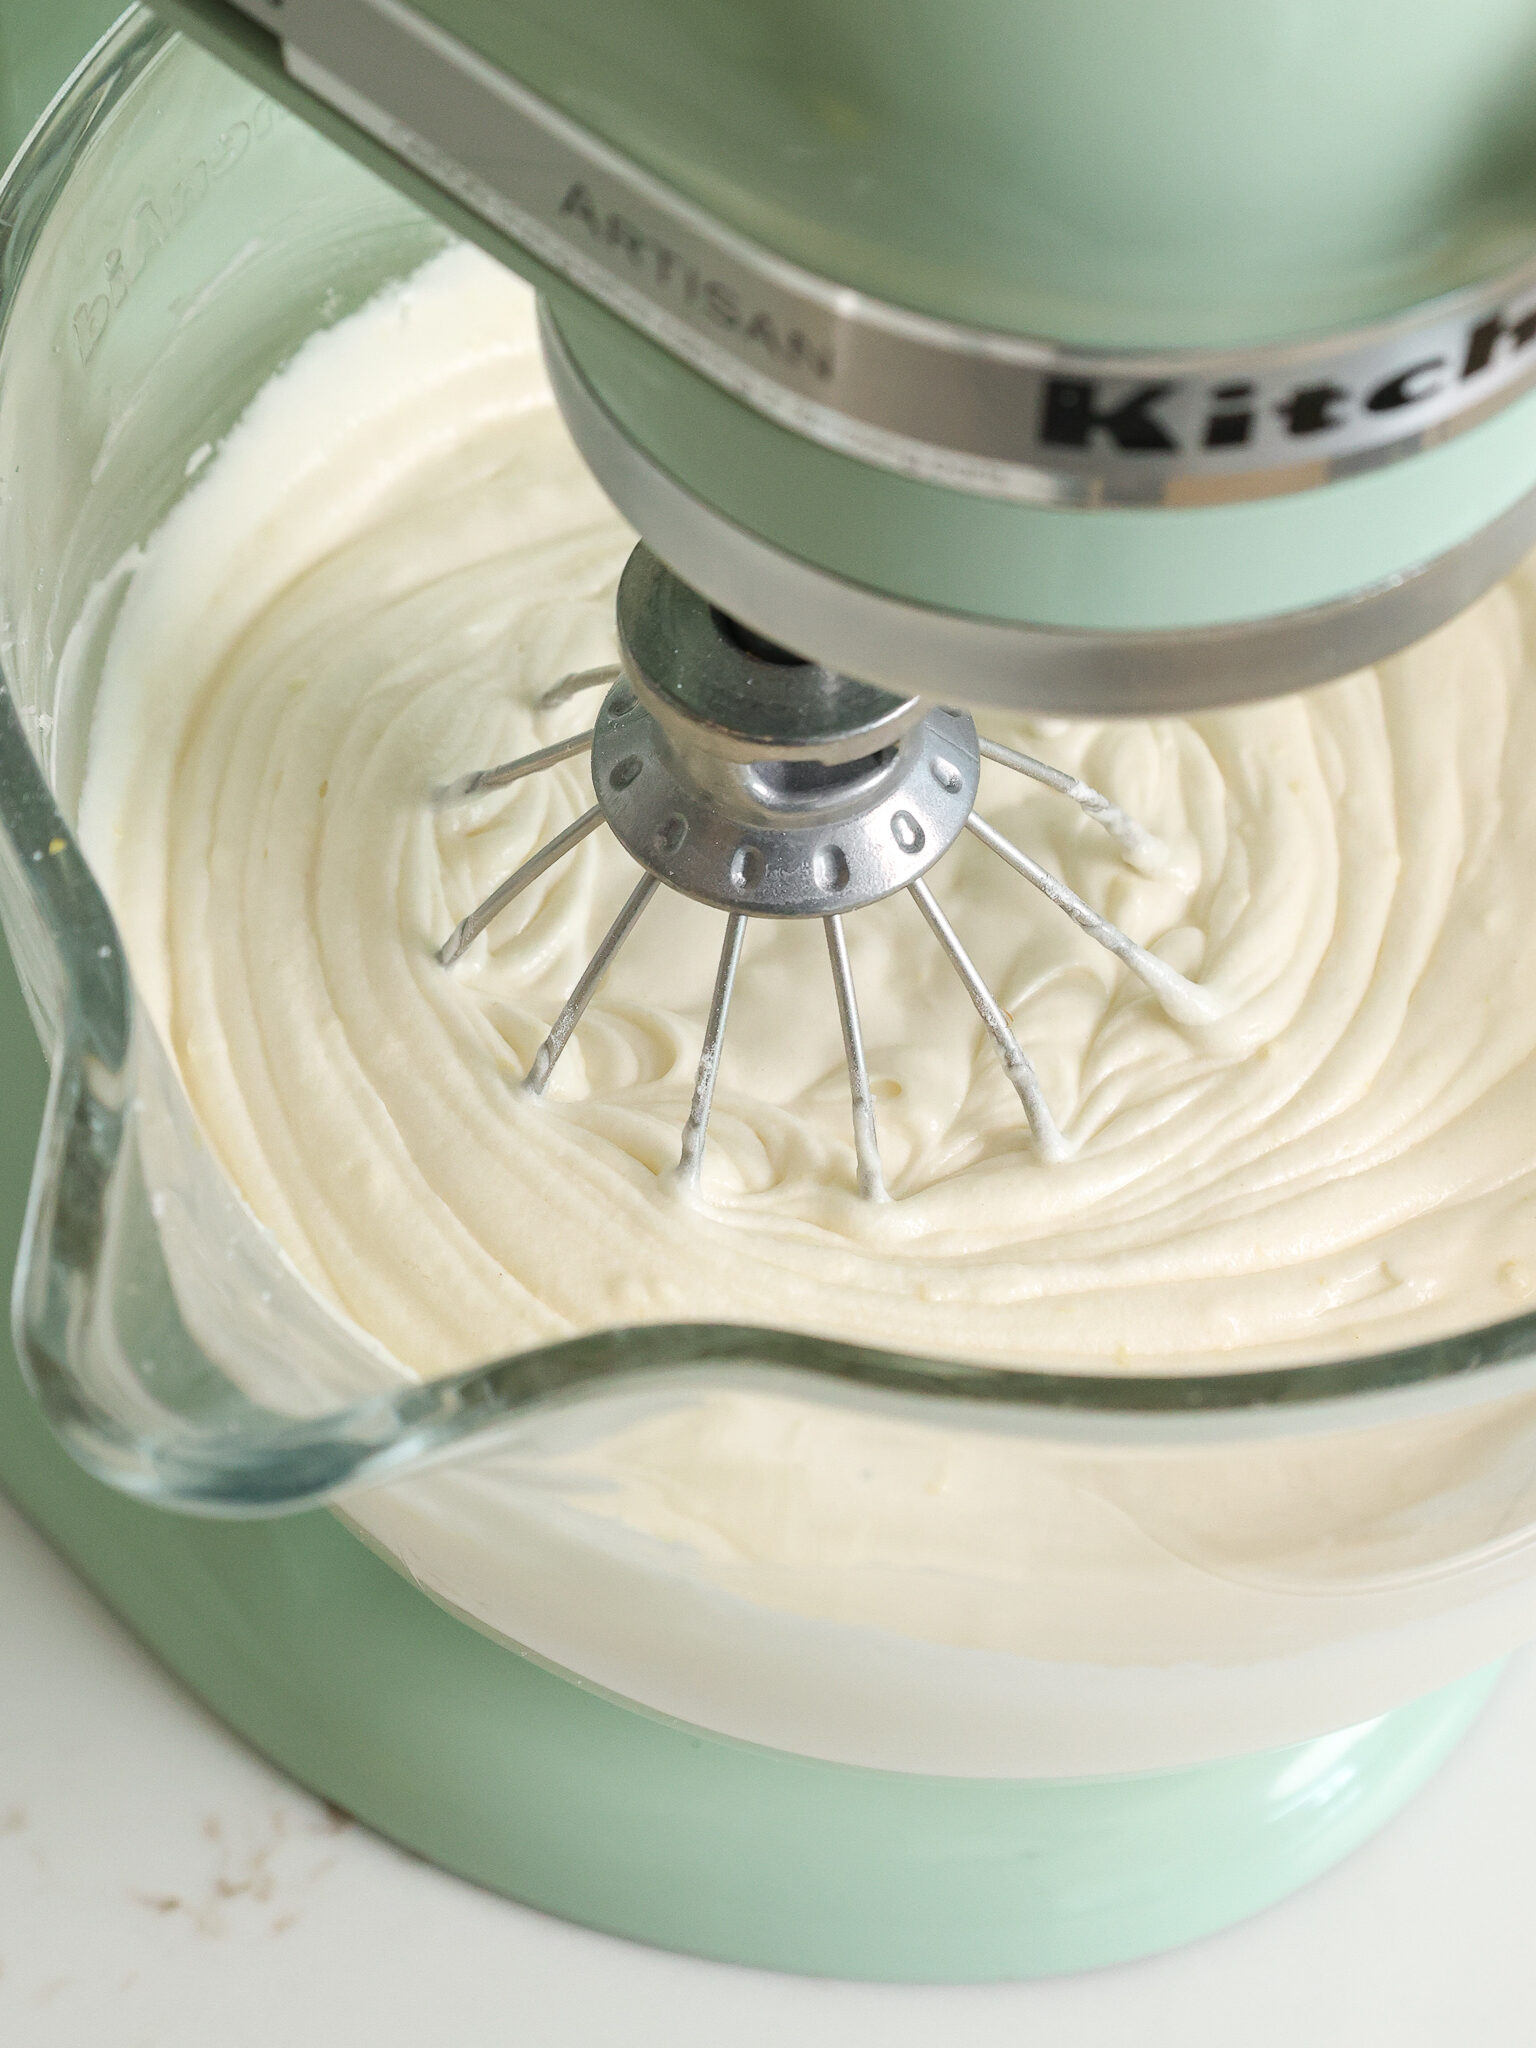
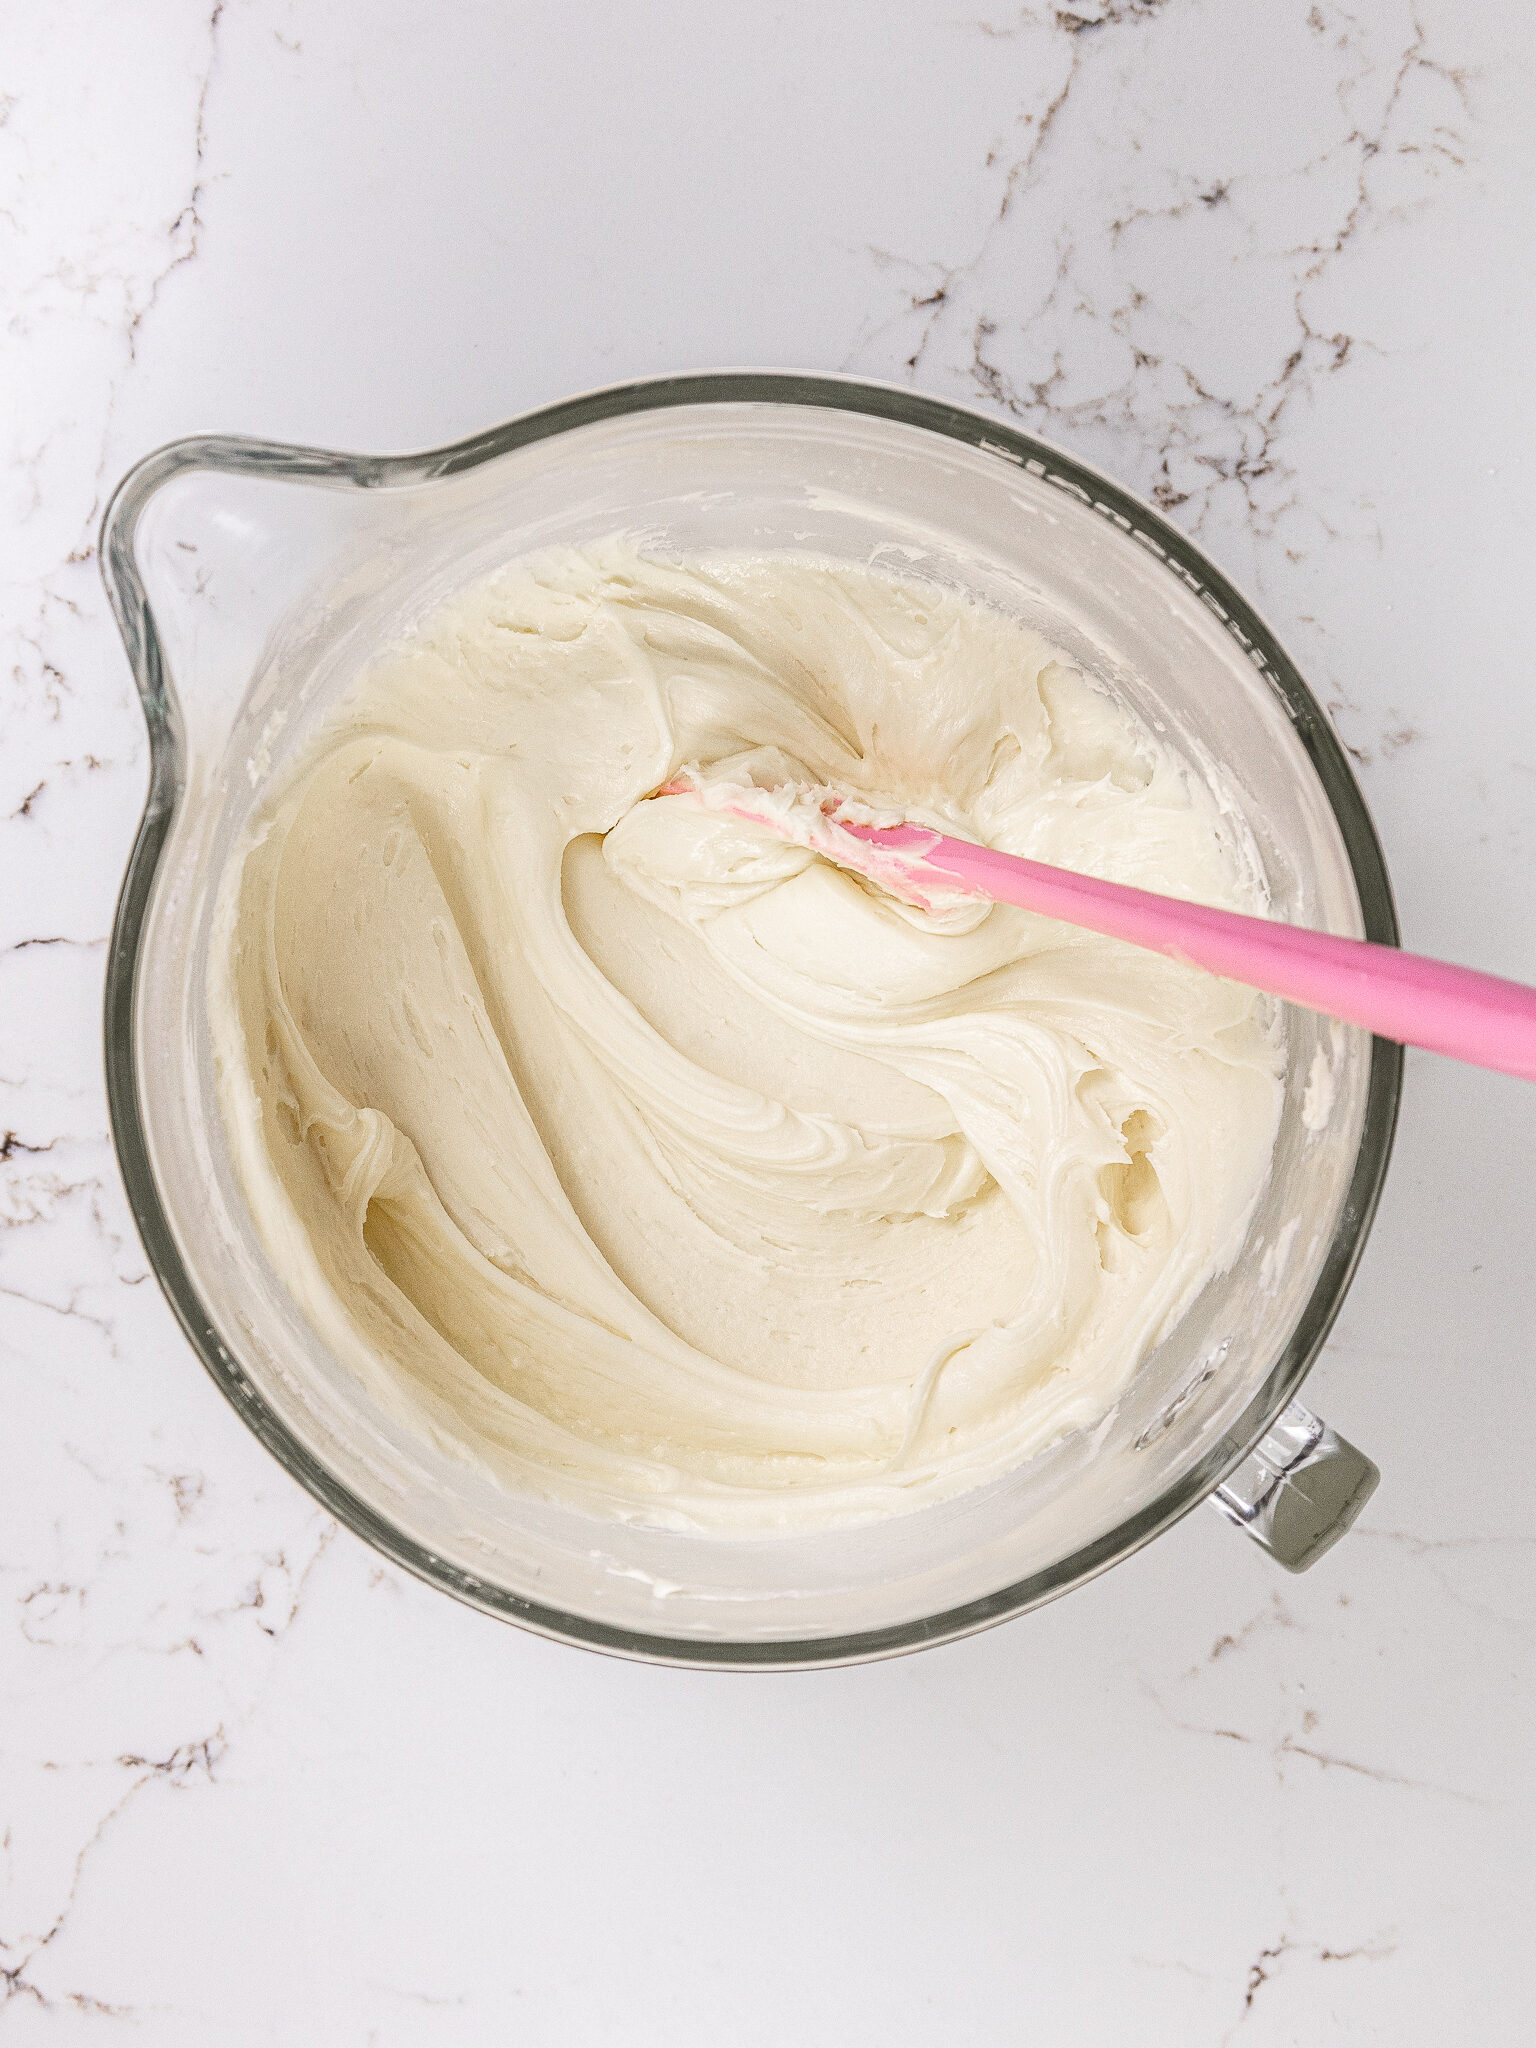
Step 2: Make the Vanilla Buttercream Frosting
While the cake layers bake and cool, make the buttercream frosting.
Mix the frosting by hand with a rubber spatula for a couple minutes once it’s made. This will give it a silky smooth consistency that makes it easier to use.
If the frosting seems too thick, add in additional cream (1 Tbsp at a time). Or if the frosting is too thin, add in more powdered sugar (1/4 cup at a time).
If you’re not sure what consistency you’re look for, check out my buttercream consistency guide.
Cover the frosting with plastic wrap to prevent it from crusting and set aside.
Step 3: Stack and Frost the Cake Layers
If possible, chill your cake layers in the freezer for 20 minutes before assembling the cake.
It makes them cold to the touch, which minimizes crumbing and makes them so much easier to frost and stack.
Stack and frost the cake layers on a greaseproof cake board or flat plate, using a dab of vanilla buttercream to help stick the first cake layer to the board.
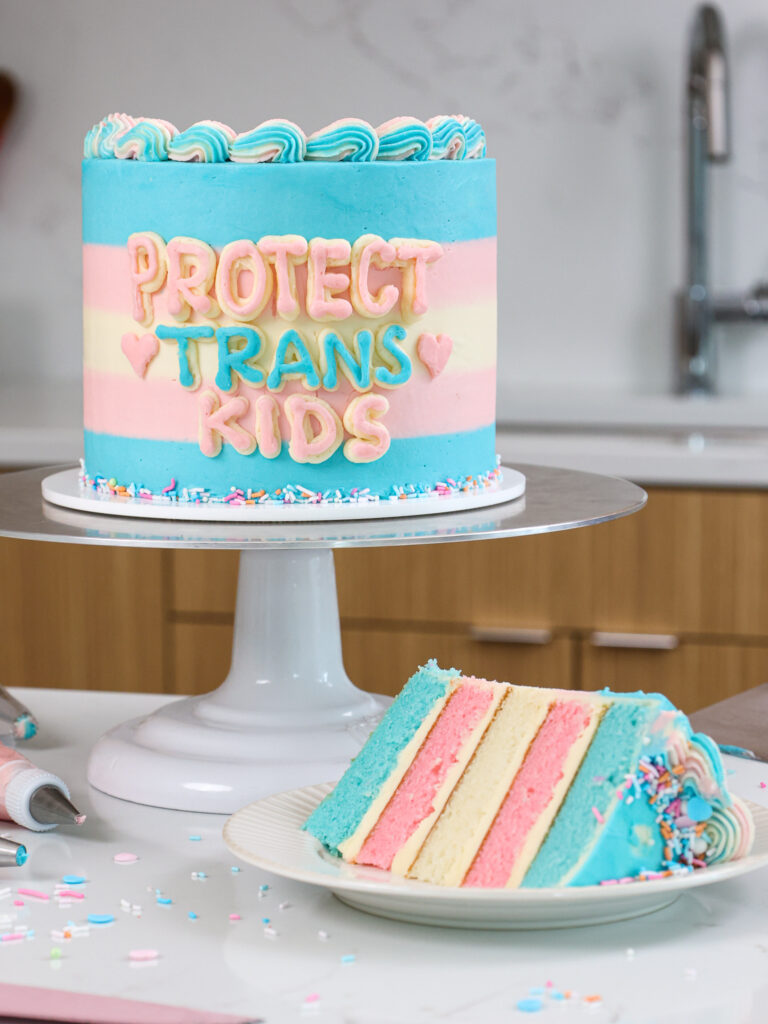
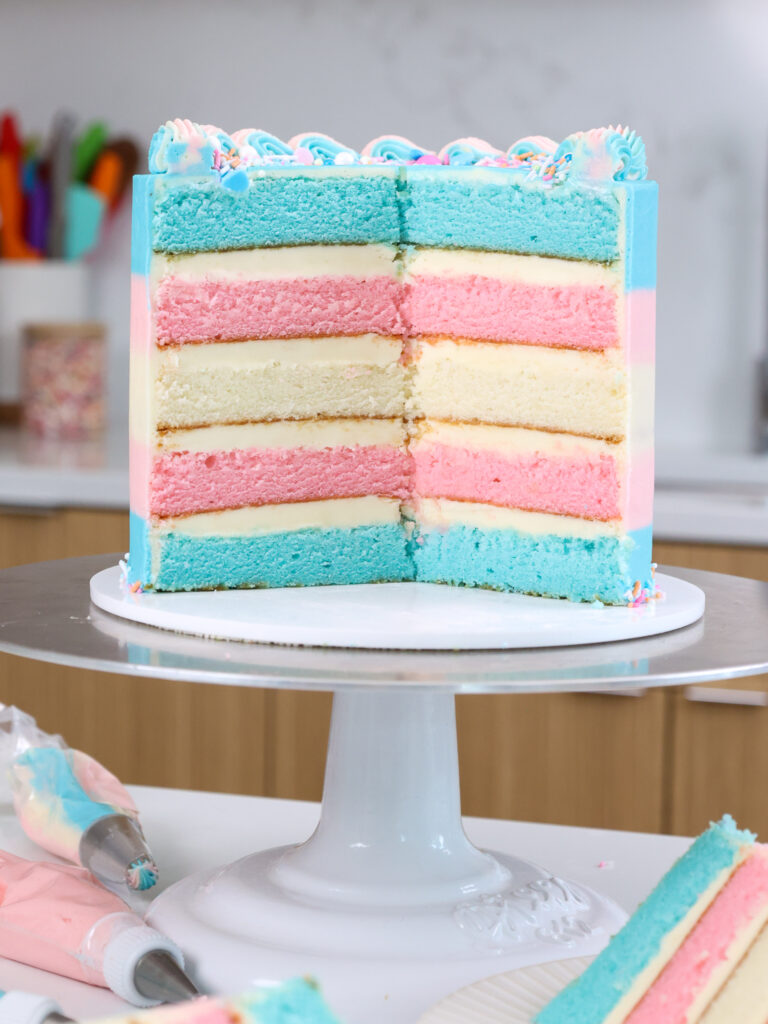
Start with one of the blue layers, and spread a thick, even layer of buttercream on top of it. Repeat this process with the remaining cake layers in the following order: pink, white, pink, blue.
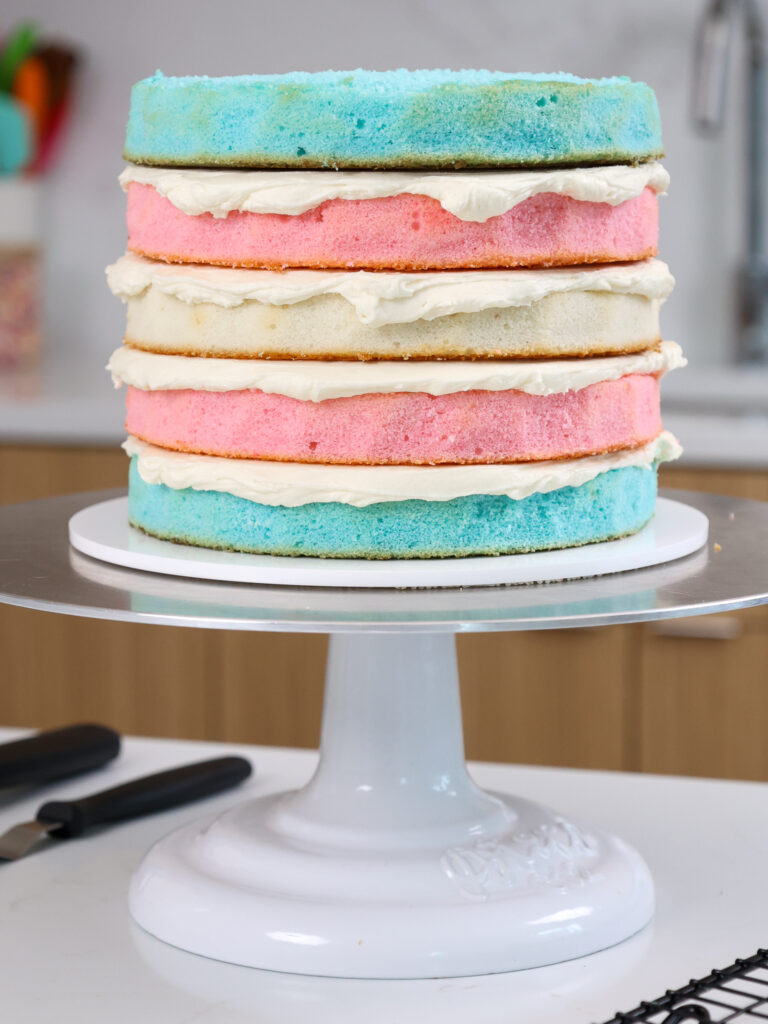
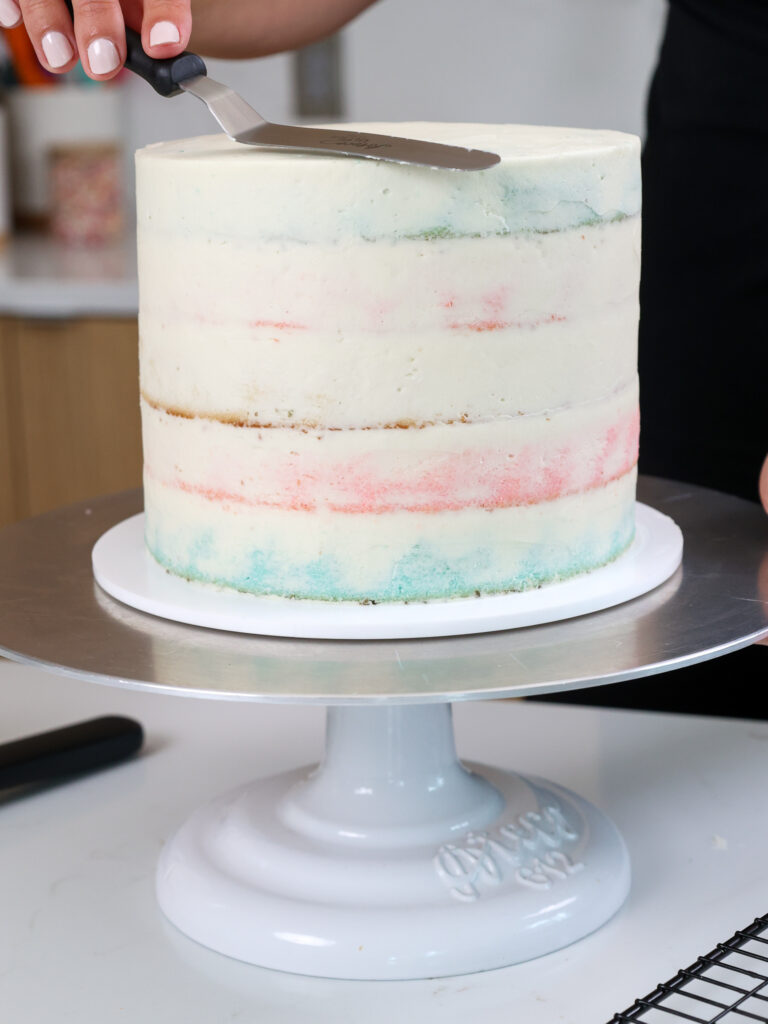
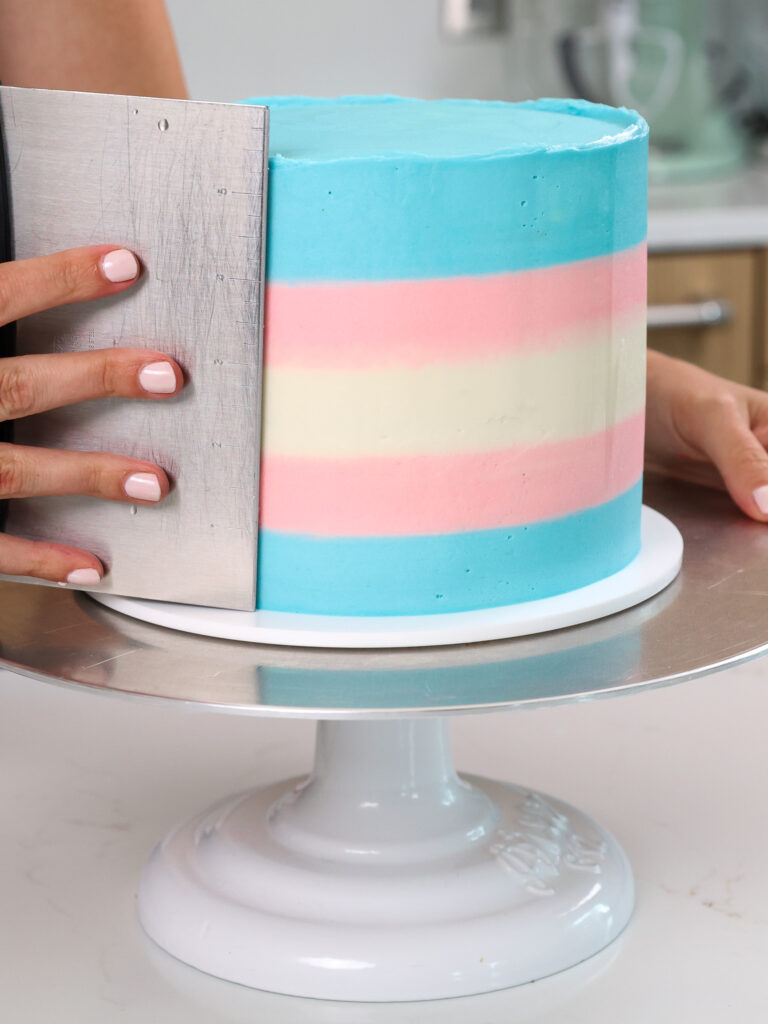
Once you’ve stacked the cake layers, smooth a thin coat of vanilla buttercream around the cake with a large offset spatula and bench scraper.
Freeze the cake for about 10 minutes in the freezer or 30 minutes in the fridge, or until the frosting is firm to the touch.
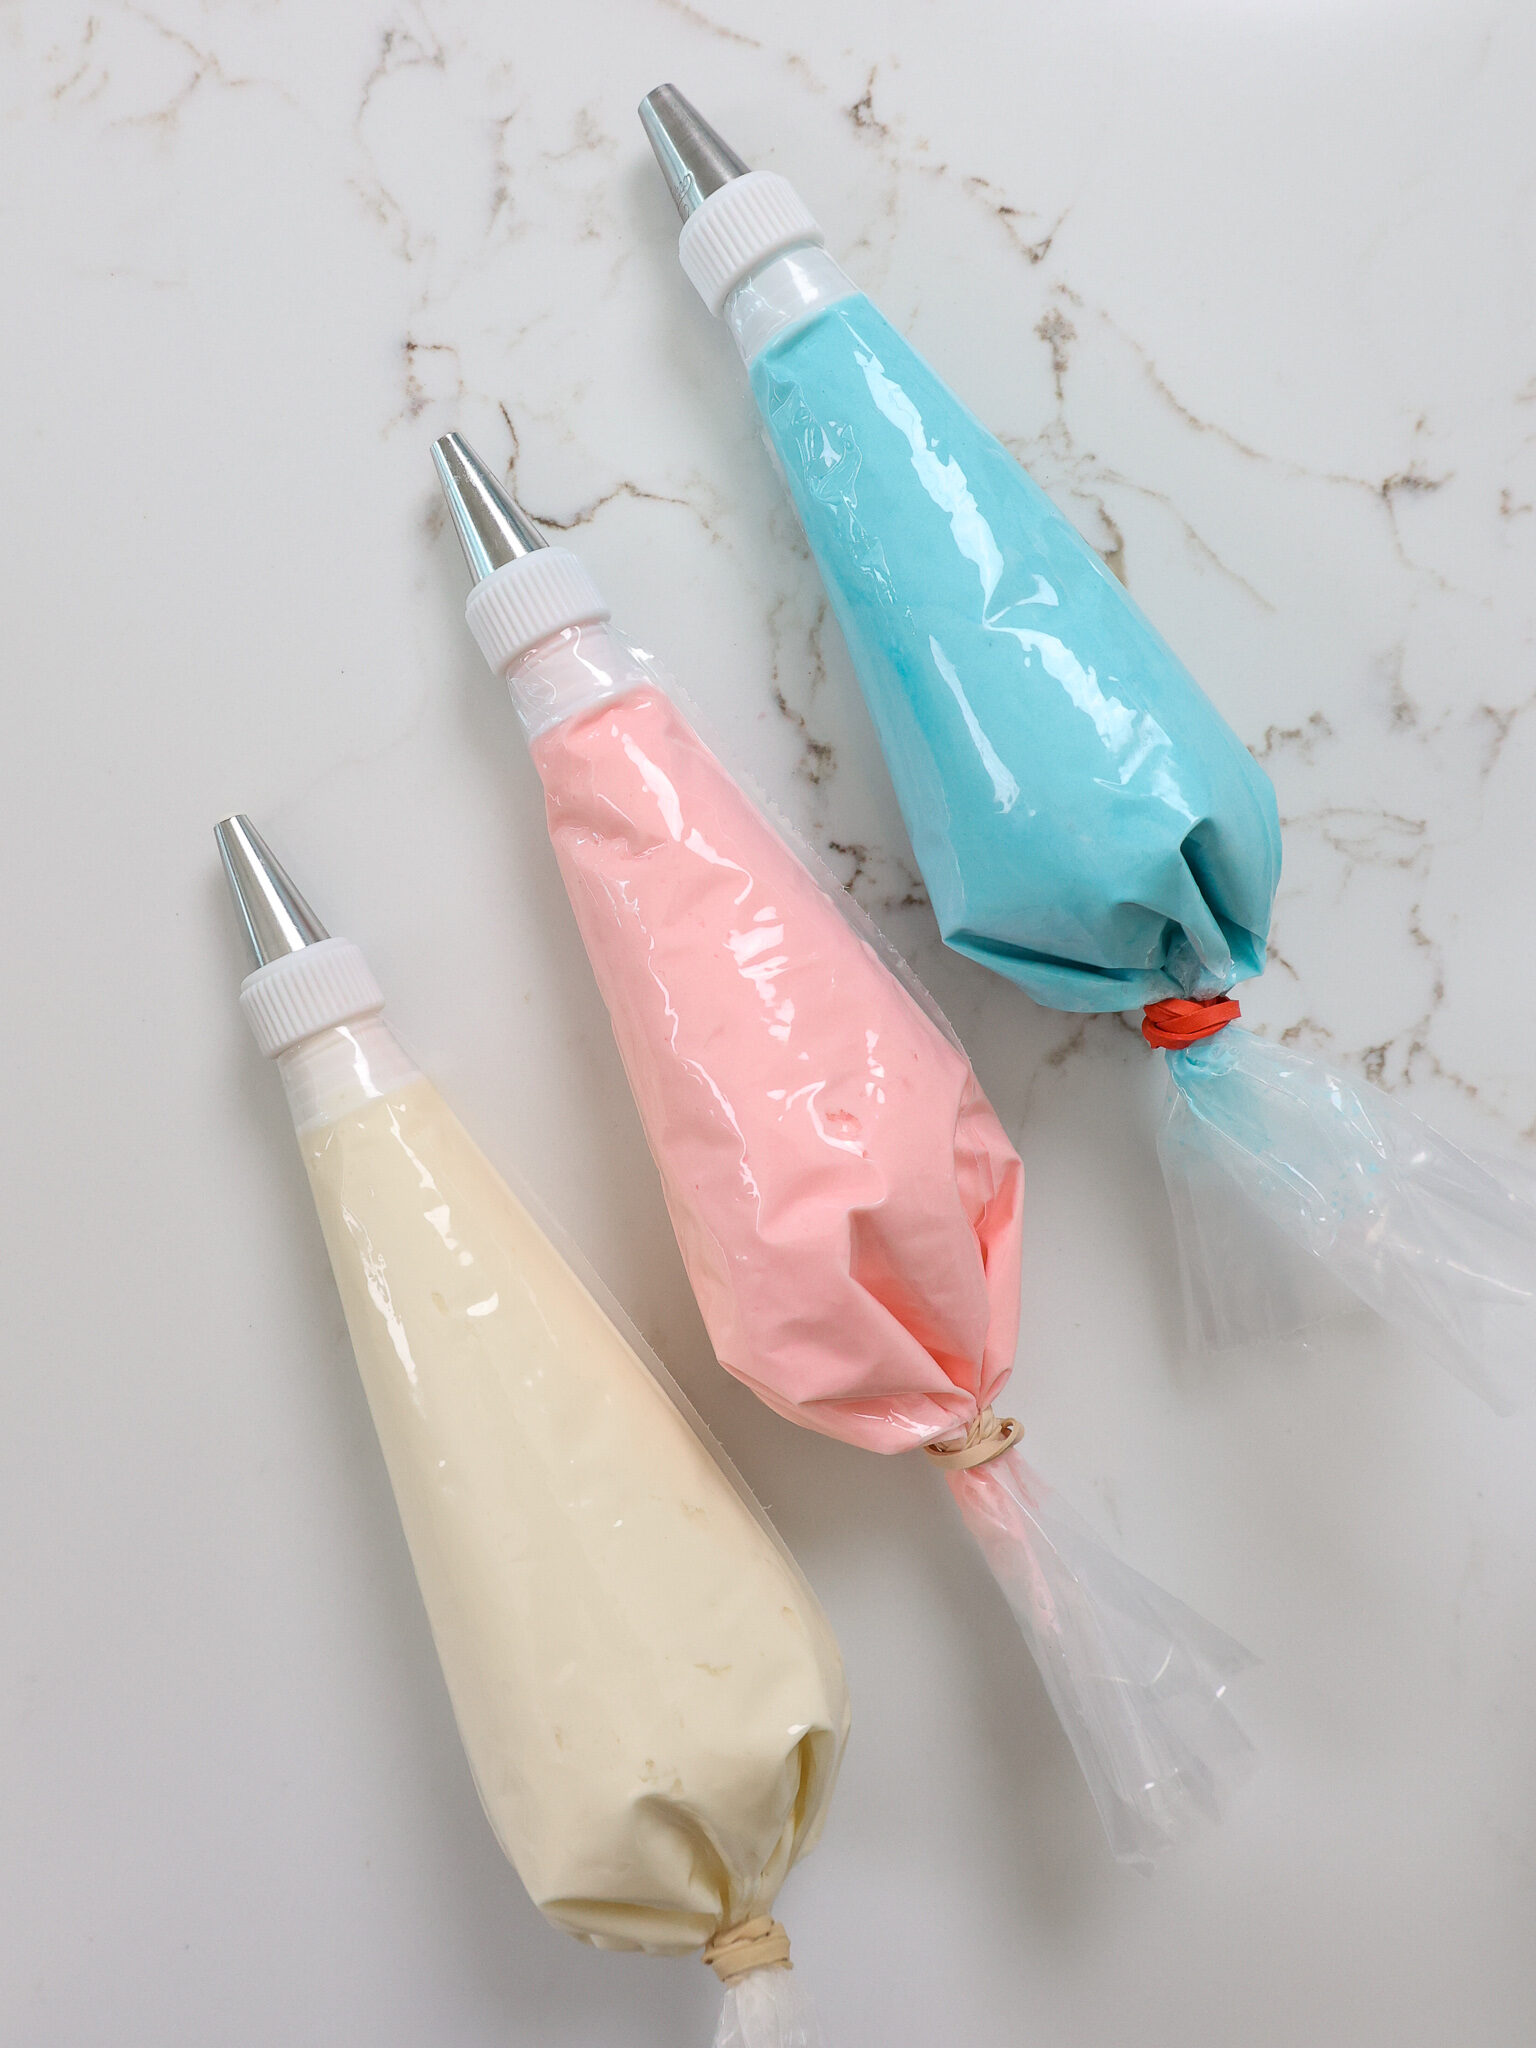
Place 1/4 of the remaining frosting in a small piping bag fit with a small round tip (like a Wilton 10) or cut a small, 1 cm opening at the base of the bag. Set aside.
Add 1/3 of the remaining frosting in a medium-sized bowl and color a light shade of pink with gel food coloring (I used a small drop of deep pink gel food coloring).
Color the remaining buttercream light blue with gel food coloring (I used a small drop of royal blue gel food coloring). You want to have slightly more blue frosting than the other colors, because it is also used to cover the top of the cake.
Place the blue and pink frosting in small piping bags fit with a small round tip (like a Wilton 10) or cut a small, 1 cm opening at the base of each bag.
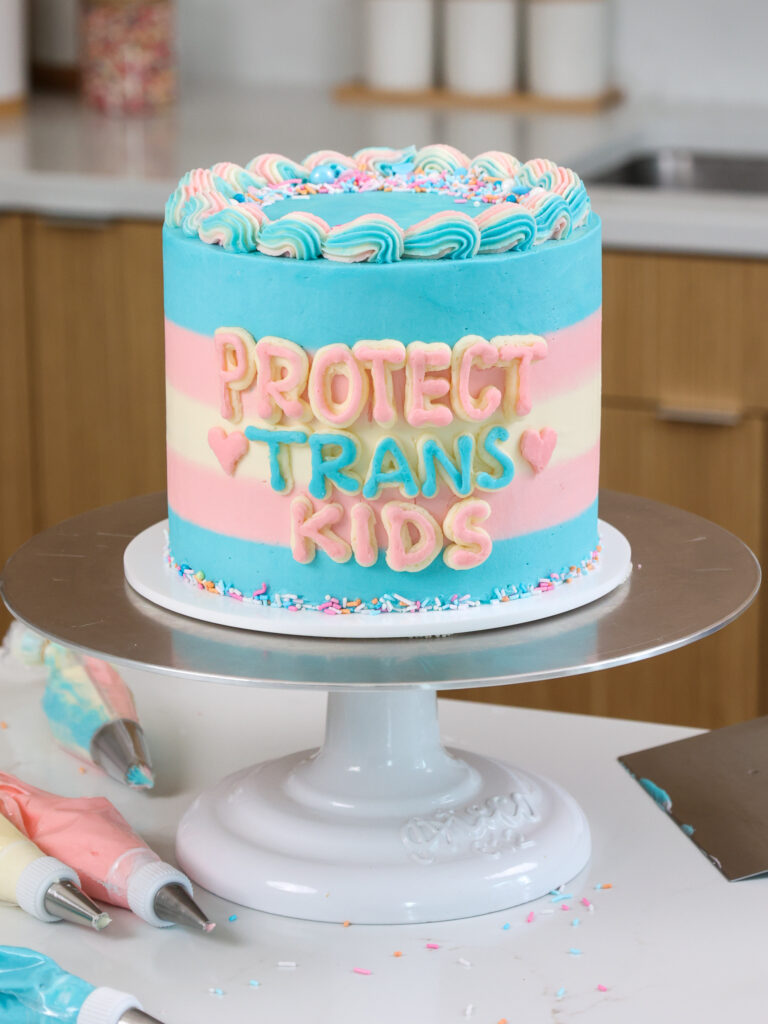
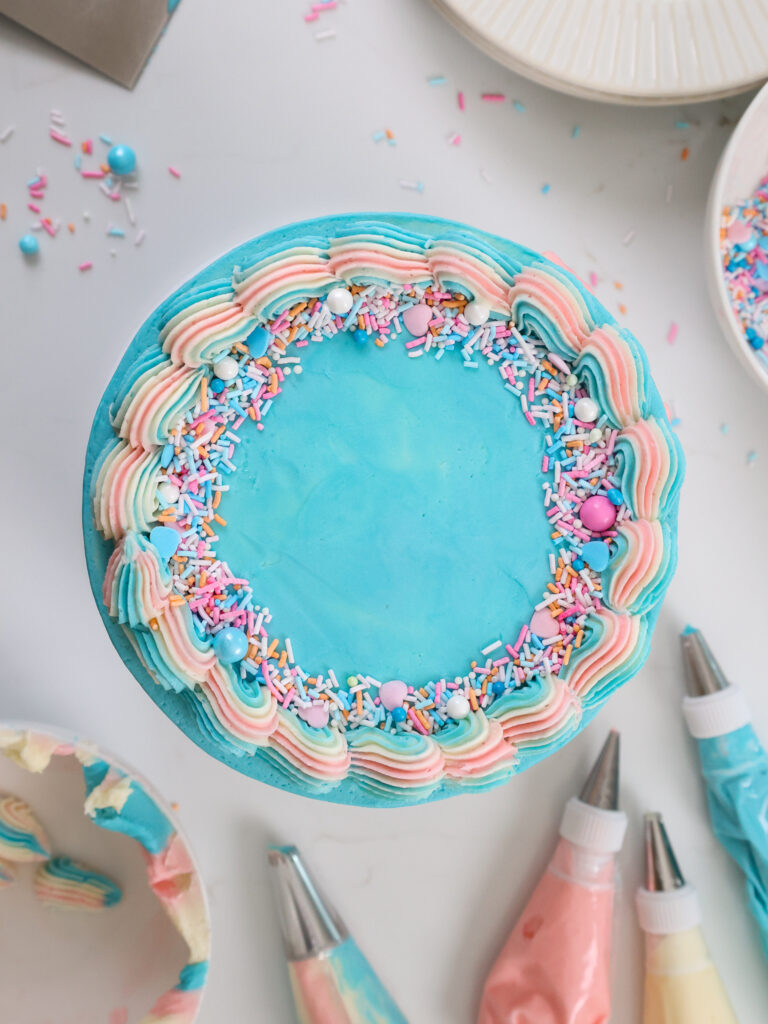
Pipe the frosting in lines around the cake to match the cake layers inside. You want to make 5 bands that are about the same thickness. Start with a band of blue frosting, followed by pink, white, pink, then blue.
Cover the top of the cake with blue buttercream, then smooth the frosting with a large offset spatula and bench scraper.
If desired, pipe a message on the side of the cake. Then add the remaining buttercream inside a small piping bag fit with a small French tip (like a Wilton 4B).
Pipe a border around the top of the cake, add some sprinkles, then enjoy!
Substitutions & Swaps: Vanilla Cake Layers
Below are some swaps and substitutions that can be made in this cake recipe:
- Unsalted Butter – If you only have salted butter on hand, you can use it in place of the unsalted butter. Just be sure to omit the salt that this recipe calls for. You can also use vegan butter in its place!
- Cake Flour – If you can’t find cake flour, you can make your own makeshift cake flour using this method. You can also swap in a good gluten free flour blend (like this) if needed. Just be sure to stir the batter longer than normal to help give the cake proper structure, and let the batter sit for about 20 minutes before baking it if you opt to make a gluten free version.
- Egg whites – I like to use the type that come in a carton so that I don’t have to separate my eggs, but you can also use fresh egg whites or 5 large whole eggs. If you have an egg allergy you can try using a vegan egg replacer in the cake batter.
- Sour Cream – You can also use full fat yogurt, buttermilk, whole milk, or an alternative yogurt or milk (almond, soy, oat).
- Vegetable Oil – Use any flavorless oil in this recipe.
Substitutions & Swaps: Buttercream Frosting
Below are some swaps and substitutions that can be made in this frosting recipe:
- Unsalted Butter – If you only have salted butter on hand, you can use it in place of the unsalted butter. Just be sure to omit the salt that this frosting recipe calls for. You can also use vegan butter in its place!
- Heavy Cream – You can use whole milk or alternative milk (soy, almond, oat) instead of heavy cream or whipping cream. This will thin the frosting out more though, so I recommend using about half the amount the recipe calls for.
- Gel Food Coloring – Natural food coloring or liquid food coloring can be used if needed to color the frosting. However, I find gel food coloring works best!
Making This Trans Flag Cake in Advance and Storage Tips
Make your cake layers in advance and freeze them. It breaks the process up and makes it more approachable.
Make the frosting ahead of time or save any leftover frosting. Store it in an airtight container in the fridge for up to a month. Just be sure to give it a good stir once it thaws to make it nice and smooth again. This cake can last in the fridge for up to a week.
A frosted cake can last in the fridge for up to a week, or in the freezer up to a month. If you freeze the cake, transfer it to the fridge the night before you plan to eat it.
This will help it gradually thaw and minimize any temperature shock. Remove the cake from the fridge about 30 minutes before you plan to cut into it.
Tips for Making the Best Trans Flag Cake
- Ingredients at room temp mix together better! Set out any cold ingredients ahead of time.
- Properly measure your flour (spoon into the cup measure, then level). Or better yet, use a kitchen scale to measure your dry ingredients.
- Use a kitchen scale to divide the batter. It will help the cake layers bake to the same height and bake more evenly.
- Bang your cake pans on the counter before putting them in the oven. This brings any big air bubbles that are trapped in the batter to the surface.
- Level the room temperature or thawed cake layers with a serrated knife to make them easier to stack.
- Chill the cake layers in the freezer for about 20 minutes before assembling the cake. It makes them so much easier to stack and frost!
- Use gel food coloring to create perfectly colored cake layers and frosting. It works best because it doesn’t throw off the consistency of the frosting or give it a bitter taste.
Let Me Know What You Think
If you try this cake recipe and tutorial, I’d love to hear what you think! Please leave a rating and comment below.
And don’t forget to tag me @chelsweets and use #chelsweets on social media so I can see your amazing creations!
Other Recipes You Might Like:

Trans Flag Cake
This cake is decorated to look just like the trans flag! It's delicious blue, pink and white cake layers are frosted w/ homemade buttercream.
Ingredients
Vanilla Cake Recipe
- 1 cup or 2 sticks unsalted butter, room temperature (226g)
- 3 cups granulated sugar (600g)
- 1 cup pasteurized egg whites from a carton or 5 large eggs (235g)
- 3 cups cake flour (360g)
- 2 1/2 tsp baking powder (10g)
- 1 tsp fine salt (6g)
- 1 1/2 cups full-fat sour cream, room temperature (380g)
- 1/4 cup vegetable oil (56g)
- 1 tsp vanilla extract (4g)
- Blue and pink gel food coloring
Vanilla Buttercream Frosting
- 2 1/2 cups or 4 sticks unsalted butter, room temperature (565g)
- 1 tsp vanilla extract (4g)
- 1/2 tsp fine salt (3g)
- 8 cups powdered sugar (904g)
- 1/3 cup heavy cream or heavy whipping cream, room temperature (80g)
- Blue and pink gel food coloring
Recommended Tools
- 7-inch cake pans
- Kitchen Scale
- Spinning cake stand
- 10-inch greaseproof cake board
- Large offset spatula
- Electric hand mixer or stand mixer
Instructions
Vanilla Cake Layers
- Preheat the oven to 350 F / 175 C. Grease and line 5, 7-inch or 5, 8-inch cake pans (I used 7-inch pans). If you don't have 5 pans, don't worry! Grease & line however many you have and bake the cake layers in a couple rounds.
- Add 1 cup of unsalted butter into the bowl of a stand mixer or a large bowl and beat with a whisk attachment on a medium speed until smooth and creamy.
- Add 3 cups of granulated sugar and mix together on a high speed for 2-3 minutes with a whisk attachment or hand mixer. Scrape the sides of the bowl with a rubber spatula as needed. The mixture should become lighter in color.
- Pour in 1 cup of egg whites and mix at a medium-low speed until incorporated.
- In a separate, medium-sized bowl, whisk together 3 cups cake flour, 2 1/2 tsp baking powder and 1 tsp salt. Add half of the dry ingredients into the butter/egg mixture and mix on a medium speed until combined.
- Next, add 1 1/2 cups of sour cream, 1/4 cup vegetable oil, and 1 tsp vanilla extract into the batter. Mix at a medium speed until combined, scraping the sides and bottom of the bowl as needed.
- Mix in the remaining half of the dry ingredients on a medium speed.
- We need to make 2 blue layers, 2 pink layers, and 1 white layer. There are two ways to do this:
- Option 1: Divide the batter evenly between five bowls (about 360g per bowl). Color two of the bowls pink, and two of them blue with gel food coloring. Leave one uncolored.
- Option 2: If you have a kitchen scale, fill two, separate bowls with 720g of batter each. Leave the remaining batter in the mixing bowl uncolored. Color one the bowls with 720g of batter a light pink, and the other bowl light blue.
- Next, pour the batter into the prepared pans. If you don't have enough pans, the extra batter can sit at room temperature. Bake the layers that you can, let them cool, then clean out the pans and use them to bake the remaining layers.
- If you make 7-inch cake layers, bake them for 33-35 minutes, or until a toothpick comes out with a few moist crumbs. Or if you make 8-inch cake layers, bake them for 29-32 minutes. Rotate the pans halfway through to help them bake evenly.
- Let the pans cool for 10 minutes, then run an offset spatula around the perimeter of the pan to separate the cake from the pan.
- Place the cake layers into the freezer for 45 minutes to accelerate the cooling process. Once the layers are fully cooled, carefully flip the pans and remove the layers from the pans.
- Use a serrated knife to level the top of each cake layer. I also trimmed the caramelization from the sides of the cake, but this is optional. Set the cake layers aside or wrap them and freeze them at this point if you're making them in advance.
Vanilla Buttercream Frosting
- While the cake layers bake and cool, make the vanilla buttercream.
- Beat 2 1/2 cups of butter on a medium speed for 30 seconds with a paddle attachment or in a large bowl with a hand mixer until smooth.
- Add 1 tsp of vanilla extract and 1/2 tsp fine salt. Mix on low until the ingredients are fully incorporated.
- Slowly mix in 8 cups of powdered sugar. Halfway through, add in 1/3 cup of heavy cream to make the frosting easier to mix.
- Once all the powdered sugar has been incorporated, mix on a low speed until the ingredients are fully incorporated and the desired consistency is reached. I also like to stir it by hand with a rubber spatula once it's fully made. This will help make the frosting silky smooth, and easier to smooth onto your cake.
- Wait to color the frosting until the cake has been crumb coated. Cover the buttercream flush with plastic wrap and set aside.
Assembling This Trans Flag Cake
- Stack and frost the cake layers on a greaseproof cake board or flat plate, using a dab of vanilla buttercream to help stick the first cake layer to the board.
- Start with one of the blue layers, and spread a thick, even layer of buttercream on top of it. Repeat this process with the remaining cake layers in the following order: pink, white, pink, blue.
- Once you've stacked the cake layers, smooth a thin coat of vanilla buttercream around the cake with a large offset spatula and bench scraper. Freeze the cake for about 10 minutes in the freezer or 30 minutes in the fridge, or until the frosting is firm to the touch.
- Place 1/4 of the uncolored, remaining frosting in a small piping bag fit with a small round tip or cut a small, 1 cm opening at the base of the bag. Set aside.
- Add 1/3 of the remaining frosting in a medium-sized bowl and color a light shade of pink with gel food coloring (I used a small drop of deep pink gel food coloring).
- Color the remaining buttercream light blue with gel food coloring (I used a small drop of royal blue gel food coloring). You want to have slightly more blue frosting than the other colors, because it is also used to cover the top of the cake. Place the pink and blue frosting in small piping bags fit with a small round tip (like a Wilton 10) or cut a small, 1 cm opening at the base of each bag.
- Pipe the frosting in lines around the cake to match the cake layers inside. You want to make 5 bands that are about the same thickness. Start with a band of blue frosting, followed by pink, white, pink, then blue. Cover the top of the cake with blue buttercream, then smooth the frosting with a large offset spatula and bench scraper.
- If desired, pipe a message on the side of the cake. Then add the remaining buttercream inside a small piping bag fit with a small French tip (like a Wilton 4B). Pipe a border around the top of the cake, add some sprinkles, then enjoy!
Notes
My Tips for Making the Best Trans Flag Cake
- Ingredients at room temp mix together better! Set out any cold ingredients ahead of time.
- Properly measure your flour (spoon into the cup measure, then level). Or better yet, use a kitchen scale to measure your dry ingredients.
- Once you add in the flour, mix your cake batter just until the ingredients are incorporated. This will ensure your cake layers are tender and fluffy.
- Use a kitchen scale to weigh your cake pans as you fill them. It helps the cake layers bake to the same height and bake more evenly.
- Bang your cake pans on the counter before putting them in the oven. This brings any air bubbles that are trapped in the batter to the surface.
- Level your room temperature or thawed cake layers with a serrated knife to make them easier to stack.
- Chill the cake layers in the freezer for about 20 minutes before assembling the cake. It makes them so much easier to frost.
- Use gel food coloring to create perfectly colored cake layers and frosting. It works best because it doesn't throw off the consistency of the frosting or give it a bitter taste.
Making This Trans Flag Cake in Advance & Storage Tips
- Make your cake layers in advance and freeze them. It breaks the process up and makes it more approachable.
- Make the frosting ahead of time or save any leftover frosting! It can be stored in an airtight container in the fridge for up to a month. This frosting can also be stored in the freezer for up to 3 months. Just be sure to give it a good stir once it thaws to make it nice and smooth again.
- A frosted cake can last in the fridge for up to a week, or in the freezer up to a month. If you freeze the cake, transfer it to the fridge the night before you plan to eat it. This will help it gradually thaw and minimize any temperature shock. Remove the cake from the fridge about 30 minutes before you plan to cut into it.
Nutrition Information
Yield
24Serving Size
1Amount Per Serving Calories 622Total Fat 32gSaturated Fat 18gTrans Fat 0gUnsaturated Fat 13gCholesterol 119mgSodium 260mgCarbohydrates 81gFiber 0gSugar 65gProtein 5g
Kit
Friday 18th of November 2022
Thank you for sharing this recipe! I baked this cake to come out to my parents and they were supportive and also said it tasted really good. It looked good even though I’m awful at decorating cakes and just made the outside purple to represent me being nonbinary but anyway, thank you for this!! It was a wonderful recipe.
Chelsweets
Saturday 19th of November 2022
Hi Kit,
I love that so much and I'm so happy happy to hear that!!! Thank you so much for sharing :)
Amy True
Thursday 7th of July 2022
I loved this cake & it’s so delish, plus the colors are amazing, and I get to celebrate the trans community!!! It’s SO wonderful, thank you Chels
Chelsweets
Tuesday 12th of July 2022
Thank you Amy!!! <3 It is important to celebrate the trans community!!
MK
Saturday 2nd of July 2022
What a beautiful cake! The colors are perfect.
Chelsweets
Sunday 3rd of July 2022
Thank you!!! I tried so hard to get the color just right! :)
Alex
Friday 24th of June 2022
Thank you for being such a wonderful human being.
Chelsweets
Saturday 25th of June 2022
This comment just about made me cry (in a good way). Thank you! <3