
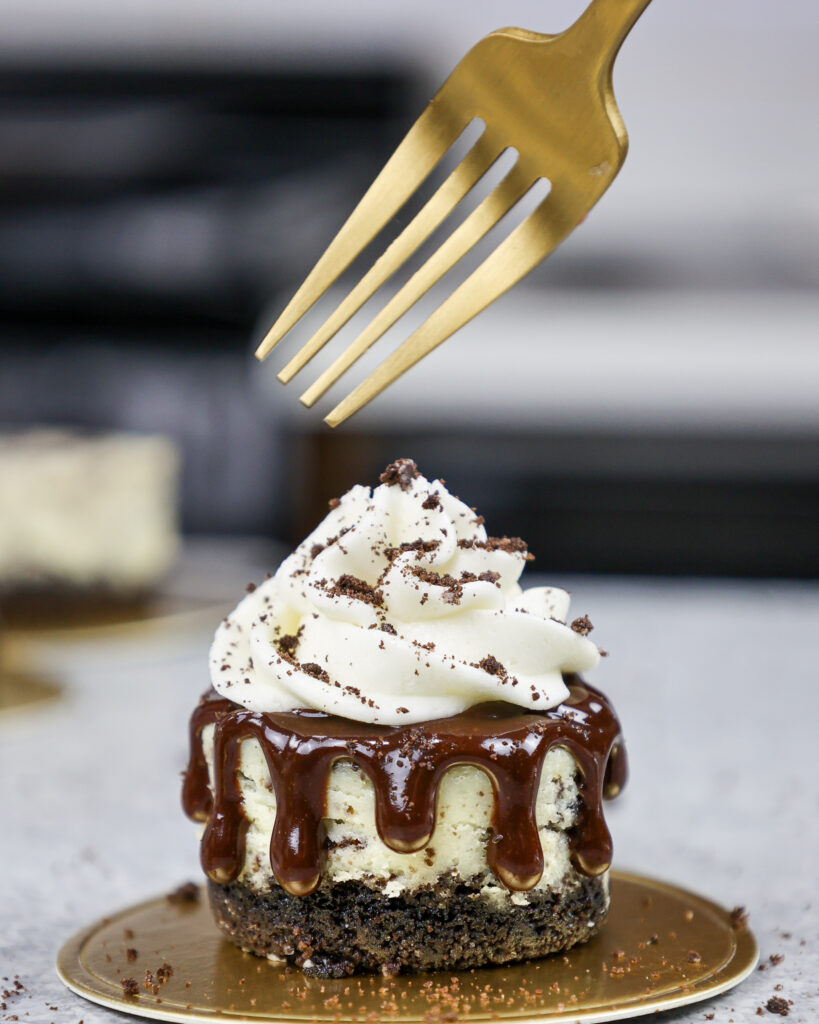
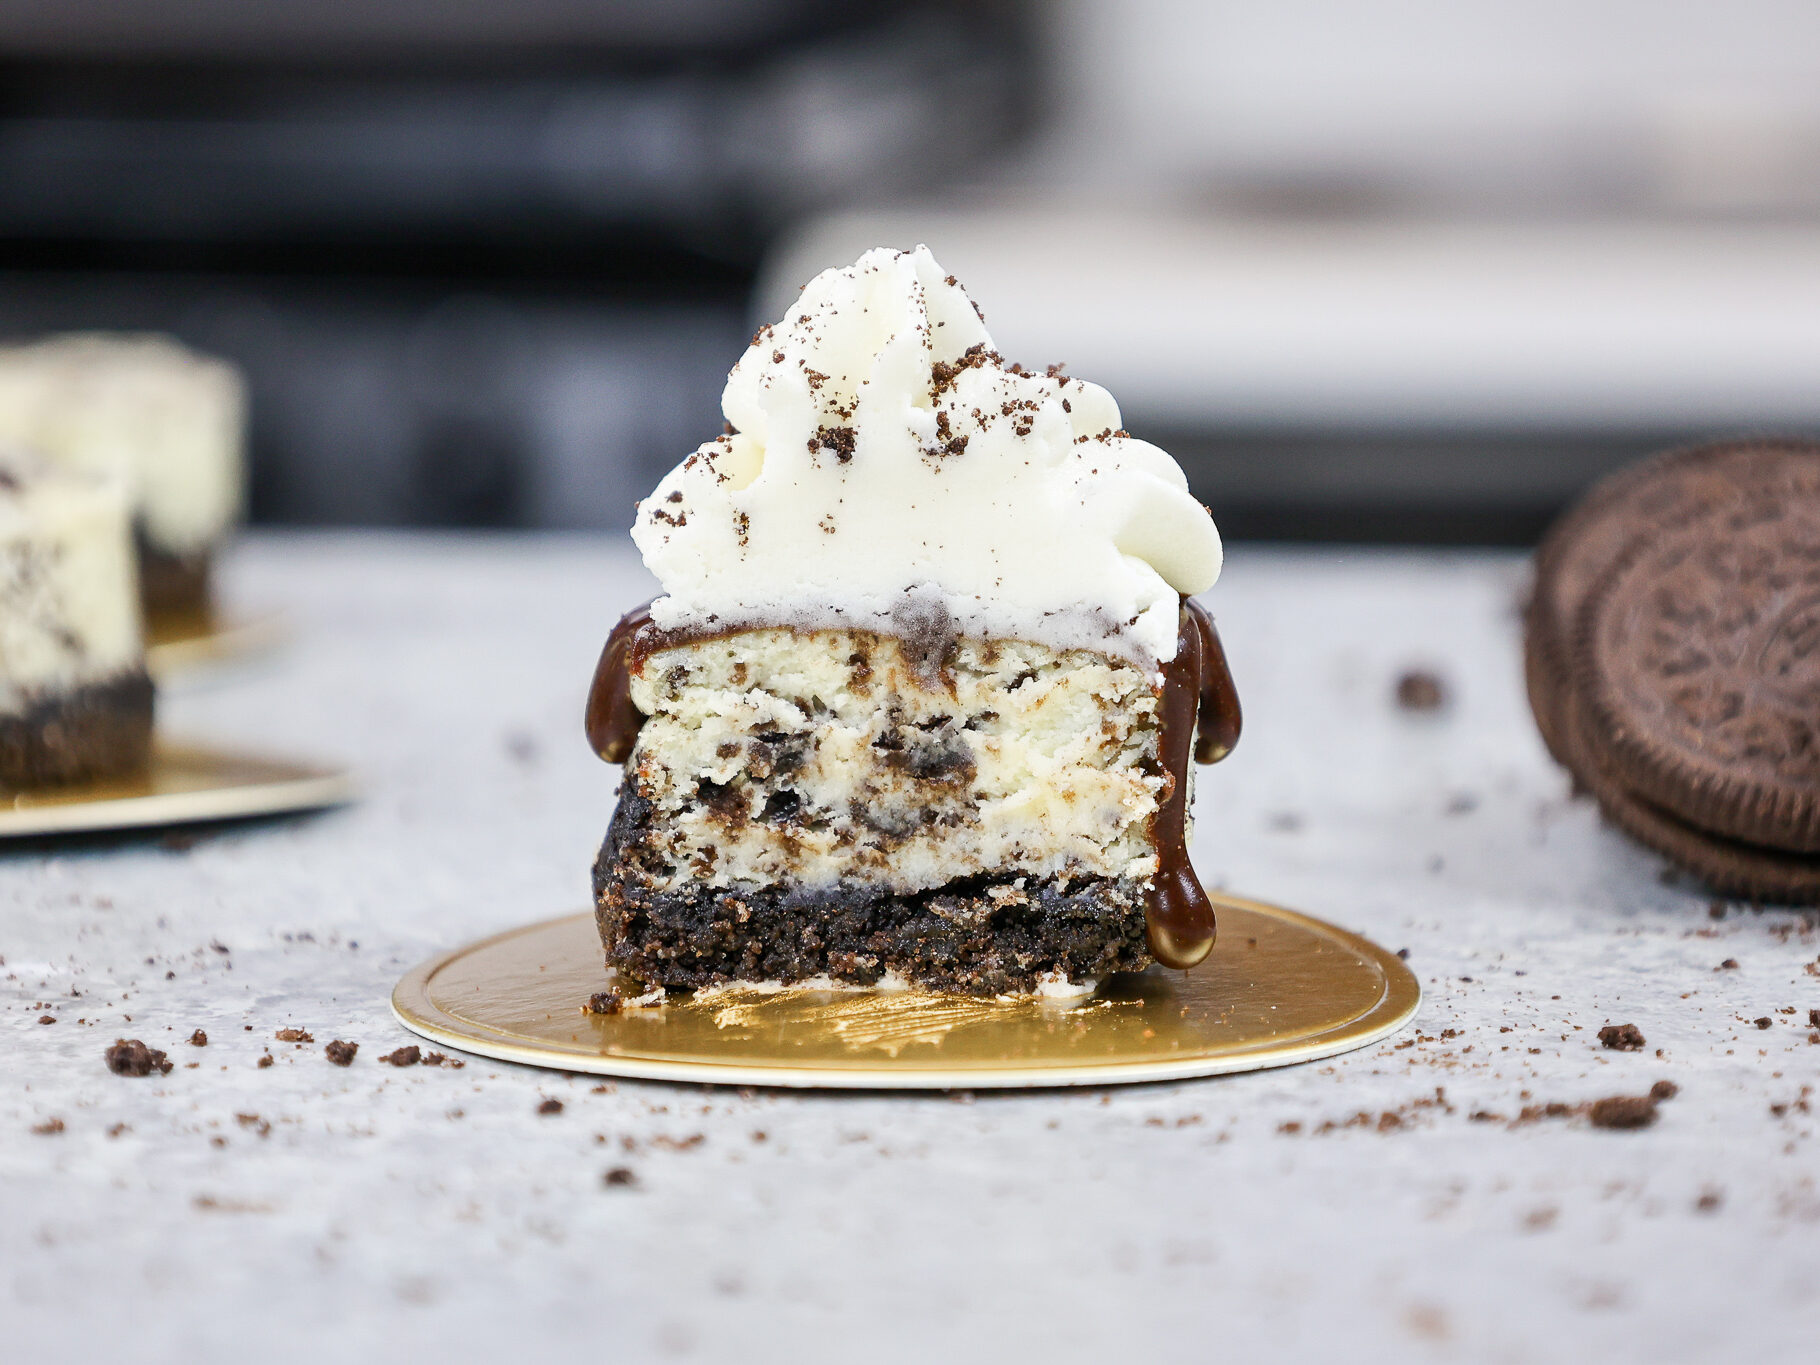
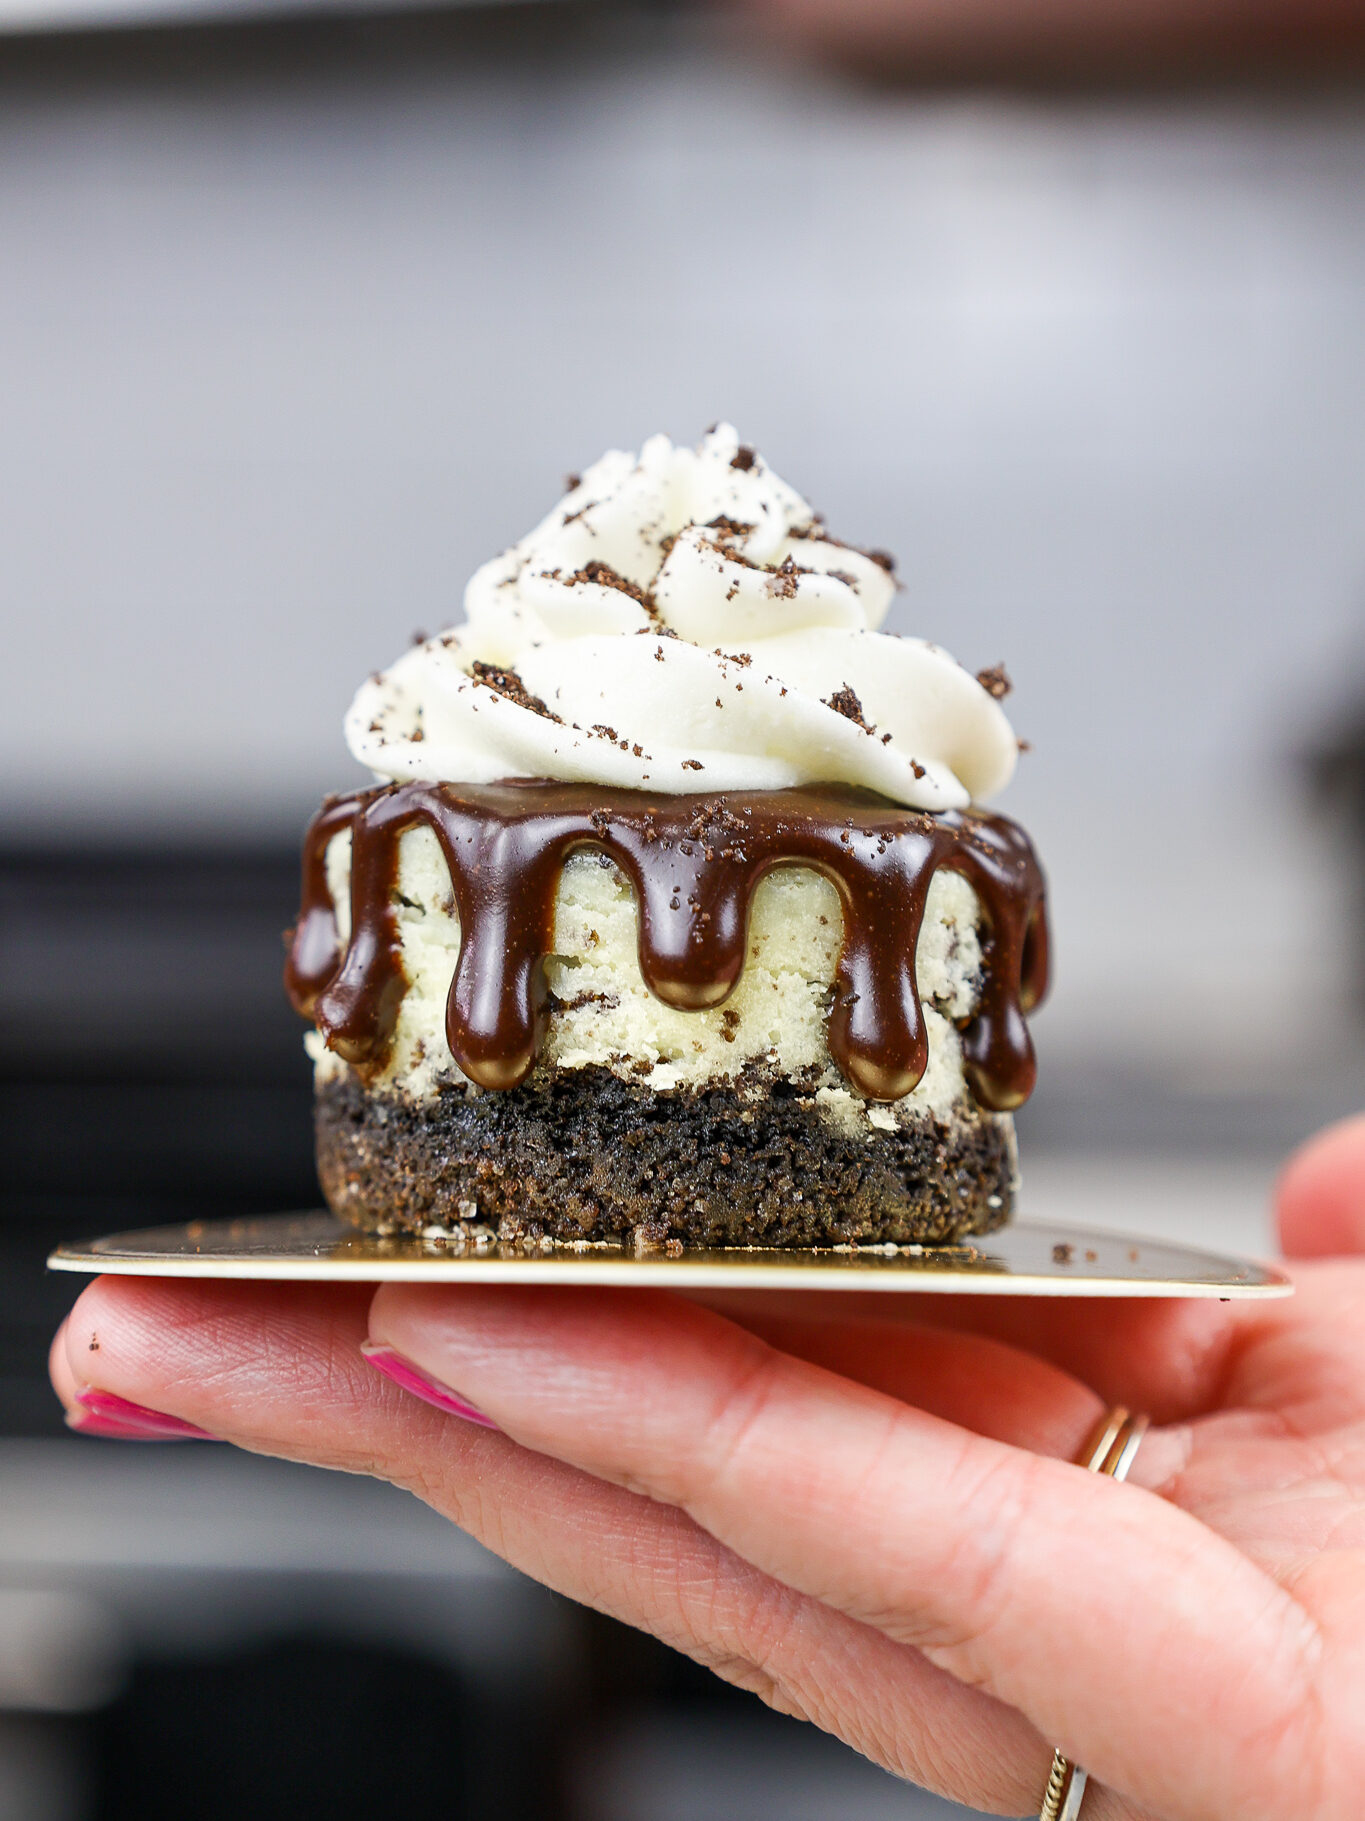
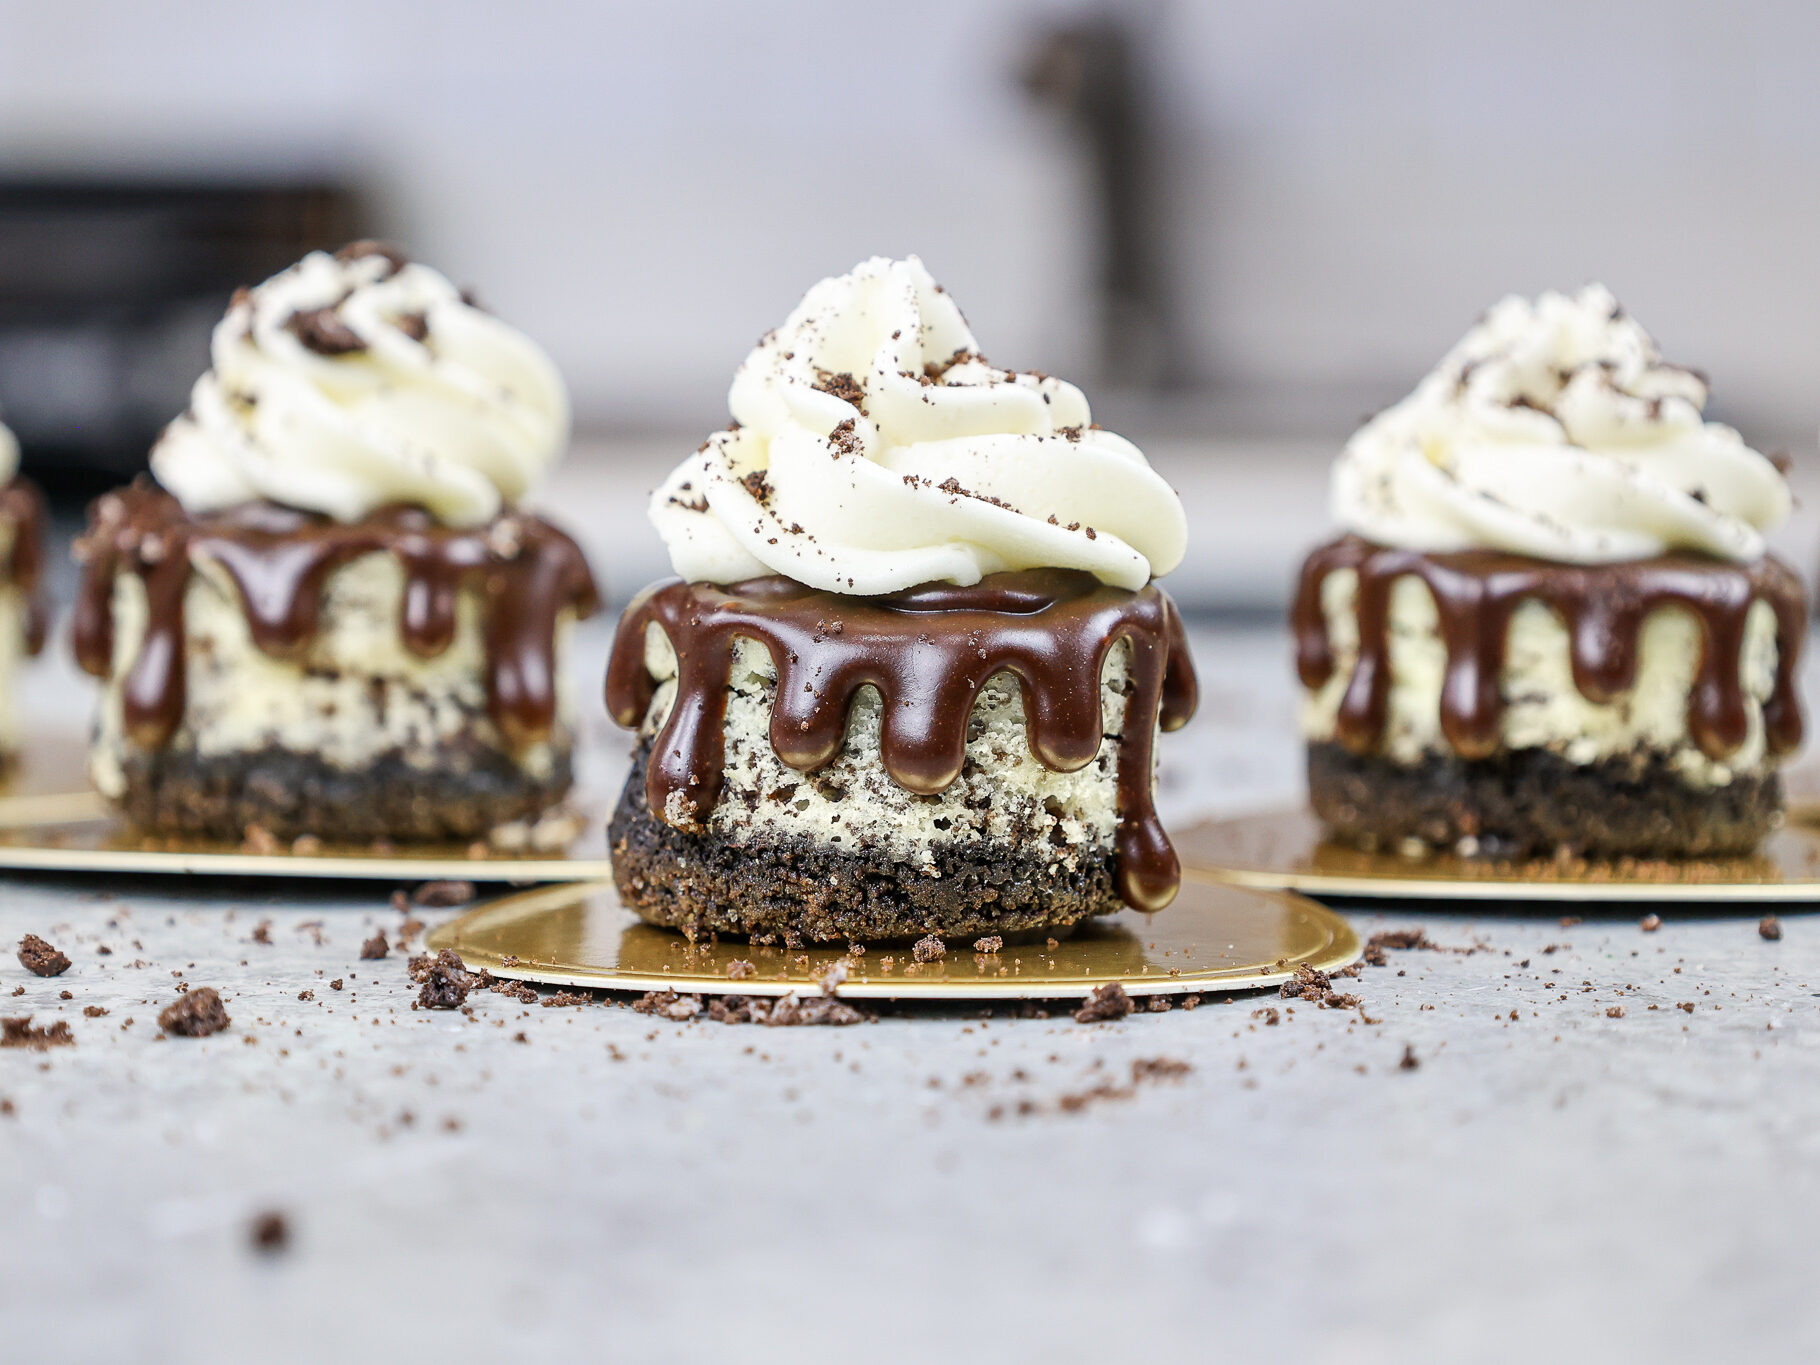
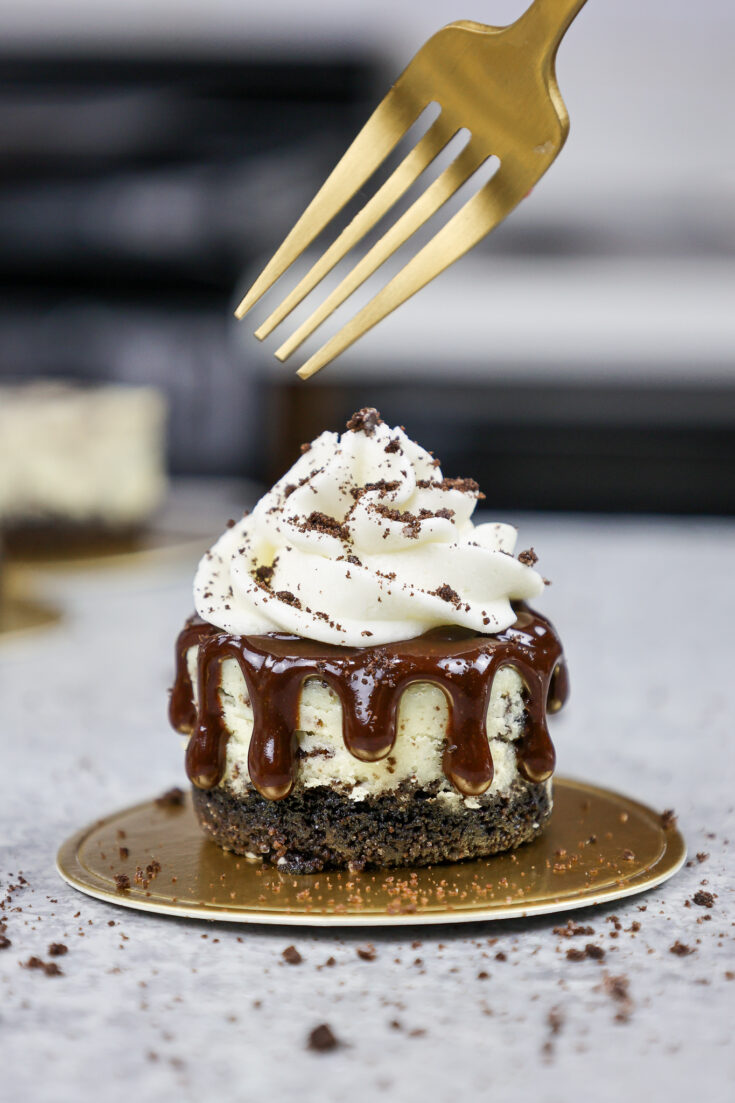
This mini Oreo cheesecake recipe makes the perfect bite sized desserts! They’re made with an oreo cookie crust, the creamiest Oreo cheesecake filling and are topped with a dark chocolate ganache.
I wasn’t quite sure what to call these at first, because they kind of remind me of Oreo cheesecake cupcakes, especially if you make them in a cupcake pan with liners!
They’re so small they almost feel like Oreo cheesecake bites. But in the end I figured mini Oreo Cheesecake seemed the most fitting.
How to Make these Mini Oreo Cheesecakes Without Using a Water Bath
Water baths always seem like such a production, with sloshing water and the risk of water leaking into your cheesecake.
Thanks to a gradual cooking and cooling process, this cheesecake recipe doesn’t require a water bath! Cooking it low and slow gives it an amazing texture, and letting the cheesecake gradually cool minimizes any risk of cracking.
The end result is a creamy, delicious cheesecake that’s crack-free!! The process is so easy and stress-free, you’ll wonder why you ever used a water bath in the first place.
Substitutions & Swaps – Oreo Cookie Crust
This recipe uses quite a few ingredients and I know you might not have all of them on hand.
Below are some swaps and substitutions that can be made in this recipe.
- Oreo Cookie Crumbs – I like to crush my Oreos (center and all!) in a food processor, but you can also crush them in a ziplock bag with a rolling pin. You can also use crushed graham cracker crumbs in a pinch!
- Granulated Sugar – Adding granulated sugar to the crust helps solidify the crust once it’s baked and makes a more stable crust.
- Salted Butter – To keep things simple I use salted butter to make the crust. If you only have unsalted butter, add about 1/4 tsp of salt into the crust mixture.
Substitutions & Swaps – Oreo Cheesecake Filling
- Cream Cheese – This recipes tastes best with full-fat cream cheese. I find using cream cheese that comes in brick form works best! However, you can use low fat cream cheese or Neufchatel cheese in its place and the recipe will still bake up well.
- Granulated Sugar – I think this cheesecake has just the right amount of sweetness, but you can increase or decrease the amount of sugar by a teaspoon or two based on your preferences.
- Vanilla Extract – Vanilla extract helps enhance the other flavors in this cheesecake! If you don’t have any on hand it can be omitted.
- Heavy Cream – You can use heavy whipping cream or double cream if you can’t find heavy cream at your grocery store.
- Cornstarch – Cornstarch helps prevent cracking and helps lighten up the texture of the cheesecake. You can use all-purpose flour in its place if needed, but cornstarch works best!
- Egg – Sadly this recipe does not turn out with egg alternatives like applesauce or flax seed eggs. I highly recommend using a regular large egg.
- Oreos – I like to add chopped Oreos into the cheesecake batter to really pack it with Oreo flavor! If you don’t have any on hand you can omit adding them to the batter.
Baking These Mini Cheesecakes Without a Mini Cheesecake Pan
This recipe bakes up best in mini cheesecake pan, and makes 12 mini cheesecakes. However, you can also use a classic cupcake pan lined with paper liners if needed to make about 9 mini cheesecakes.
You can also turn this recipe into Oreo cheesecake bars by doubling the recipe and baking them in an 8 inch x 8 inch pan for 25-30 minutes at 325 F / 165 C.
Be sure to line the pan with parchment paper and spray with non-stick spray to make it easier to cut and remove slices.
Making this Mini Cheesecake in Advance & Storage Tips
These mini cheesecakes can be stored in the fridge for up to 3 days. Store them in an airtight container or cover the pan tightly with plastic wrap to keep them fresh.
You can also freeze these mini cheesecakes for up to 2 weeks! After they’re baked and cooled, release them from the pan then either place them in an airtight container or wrap each cheesecake in a layer of plastic wrap and foil.
The chocolate ganache topping can also be made in advance and stored in the fridge in an airtight container for up to a week.
When you’re ready to enjoy one of these frozen mini cheesecakes, place it in the fridge overnight, then unwrap and enjoy it the following day.
Whether you’re freezing or refrigerating these mini cheesecakes, wait to add the chocolate sauce and whipped cream until you’re ready to enjoy it.
How to Make the Best Mini Oreo Cheesecake
- Make sure your ingredients are at room temperature. It helps them mix together better and ensure your cheesecake has a smooth texture once it’s baked.
- Beat your cream cheese on a medium to medium high speed before adding the other ingredients! This helps to prevent lumps from forming in the cheesecake batter and helps the cheesecake bake up properly.
- Mix on a low speed once you start mixing ingredients into the cream cheese. After you’ve fluffed up the cream cheese, you want to incorporate as little air as possible into the batter. Excess air in your batter can cause your cheesecake to crack!
- Beat your egg in a separate bowl then slowly mix them into your cheesecake batter. This will make it easier to incorporate and help you avoid over-mixing your batter.
- Follow the cooling instructions! I know it’s a slow process, but it’s worth it. It helps ensure your cheesecake has the perfect consistency once it’s cooled.
- If your cheesecake cracks while baking or cooling, don’t fret! You’ll be topping each little cheesecake with chocolate ganache and no one will ever know.
- Make room in your fridge ahead of time so you can easily chill the cheesecake once it reaches room temperature.
Let Me Know What You Think!
If you try this mini Oreo cheesecake recipe, I’d love to hear what you think of it!
Please leave a rating and let me know your thoughts by sharing a comment below.
Other Posts You Might Like:
Mini Oreo Cheesecake
This mini oreo cheesecake recipe makes the perfect bite sized dessert! They're made with an oreo cookie crust, the creamiest cheesecake filling and are topped with a dark chocolate ganache.
Ingredients
Oreo Cookie Crust
- 1 cup oreo cookie crumbs - about 8 Oreos w/ centers (95g)
- 1 Tbsp granulated sugar (13g)
- 1 Tbsp salted butter, melted (15g)
Cheesecake Filling
- 1 cup or 1-8 oz. packages full-fat cream cheese, room temperature (226g)
- 1/3 cup granulated sugar (66g)
- 2 Tbsp full-fat sour cream, room temperature (30g)
- 1 tsp vanilla extract (5g)
- 1 Tbsp heavy cream or heavy whipping cream (15g)
- 1 Tbsp cornstarch (8g)
- 1 large egg, room temperature (56g)
- 1/2 cup chopped Oreos - about 4 Oreos w/ centers (45g)
Chocolate Ganache Cheesecake Topping
- 1/2 cup dark chocolate chips (85g)
- 1/3 cup heavy whipping cream (80g)
Equipment / Tools Needed
Instructions
Oreo Cookie Crust
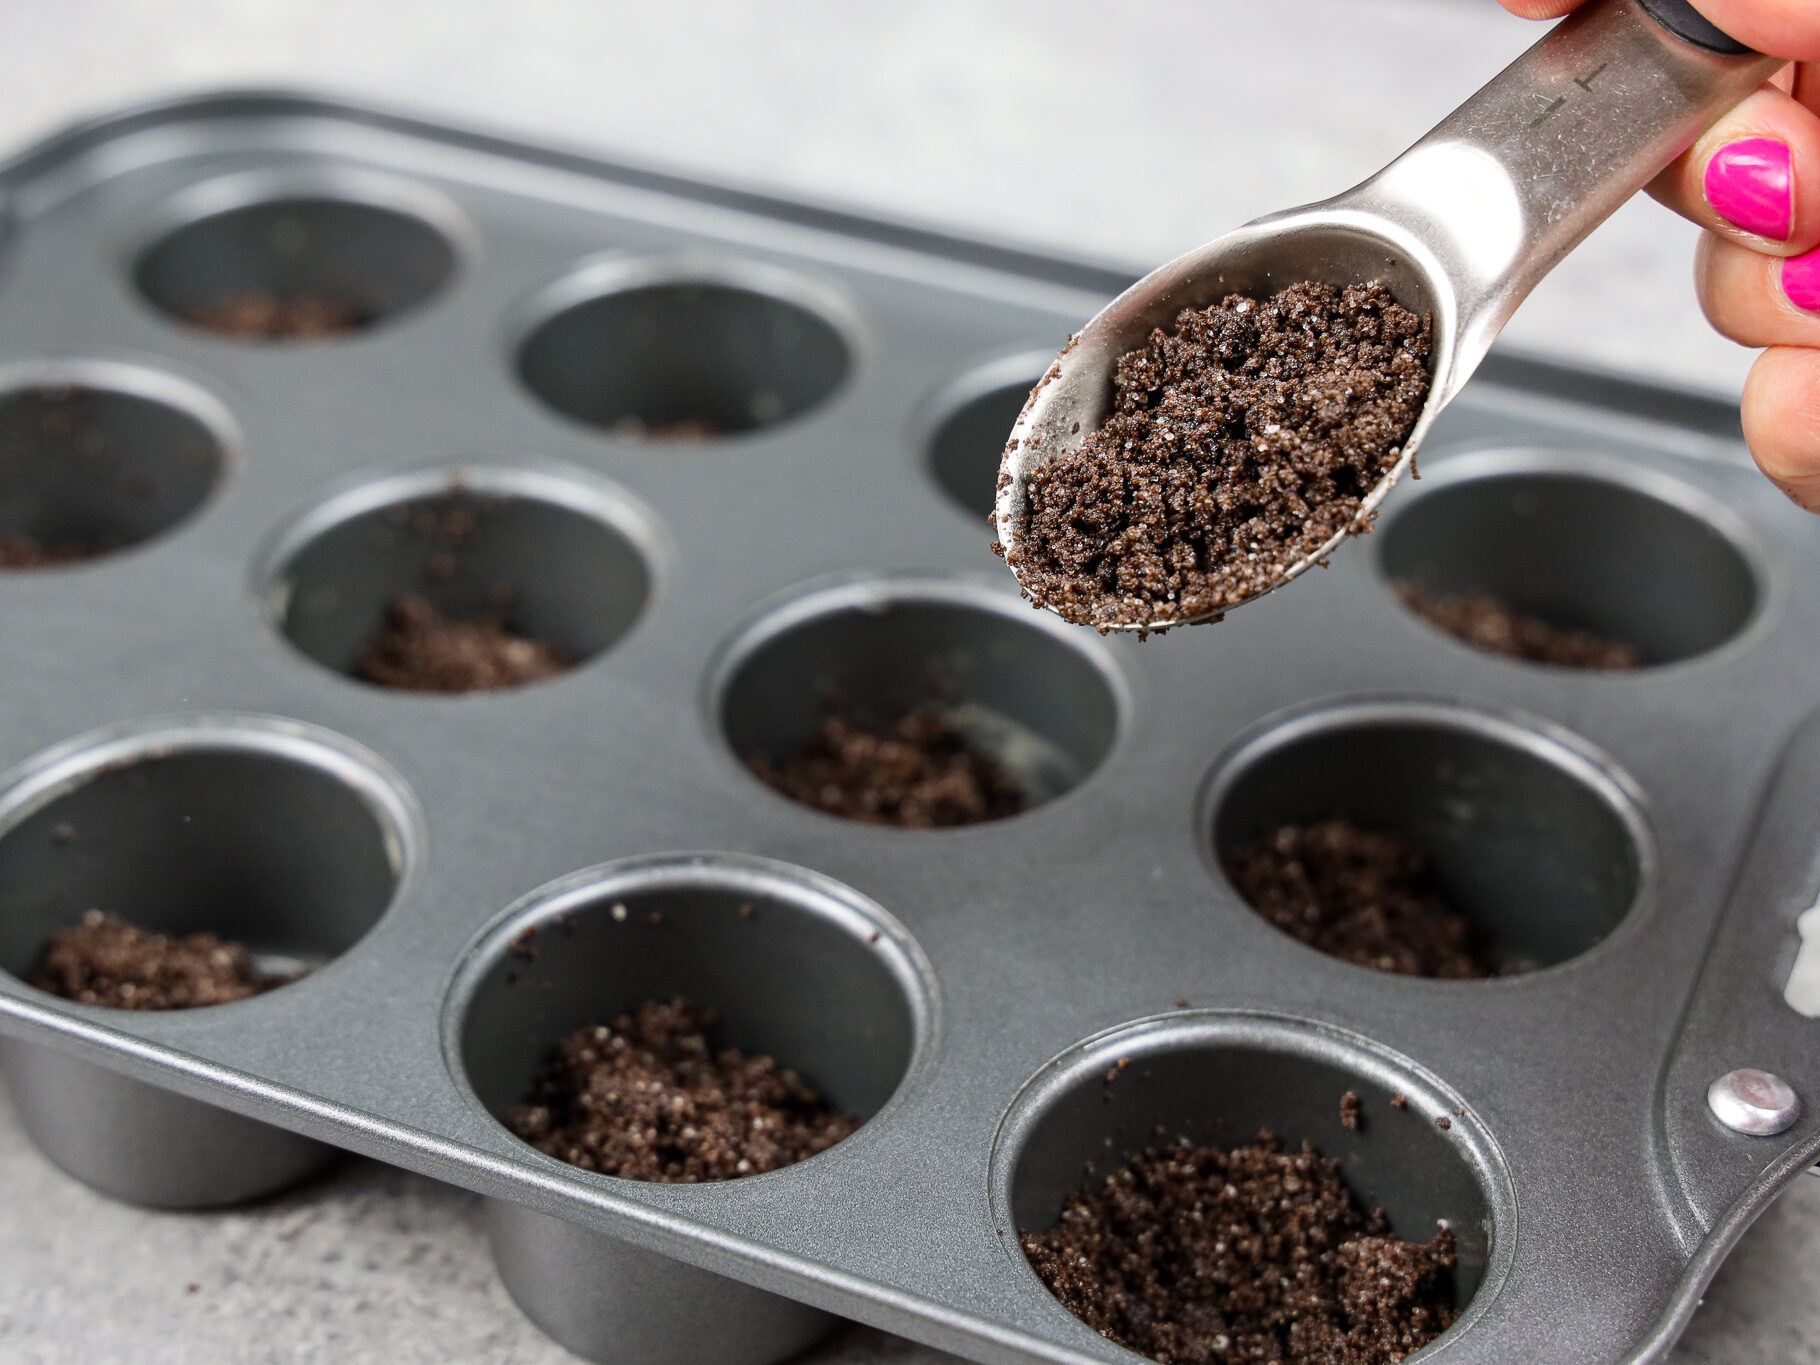
- Preheat oven to 350 F or 175 C. Spray a mini springform pan with non-stick baking spray or line a cupcake / muffin tin with 9 liners.
- Combine the oreo crumbs, granulated sugar and melted butter until the mixture looks like sand.
- Scoop about 1 Tbsp of the cookie mixture into each cavity. Use the back of a spoon or the bottom of a flat, small glass (I used a shot glass) to press down firmly and create a compact, even crust covering the bottom of each little cavity. If you're using a muffin pan, make 9 crusts by adding a rounded Tbsp into each liner.
- Bake for 5 minutes then remove from the oven. Place the pan on a wire rack to cool. Keep your oven, but lower the temperature to 300 F.
Cheesecake Filling
- While the crusts bake and cool make the cheesecake filling.
- Place the room temperature cream cheese in a large bowl. Beat with a hand mixer or stand mixer fit with a whisk attachment on a medium to medium-high speed for 2-3 minutes until creamy and smooth. Scrape the sides and bottom of the bowl a few times throughout the process.
- Add in the sugar, sour cream, vanilla extract, heavy cream and cornstarch. Mix on a low speed until combined, scraping the sides of the bowl with a rubber spatula as needed.
- Crack 1 large egg into a separate bowl and mix with a fork until scrambled. Pour the egg into the cream cheese mixture and mix on a low speed just until combined. The batter should be smooth and completely free of any lumps.
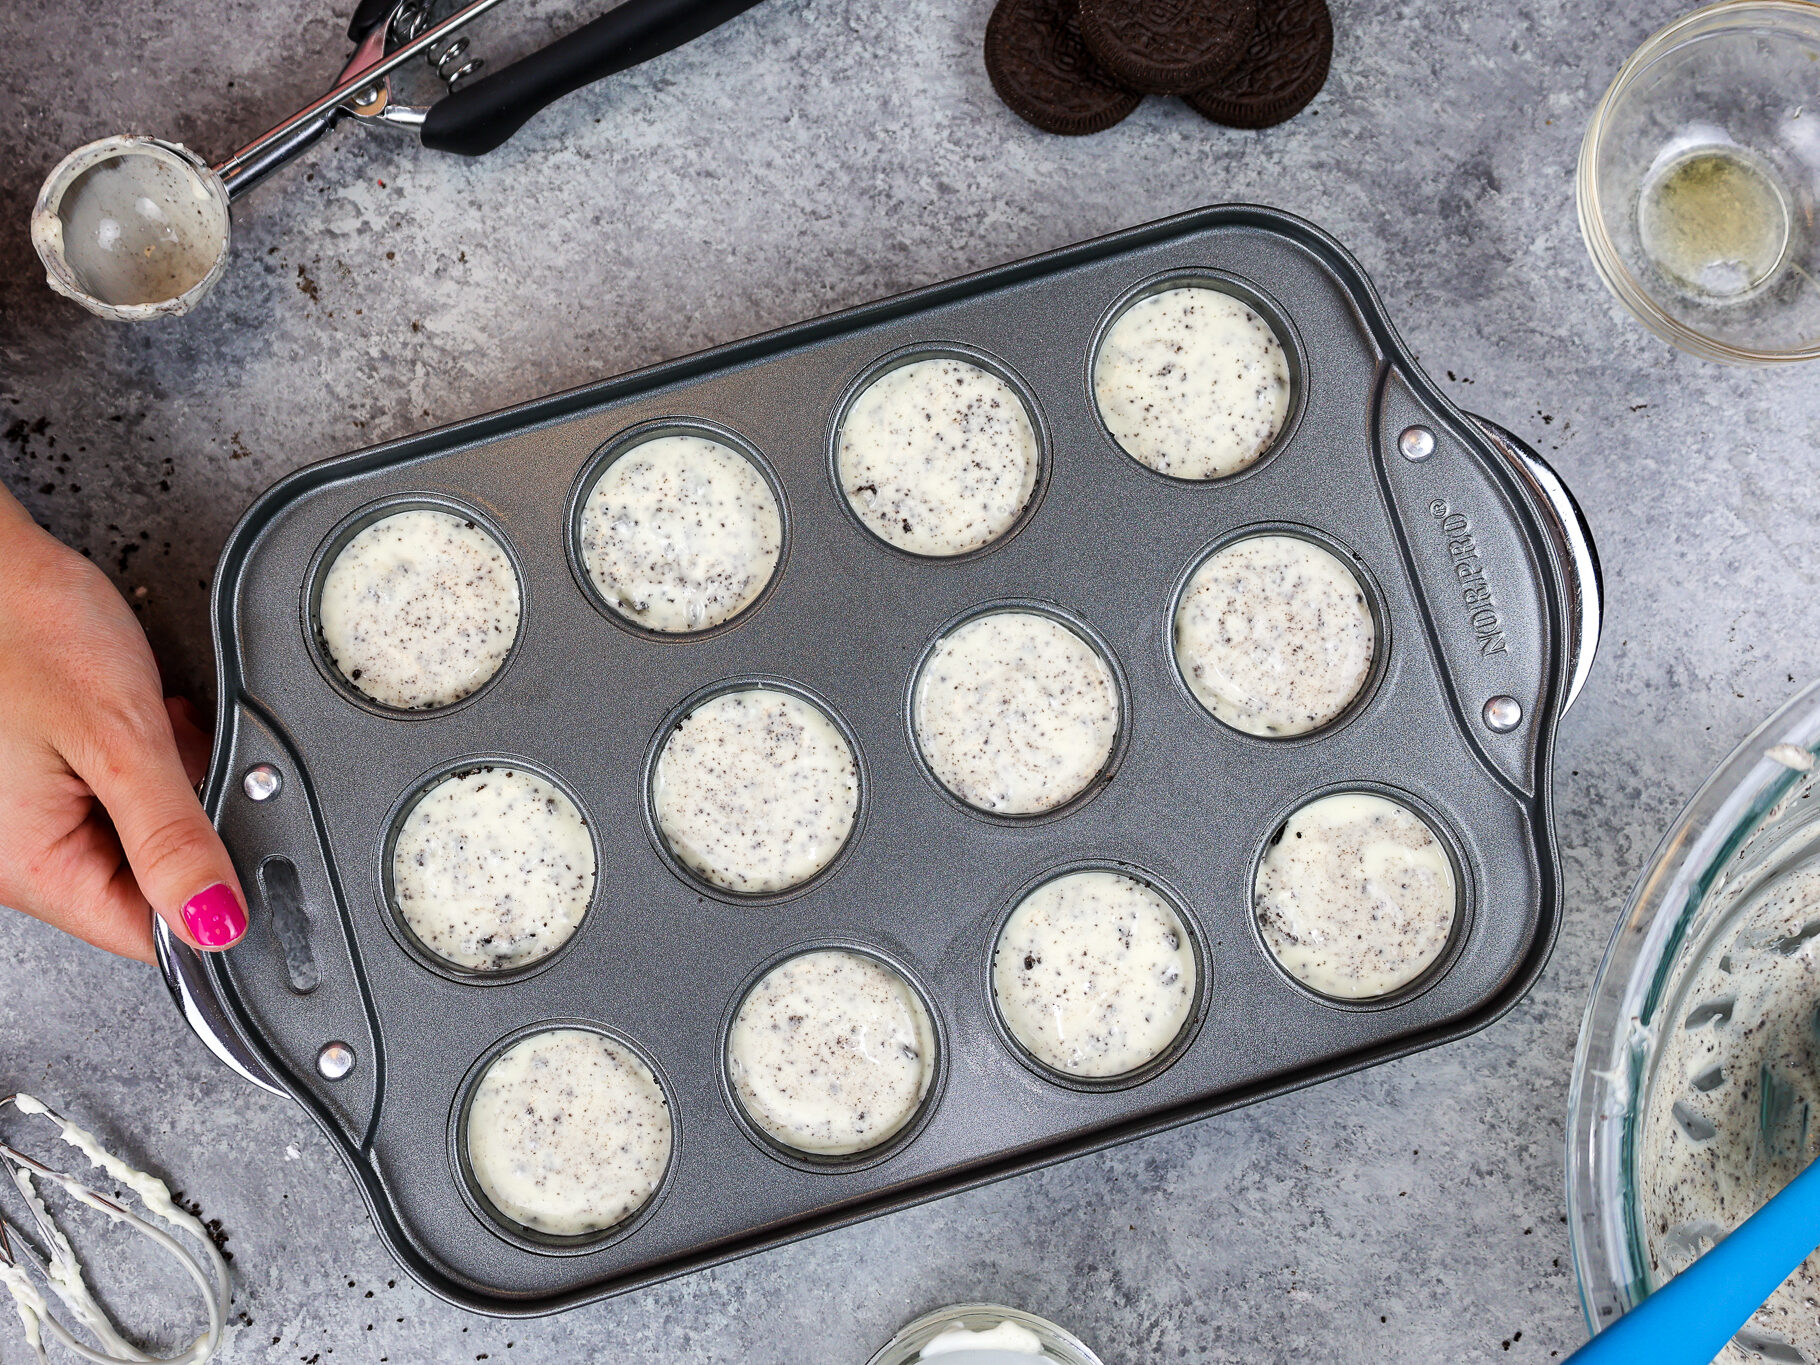
- Divide the batter evenly, trying to fill each cavity to roughly the same height. For reference, I add about 1 1/2 Tbsp of filling on top of each crust. If you're using a muffin pan, you will add about 2 Tbsp to each liner.
- Place the mini cheesecake pan on a large cookie sheet to catch any potential leaks, then bake at 300 F / 150 C for 18-21 minutes or until the tops of the mini cheesecakes are set.
- Remove the cheesecake from the oven and let it cool at room temperature for about 20 minutes. As they cool the sides should start to pull away from the edges of the pan. Once they've reached room temperature, cover the top of the pan and refrigerate the cheesecake for an additional 2 hours or overnight.
- When you're ready to enjoy these mini cheesecakes, remove them from the fridge and carefully release them from the pan.
Chocolate Ganache Cheesecake Topping
- While the cheesecakes bake and cool, make the chocolate ganache topping.
- Place 1/2 cup milk chocolate chips in a heatproof bowl, and set aside.
- Heat 1/3 cup of heavy cream in a heatproof bowl in the microwave for 45 seconds to 1 minute, until gently bubbling.
- If you don’t have a microwave or prefer to use the stove top, you can heat the cream over a medium heat in a pan until it begins to simmer. Remove from heat.
- Gently pour the heavy cream over the chocolate chips, making sure they are covered with cream. Allow mixture to sit for 1-2 minutes.
- Stir slowly until the cream and chocolate are fully combined, and ganache is silky smooth.
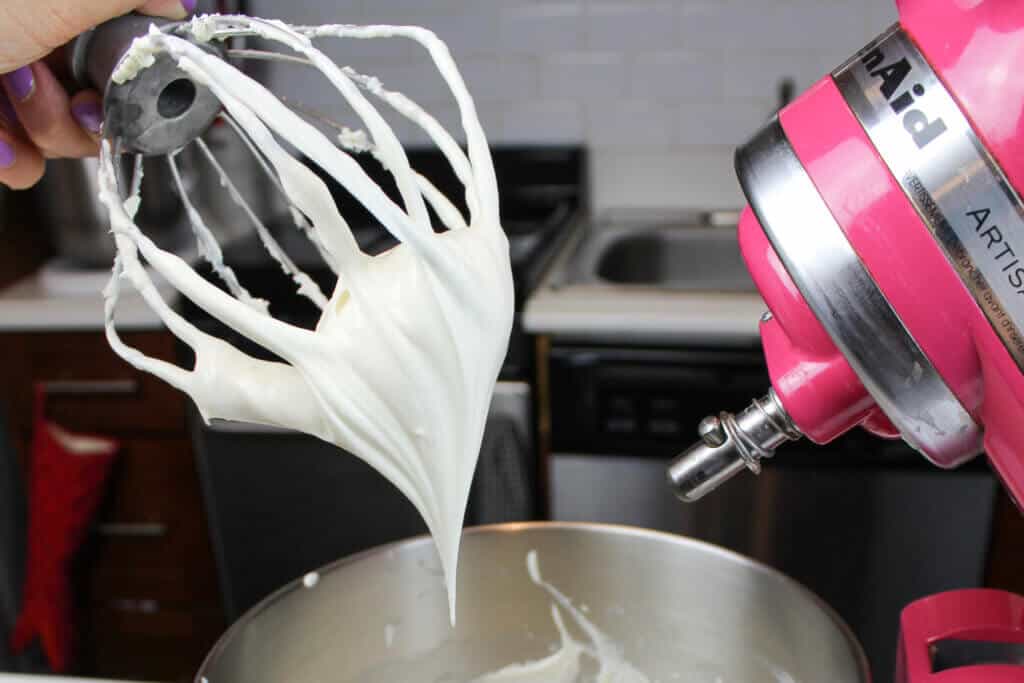
- Drizzle the chocolate ganache over each mini cheesecake and top with whipped cream and more crushed Oreos if desired. Then enjoy!
Notes
Making these Mini Oreo Cheesecakes in Advance & Storage Tips
These mini cheesecakes can be stored in the fridge for up to 3 days. Store them in an airtight container or cover the pan tightly with plastic wrap to keep them fresh.
You can also freeze these mini cheesecakes for up to a month! After they're baked and cooled, release them from the pan then either place them in an airtight container or wrap each cheesecake in a layer of plastic wrap and foil.
The chocolate topping can also be made in advance and stored in the fridge in an airtight container for up to a week.
When you're ready to enjoy one of these frozen mini cheesecakes, place it in the fridge overnight, then unwrap and enjoy it the following day.
Whether you're freezing or refrigerating these mini cheesecakes, wait to add the chocolate ganache and whipped cream until you're ready to enjoy it.
Tips for Making The Best Mini Oreo Cheesecakes
- Make sure your ingredients are at room temperature. It helps them mix together better and ensure your cheesecake has a smooth texture once it's baked.
- Beat your cream cheese on a medium to medium high speed before adding the other ingredients! This helps to prevent lumps from forming in the cheesecake batter and helps the cheesecake bake up properly.
- Mix on a low speed once you start mixing ingredients into the cream cheese. After you've fluffed up the cream cheese, you want to incorporate as little air as possible into the batter. Excess air in your batter can cause your cheesecake to crack!
- Beat your egg in a separate bowl then slowly mix them into your cheesecake batter. This will make it easier to incorporate and help you avoid over-mixing your batter.
- Follow the cooling instructions to a T! I know it's a slow process, but it's worth it. It helps ensure your cheesecake has the perfect consistency once it's cooled.
- If your cheesecake cracks while baking or cooling, don't fret! You'll be topping each little cheesecake with chocolate ganache and no one will ever know.
- Make room in your fridge ahead of time so you can easily chill the cheesecake once it reaches room temperature.
Nutrition Information
Yield
12Serving Size
1Amount Per Serving Calories 265Total Fat 15gSaturated Fat 7gTrans Fat 0gUnsaturated Fat 6gCholesterol 52mgSodium 206mgCarbohydrates 30gFiber 1gSugar 19gProtein 4g
Oreo Cupcakes: Moist Chocolate Cupcakes with Oreo Frosting
Saturday 26th of March 2022
[…] Velvet Oreo Cake Mini Oreo Cheesecakes Oreo Cheesecake Brownies Oreo Banana Bread […]
No Bake Cheesecake Bites: Quick & Easy Recipe from Scratch
Sunday 9th of January 2022
[…] Oreo Cheesecake Brownies […]
Janice
Saturday 12th of June 2021
Substitute for sour cream