
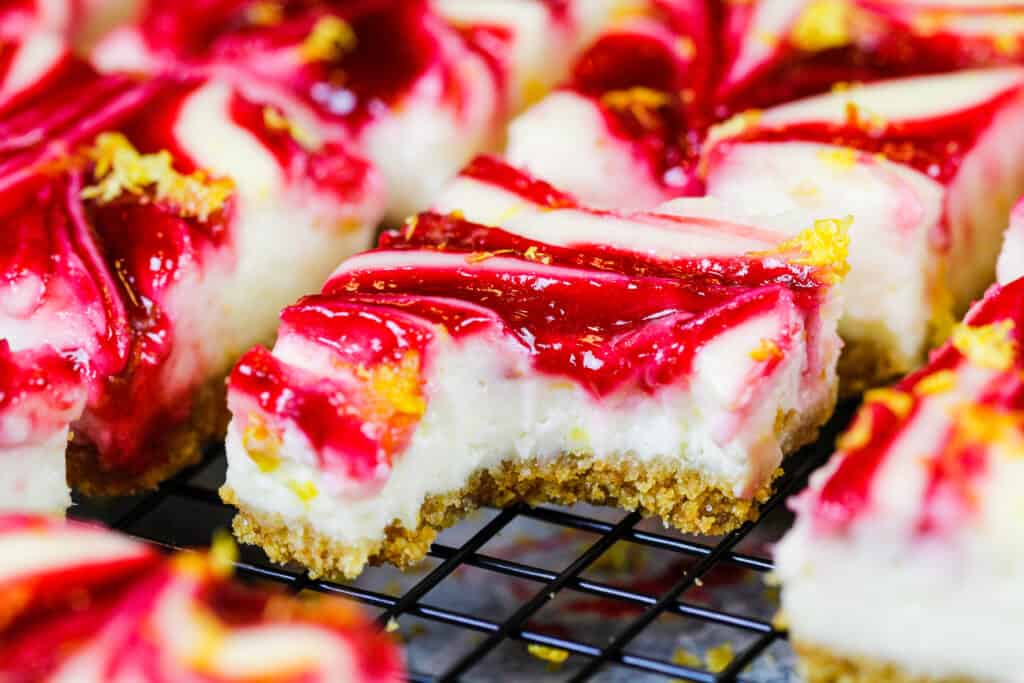
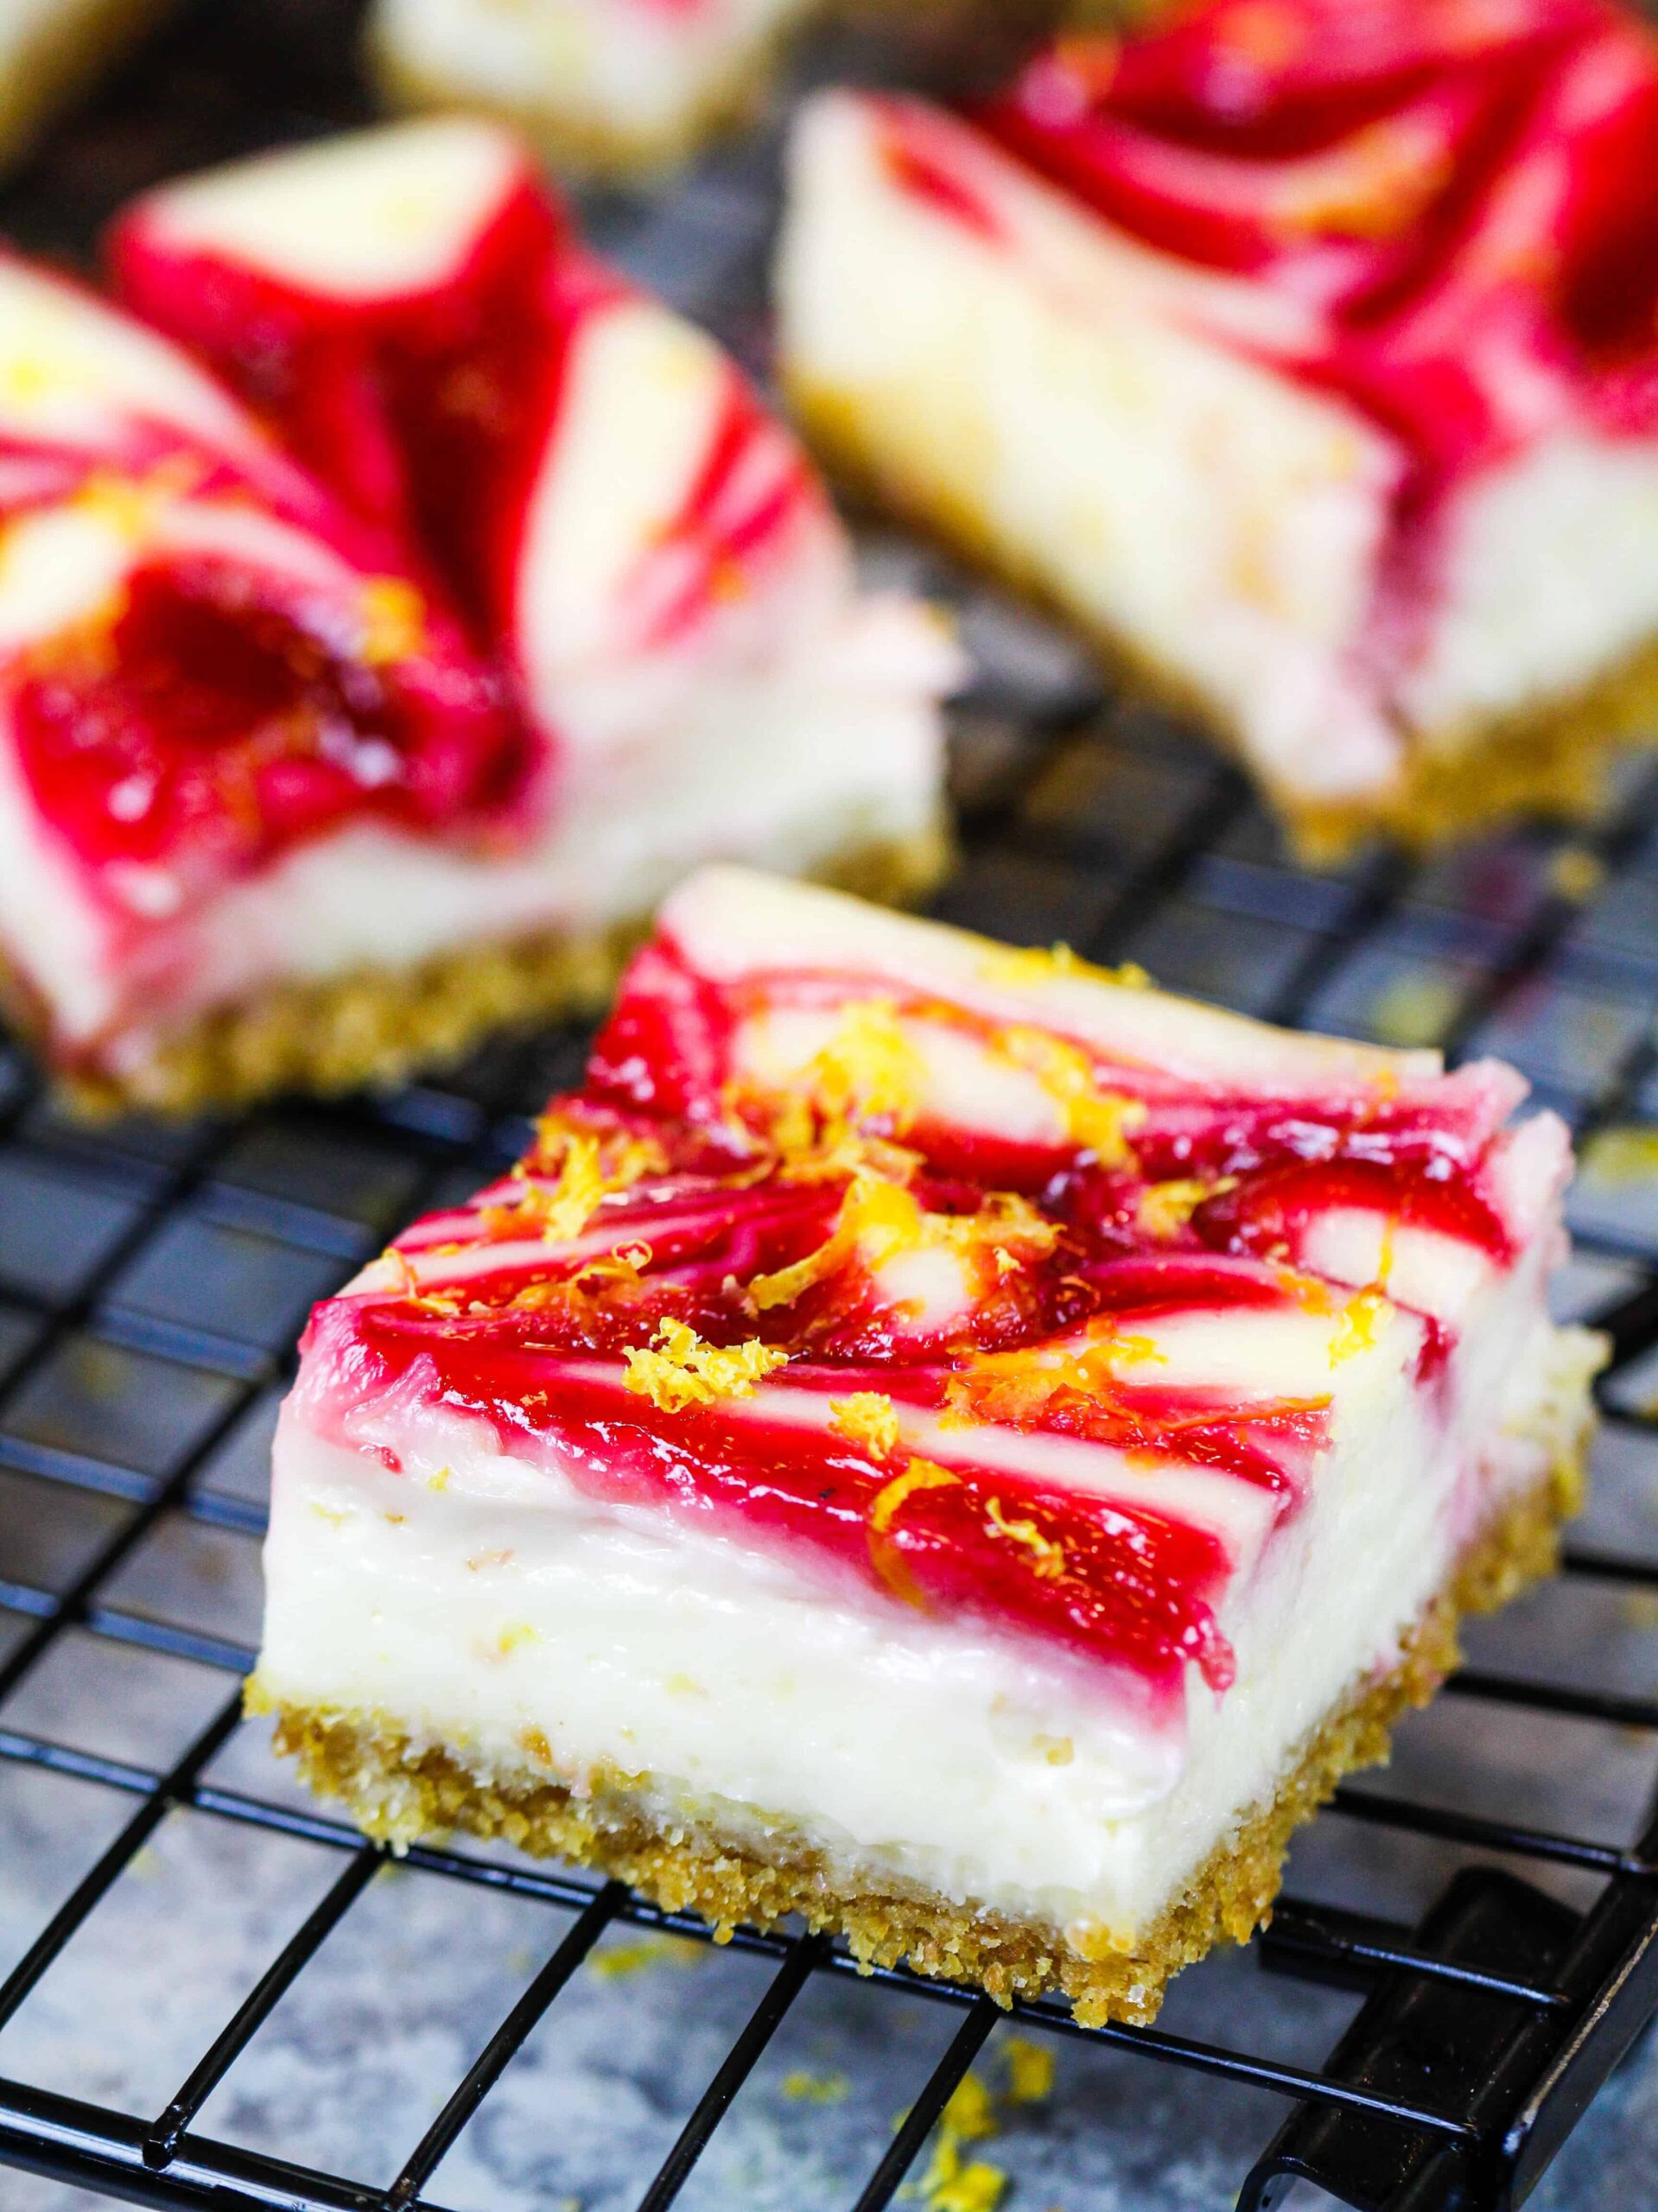
I’m a big fan of cheesecake, but they can be a bit of an ordeal to make. That’s where these lemon raspberry cheesecake bars come in.
These bars come together so quickly, and are decadently creamy yet surprisingly refreshing.
The citrus from the lemon and the tart raspberry swirl make these lemon raspberry cheesecake bars the perfect summer treat. Or really anytime of year!
This recipe is based on a cheesecake bar recipe I made years ago, but with a fruity twist.
As an added bonus, they’re incredibly easy to make and are the perfect make ahead dessert. Somehow, they taste even better overtime. It’s magic, I swear!
Substitutions & Swaps in this Lemon Raspberry Cheesecake Bar Recipe
I love this recipe just the way it is but I know some people might not have all these ingredients on hand! Or you might have food restrictions or allergies.
- Graham Cracker Crumbs – I like using graham cracker crumbs to make life easier. If you can’t find these, you can crush a sleeve of graham crackers in a food processor to get the right consistency.
- Salted Butter – To keep things simple I use salted butter to make the graham cracker crust. If you only have unsalted butter, add about 1/4 tsp of salt into the crust mixture.
- Granulated Sugar – I think these cheesecake bars have just the right amount of sweetness, but you can either increase or decrease the amount of sugar by a couple Tablespoons based on your preferences.
- Lemon Juice & Zest – You can use limes in place of the lemon juice and zest, or you can add 2 tsp of vanilla or almond extract in their place.
- Cream Cheese – This recipe tastes best with full-fat cream cheese. However, you can use low fat cream cheese or Neufchatel cheese in its place and the recipe will still turn out great.
- Eggs – Sadly this recipe does not turn out with egg alternatives like applesauce or flax seed eggs. I highly recommend using regular large eggs.
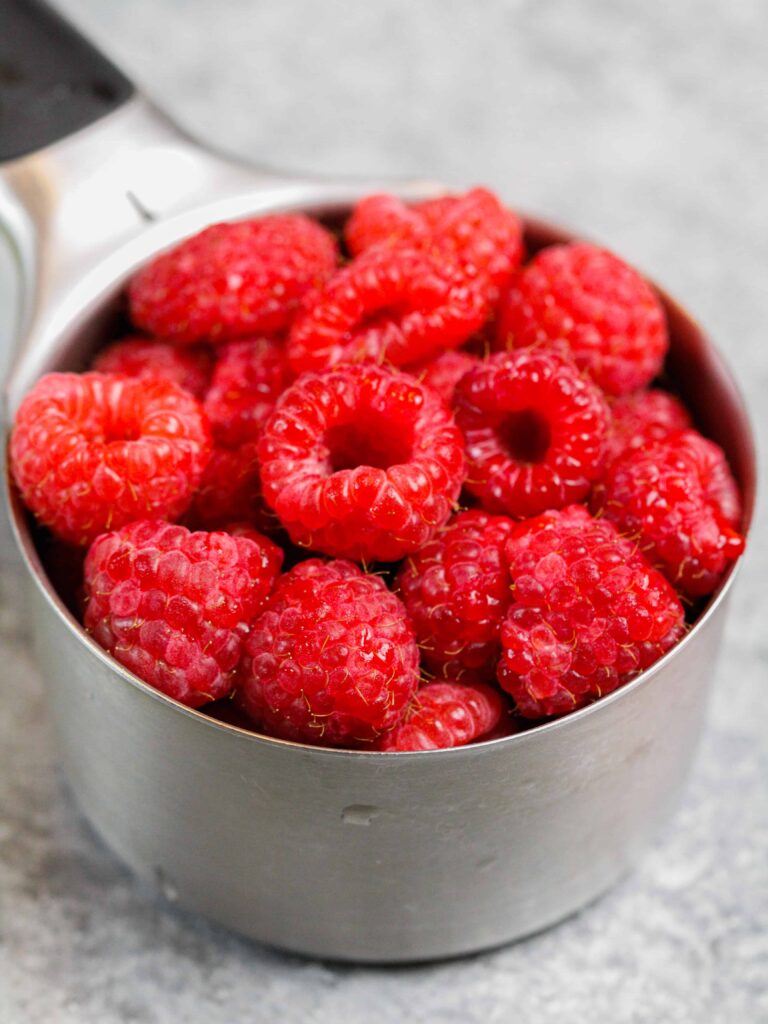
- Berries – You can use pretty much any berry in the lemon cheesecake bar recipe! It’s the perfect canvas for whatever fruit you have on hand or is in season. Blackberries, strawberries, or even marionberries would all taste amazing.
Making These Cheesecake Bars in Advance
These lemon raspberry cheesecake bars keep in the fridge for up to 5 days. Store them in an airtight container to keep them fresh.
You can also freeze these bars for up to two months! Freeze the bars on a sheet pan until they’re firm to the touch, then wrap them in a layer of plastic wrap and then foil.
When you want to enjoy the bars, place them in the fridge overnight, then unwrap and enjoy them the following day.
How To Make the Best Lemon Raspberry Cheesecake Bars
- Make sure your cream cheese is at room temperature. If you forget to set it out ahead of time, cut the blocks into smaller squares and heat it in the microwave in 10 second intervals until it reaches room temperature.
- Use fresh lemon juice and lemon zest rather than the bottled stuff. It makes a huge difference.
- Use your favorite berries! This recipe would also work great with blackberries, strawberries, or even marionberries.
- Beat your cream cheese on a low speed until it’s smooth and creamy before adding the other ingredients! This helps to prevent any lumps from forming in the cheesecake batter.
- Add fresh lemon zest to the crust to really pack these bars with citrus flavor!
- Don’t use a toothpick to check if your bars are done. Instead, gently shake the pan while it’s still in the oven. If only a small circle in the center jiggles a little, it’s ready! The center will set as the bars cool.
- Use a warm, sharp knife to get clean slices. Fill a tall cup with hot water and drip a sharp knife into it. Dry the knife fully, then make a slice. Repeat with each cut, being sure to wipe the blade completely clean after each cut.
- If you want to make this recipe in a 9 x 13-inch pan, double the recipe and bake at 325 F for 38-42 minutes.
Let Me Know What You Think!
If you try this recipe for lemon raspberry cheesecake bars, I’d love to hear what you think of it!
Please leave a rating and let me know your thoughts by sharing a comment.
Other Posts You Might Like:

Lemon Raspberry Cheesecake Bars
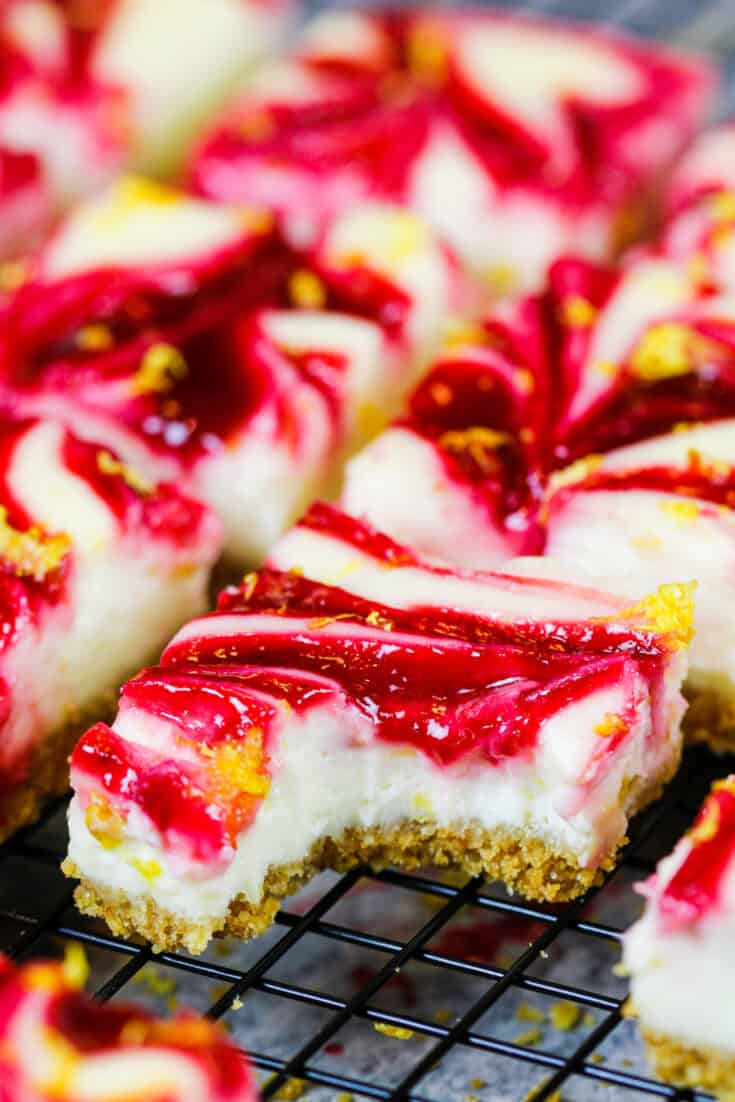
These lemon raspberry cheesecake bars are absolutely delightful! They're rich & creamy and have the most delicious raspberry swirl!
Ingredients
Graham Cracker Crust
- 1 cup graham cracker crumbs or about 9 rectangles (100g)
- 1/4 cup salted butter, melted (56g)
- 2 Tbsp granulated sugar (25g)
- 1 Tbsp fresh lemon zest (3g)
Lemon Cream Cheese Filling
- 2 cups (16 oz) cream cheese, softened (454g)
- 2/3 cup granulated sugar (133g)
- 1 Tbsp fresh lemon zest (3g)
- 1/4 cup fresh lemon juice (60g)
- 2 large eggs, room temperature (112g)
Raspberry Swirl
- 3/4 cup raspberries, fresh or frozen (95g)
- 2 Tbsp granulated sugar (24g)
Instructions
Graham Cracker Crust
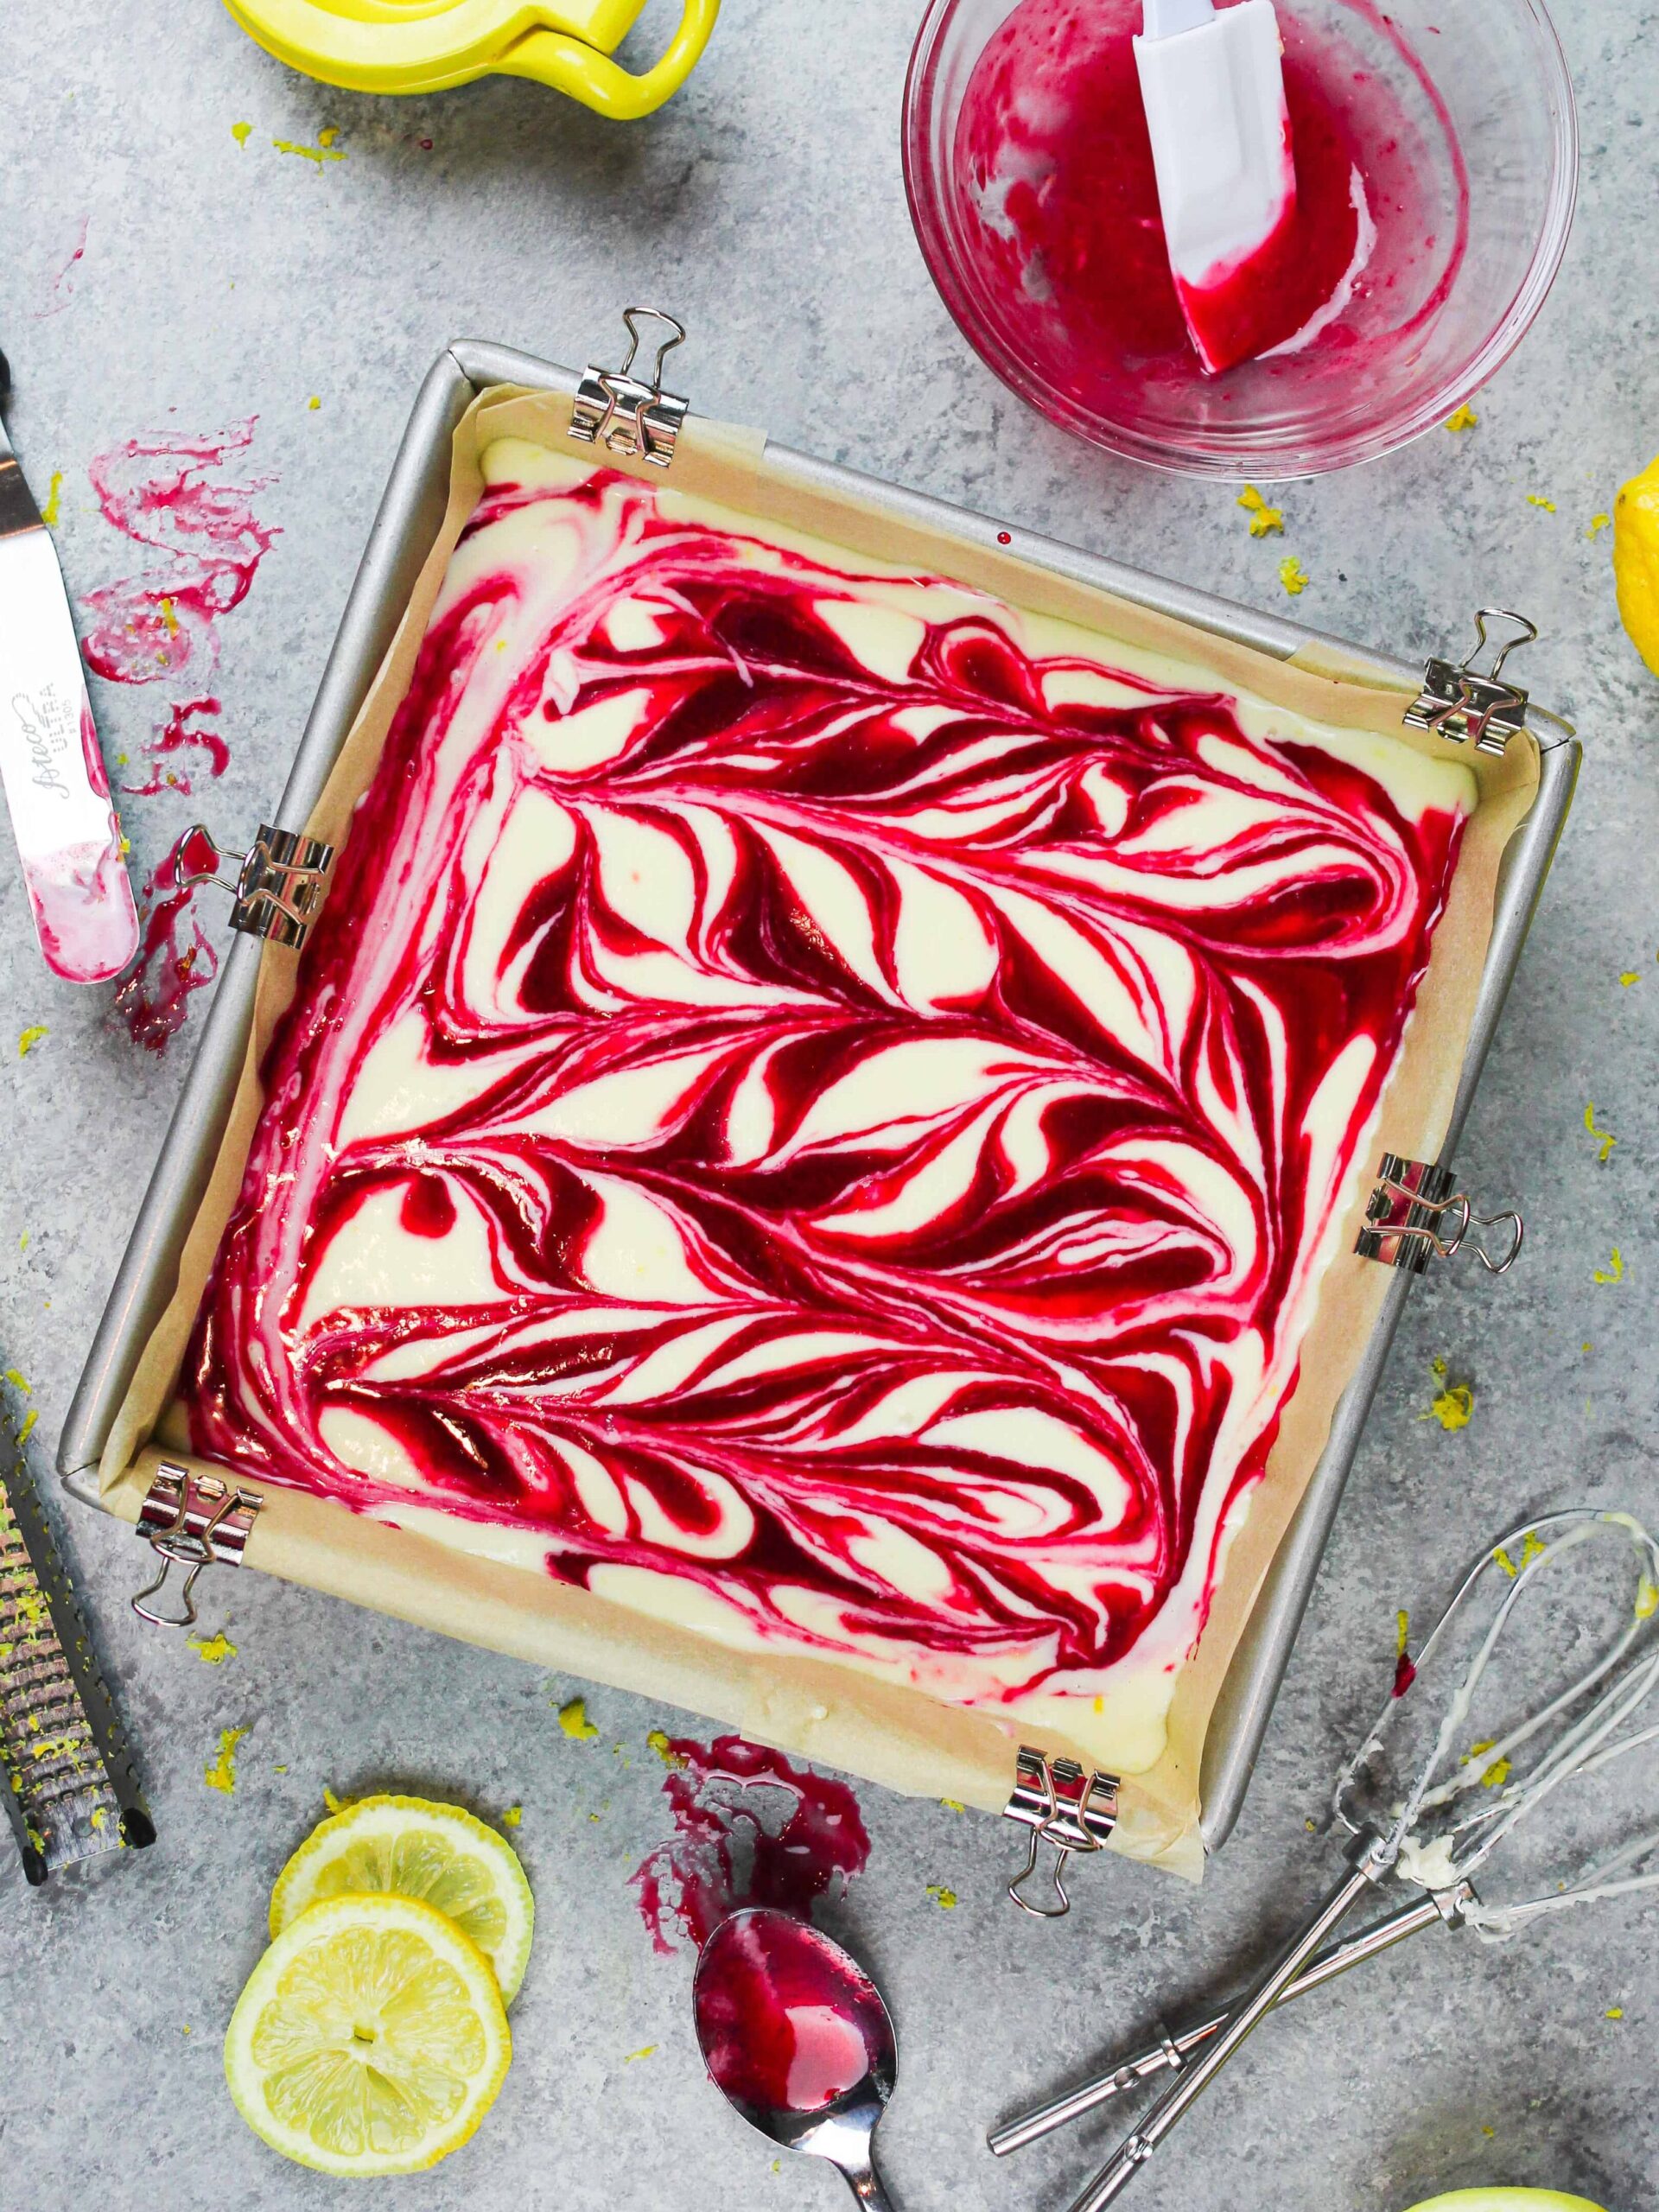
- Preheat oven to 325 F or 165 C and line an 8- x 8-inch square baking pan with parchment paper. I like to use metal (unpainted) binder clips to keep my parchment paper in place.
- Place 1 cup of graham cracker crumbs, 1/4 cup of melted butter, 2 Tbsp of sugar, and 1 Tbsp fresh lemon zest into a small bowl. Mix together until the ingredients are fully combined and the graham cracker crumbs look wet.
- Pour the graham cracker mixture into your prepared pan. Use the back of a spoon or the bottom of a measuring cup to press down firmly and create a compact, even crust.
- Bake for 8 minutes then remove from the oven. Place the pan on a wire rack to cool. Be sure to keep your oven on!!
Lemon Cheesecake
- While the graham cracker crust bakes and cools, make the lemon cheesecake filling.
- Place 2 cups of room temperature cream cheese in a medium sized bowl. Beat with a hand mixer or stand mixer with a whisk attachment on a medium to medium high speed. Mix until the cream cheese is smooth and creamy.
- Add the 2/3 cup of sugar, 1 Tbsp lemon zest, and 1/4 cup of lemon juice. Mix on a medium-low speed until combined, scraping the sides of the bowl with a rubber spatula as needed.
- Add in 2 eggs, one at a time. Mix on a medium speed until the eggs are fully incorporated.
- Pour the lemon cheesecake on top of the cooled graham cracker crust.
Raspberry Swirl
- In a food processor or blender, blend 3/4 cup of fresh or frozen (and thawed) raspberries.
- Pour the pureed raspberries into a mesh strainer to remove the seeds. Use the back of a spoon or rubber spatula to press the mixture through the strainer. Sometimes the puree sticks to the bottom of the strainer rather than dripping into your bowl, so I suggest scraping the underside of your mesh strainer with a spatula.
- Stir 2 Tbsp of sugar into the raspberry puree by hand. The mixture will be quite thin, but that's how it's supposed to be!
- Add spoonfuls of the raspberry mixture on top of the lemon cheesecake batter. Drag a knife or offset spatula through the cheesecake to create raspberry swirls.
- Bake the cheesecake bars for 36-40 minutes. Do a wiggle test to check if they're done (watch the center, and look for a small wiggle), rather than a toothpick!
- Let the bars cool completely in the pan on a metal rack. Once they reach room temperature, refrigerate them for an additional 2 hours or overnight. Do NOT put them immediately into the fridge, or the top can crack.
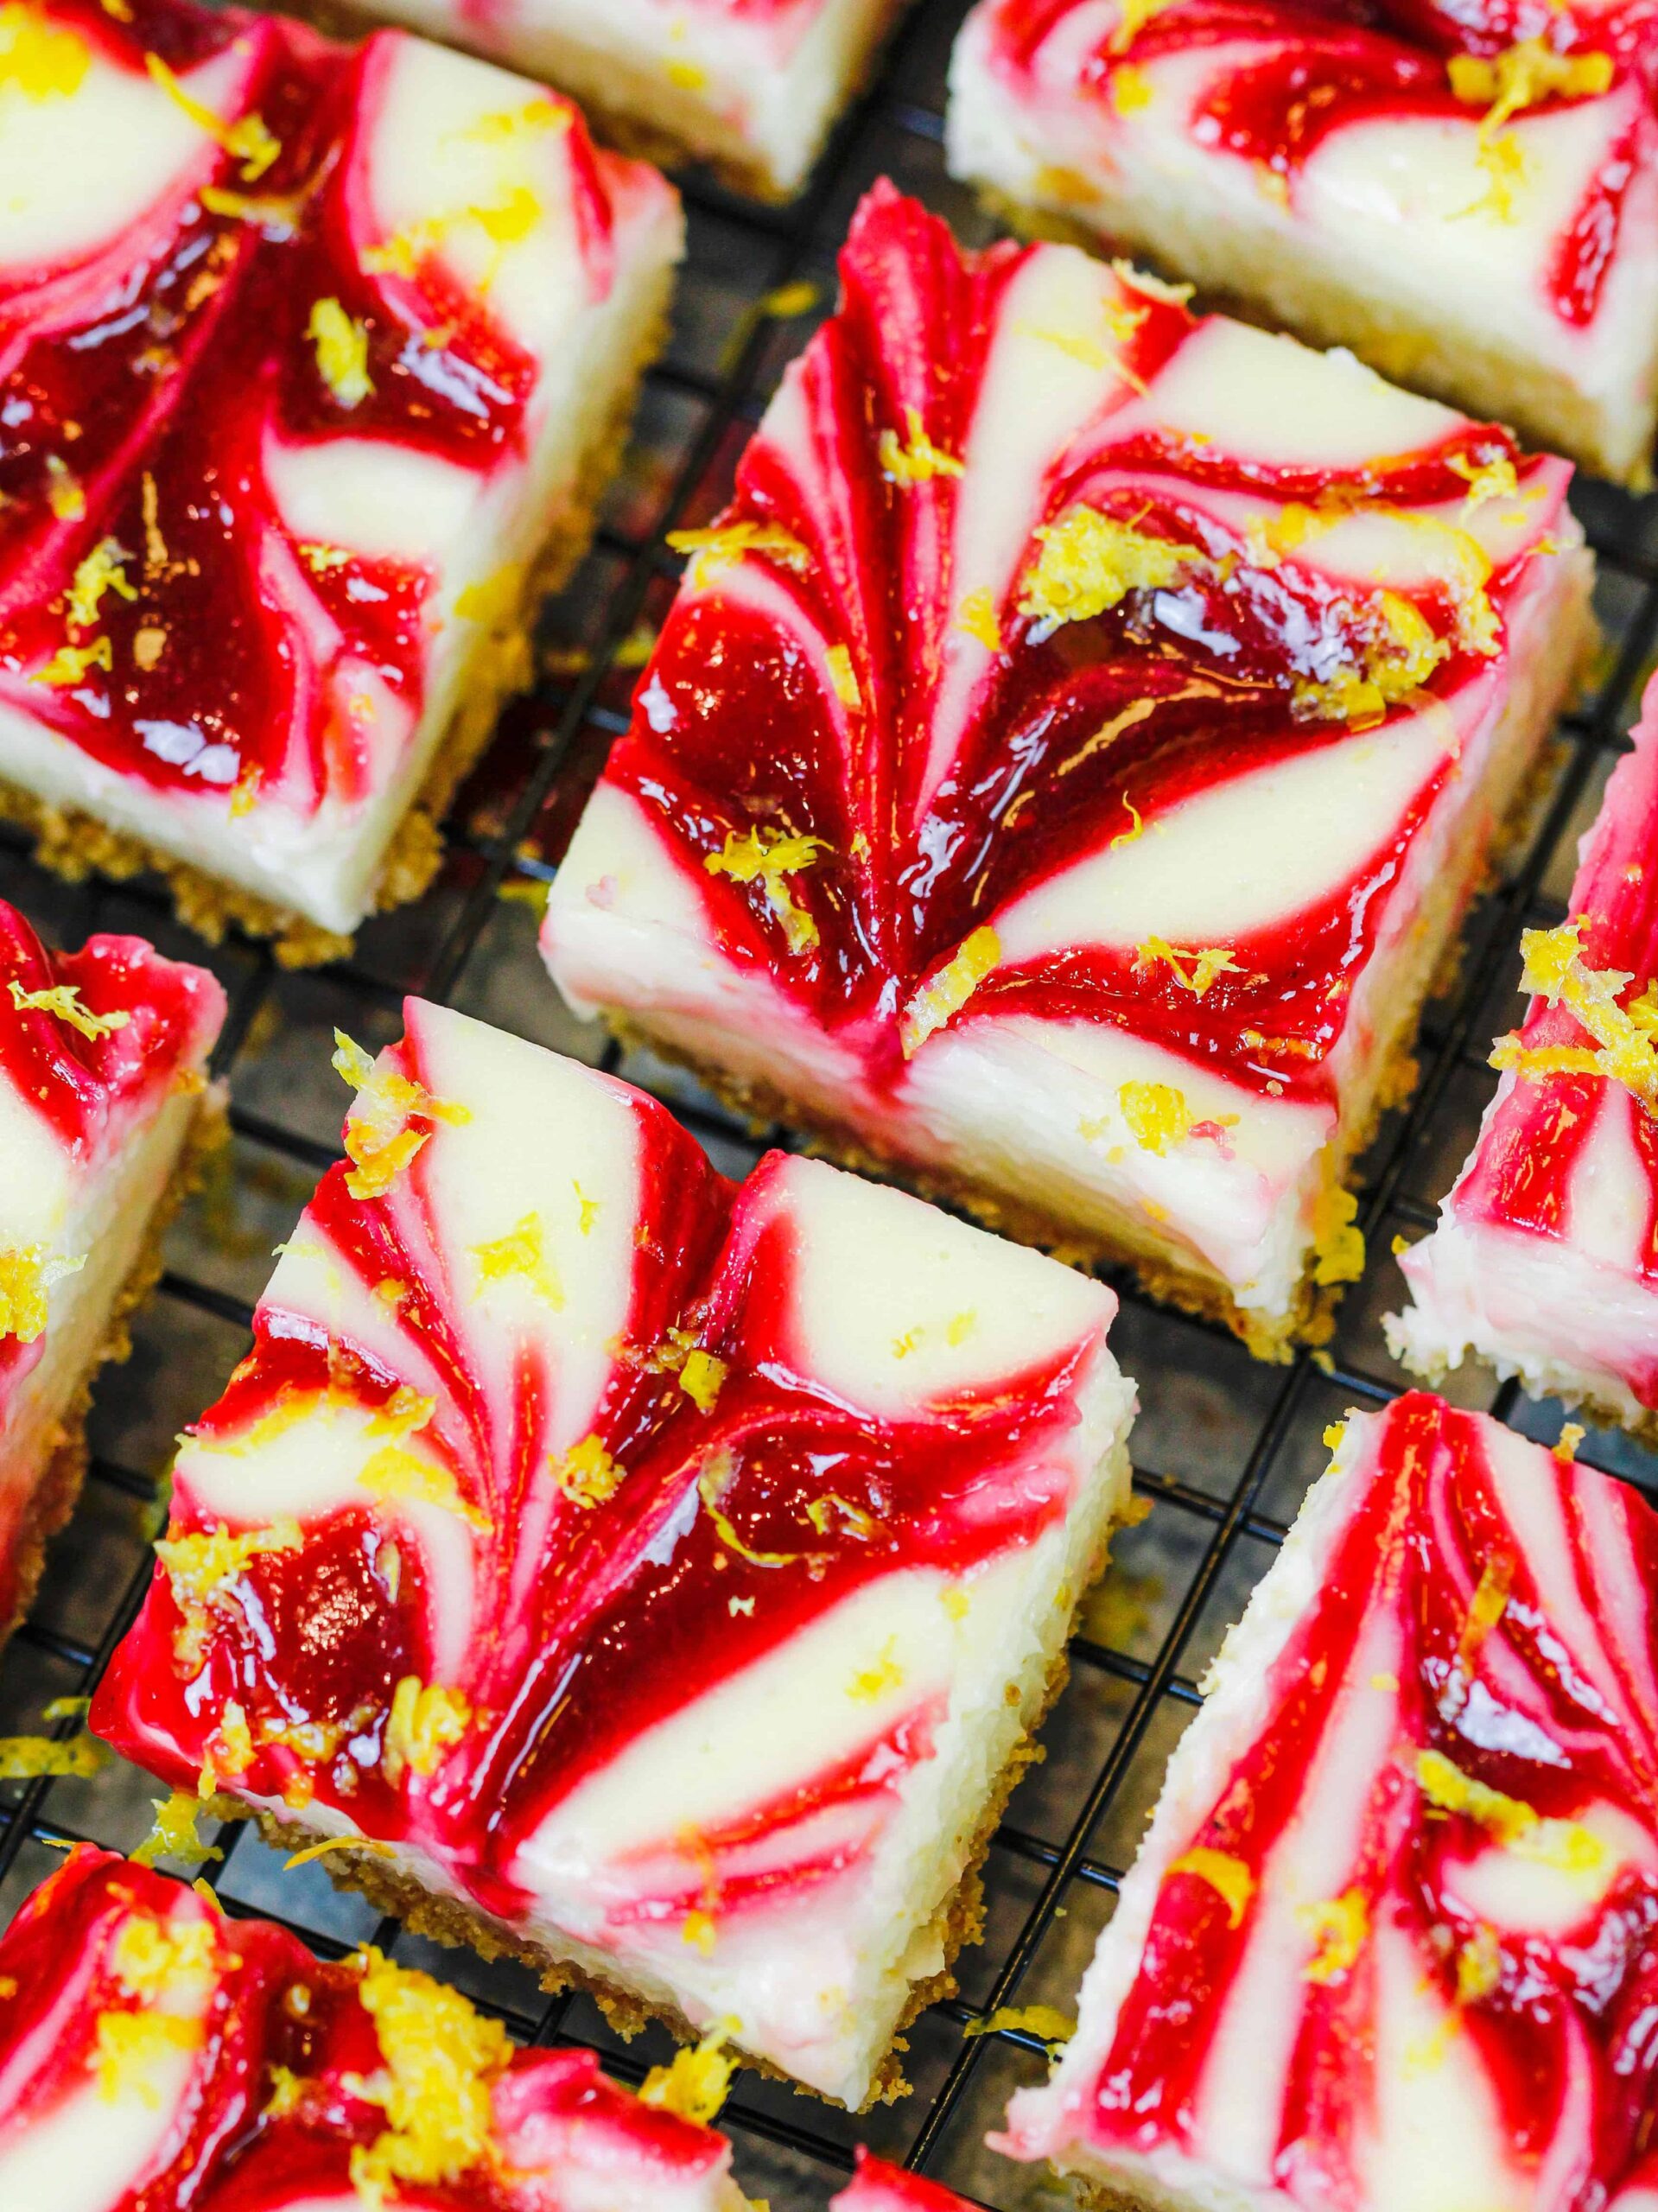
- Top the cooled bars with an additional sprinkle of lemon zest and cut them with a sharp, warm knife. Clean the knife after each cut to get perfect squares.
- Leftover bars can be kept in the fridge for up to 5 days in an airtight container.
Notes
Making These Lemon Raspberry Cheesecake Bars in Advance
These lemon raspberry cheesecake bars keep in the fridge for up to 5 days. Store them in an airtight container to keep them fresh.
You can also freeze these bars for up to two months! Freeze the bars on a sheet pan until they're firm to the touch, then wrap them in a layer of plastic wrap and then foil. When you want to enjoy the bars, place the bars in the fridge overnight, then unwrap and enjoy the following day.
How To Make the Best Lemon Raspberry Cheesecake Bars
- Make sure your cream cheese is at room temperature. If you forget to set it out ahead of time, cut the blocks into smaller squares and heat it in the microwave in 10 second intervals until it reaches room temperature.
- Use fresh lemon juice and lemon zest rather than the bottled stuff. It makes a huge difference.
- Use your favorite berries! This recipe would also work great with blackberries, strawberries, or even marionberries.
- Don't use a toothpick to check if your bars are done. Instead, gently shake the pan while it's still in the oven. If only a small circle in the center jiggles a little, it's ready! The center will set as the bars cool.
- Use a warm, sharp knife to get clean slices! Fill a tall cup with hot water and drip a sharp knife into it. Dry the knife fully, then make a slice. Repeat with each cut, being sure to wipe the blade completely clean each time.
- If you want to make this recipe in a 9 x 13-inch pan, double the recipe and bake at 325 F for 38-42 minutes.
Nutrition Information
Yield
16Serving Size
1Amount Per Serving Calories 300Total Fat 10gSaturated Fat 3gTrans Fat 0gUnsaturated Fat 5gCholesterol 34mgSodium 272mgCarbohydrates 49gFiber 2gSugar 24gProtein 5g
Shari Thompson
Monday 13th of June 2022
I have made this several times and it is so good! I usually make it in a springform pan and it looks beautiful. I tried it as bars today and learned something new in the process. I was moving too quickly and I forgot to add the lemon juice to the cheesecake filling...so I added it at the end, after the eggs had been incorporated. I learned that doesn't work so well. The filling was thinner than usual and I was concerned about that. My concern was correct as it never really set up very well. I baked it an extra 6 minutes or so and but the edges were starting to brown and it was still jiggly. After cooling and chilling it still tastes good enough to eat, but the texture just isn't the same or the way it should be. Live and learn. :-)
Chelsweets
Monday 13th of June 2022
Hi Shari,
So happy to hear you love this recipe! And that's super interesting and good to know! Noted for the future <3 Happy baking!
Biscoff Cheesecake with Cookie Crust and Cookie Butter Drizzle
Wednesday 20th of April 2022
[…] Cake Filling Raspberry Cheesecake Bars Biscoff Brownies Biscoff Cinnamon Rolls Yield: […]
Red Velvet Oreo Cheesecake -Decadent Recipe from Scratch
Tuesday 19th of April 2022
[…] Cake Filling Raspberry Cheesecake Bars Red Velvet Crinkle Cookies Red Velvet Macarons […]
Pat
Thursday 7th of April 2022
You give so much info but can never find the recipe?
Pink Drip Cake: Easy Recipe and Tutorial
Monday 4th of April 2022
[…] Lemon Raspberry Cheesecake Bars White Drip Cake Valentine’s Day Cake Ideas Cotton Candy Macarons {"@context":"http://schema.org","@type":"Recipe","name":"Pink Drip Cake","author":{"@type":"Person","name":"Chelsey White"},"datePublished":"2019-10-04","recipeYield":30,"description":"Whether you're celebrating a baby shower, birthday, or just love the color pink, this vanilla pink drip cake is perfect for so many occasions!","image":["https://chelsweets.com/wp-content/uploads/2019/04/IMG_1029-2-720x720.jpg","https://chelsweets.com/wp-content/uploads/2019/04/IMG_1029-2-720x540.jpg","https://chelsweets.com/wp-content/uploads/2019/04/IMG_1029-2-scaled.jpg","https://chelsweets.com/wp-content/uploads/2019/04/IMG_1029-2-720x405.jpg","https://chelsweets.com/wp-content/uploads/2019/04/IMG_1029-2-735x1103.jpg"],"recipeCategory":"Cakes","recipeCuisine":"American","prepTime":"PT30M","cookTime":"PT35M","performTime":"PT1H20M","totalTime":"PT1H50M","recipeIngredient":["3 cups all-purpose flour (375g)","3 cups granulated sugar (600g)","2 1/2 tsp baking powder (10g)","1 tsp salt (5g)","1 cup unsalted butter, room temperature (226g) - 2 sticks","2 tsp vanilla extract (9g)","1 cup egg whites or about 7 egg whites (235g)","1 1/2 cups buttermilk, room temperature (360g)","2 Tbsp vegetable oil (28g)","Pink gel food coloring","2 cups unsalted butter, room temperature (452g)","8 cups powdered sugar (1000g)","1/2 tsp salt (3g)","2 Tbsp heavy cream or whipping cream (30g)","1 Tbsp vanilla extract (12g)","Pink gel food coloring","1/3 cup heavy cream (77g)","1 cup white chocolate chips (175g)","Pink gel food coloring","Pink Candies and Lollipops"],"recipeInstructions":[{"@type":"HowToStep","text":"Preheat oven to 350u00b0F. Line three eight-inch pans with parchment rounds and grease with non-stick cooking spray.","position":1,"name":"Preheat oven to 350u00b0F. Line three eight-inch pans...","url":"https://chelsweets.com/pink-drip-cake/#mv_create_80_1"},{"@type":"HowToStep","text":"Mix together the flour, baking powder, sugar, and salt in a stand mixer with a paddle or a large bowl with a whisk until fully combined.","position":2,"name":"Mix together the flour, baking powder, sugar, and...","url":"https://chelsweets.com/pink-drip-cake/#mv_create_80_2"},{"@type":"HowToStep","text":"Mix chunks of room-temperature butter slowly into the dry ingredients and mix on a low speed. Continue to mix until no large chunks of butter remain, and the mixture becomes crumbly.","position":3,"name":"Mix chunks of room-temperature butter slowly into the...","url":"https://chelsweets.com/pink-drip-cake/#mv_create_80_3"},{"@type":"HowToStep","text":"Pour in egg whites and mix on low until just incorporated. Mix in the buttermilk in two installments on a low speed. Add in oil and vanilla extract, and mix at a low speed until fully incorporated. Scrape down the sides of the bowl with a spatula as needed, then beat on medium speed for about 30 seconds.u00a0","position":4,"name":"Pour in egg whites and mix on low...","url":"https://chelsweets.com/pink-drip-cake/#mv_create_80_4"},{"@type":"HowToStep","text":"Add in a generous squirt of pink gel food coloring. Mix the batter on a low speed, scraping the sides and bottom of the bowl part way through to evenly color the batter.","position":5,"name":"Add in a generous squirt of pink gel...","url":"https://chelsweets.com/pink-drip-cake/#mv_create_80_5"},{"@type":"HowToStep","text":"Divide batter evenly between the prepared cake pans. I like to use a digital kitchen scale to weigh my pans, and ensure they all have the same amount of batter. This guarantees your layers will bake to be the same height.","position":6,"name":"Divide batter evenly between the prepared cake pans....","url":"https://chelsweets.com/pink-drip-cake/#mv_create_80_6"},{"@type":"HowToStep","text":"Bake for 34-36 minutes or until a skewer comes out with a few moist crumbs. Allow to cool for 10 minutes, then run an offset spatula around perimeter of the pan to separate the cake from the pan.","position":7,"name":"Bake for 34-36 minutes or until a skewer...","url":"https://chelsweets.com/pink-drip-cake/#mv_create_80_7"},{"@type":"HowToStep","text":"Place cake layers into the freezer for 45 minutes to accelerate the cooling process.","position":8,"name":"Place cake layers into the freezer for 45...","url":"https://chelsweets.com/pink-drip-cake/#mv_create_80_8"},{"@type":"HowToStep","text":"Once the cake layers are cooled. level the tops with a serrated knife.","position":9,"name":"Once the cake layers are cooled. level the...","url":"https://chelsweets.com/pink-drip-cake/#mv_create_80_9"},{"@type":"HowToStep","text":"Beat the butter on a medium speed for 30 seconds with a paddle attachment until smooth. Slowly add in the powdered sugar and mix in on a low speed. Alternate with small splashes of cream.","position":10,"name":"Beat the butter on a medium speed for...","url":"https://chelsweets.com/pink-drip-cake/#mv_create_80_10"},{"@type":"HowToStep","text":"Once fully mixed, add in the vanilla and salt, and beat on low until the ingredients are fully incorporated, and the desired consistency is reached.u00a0","position":11,"name":"Once fully mixed, add in the vanilla and...","url":"https://chelsweets.com/pink-drip-cake/#mv_create_80_11"},{"@type":"HowToStep","text":"If the frosting is too thick, add in additional cream (1 Tbsp at a time). If the fro […]