
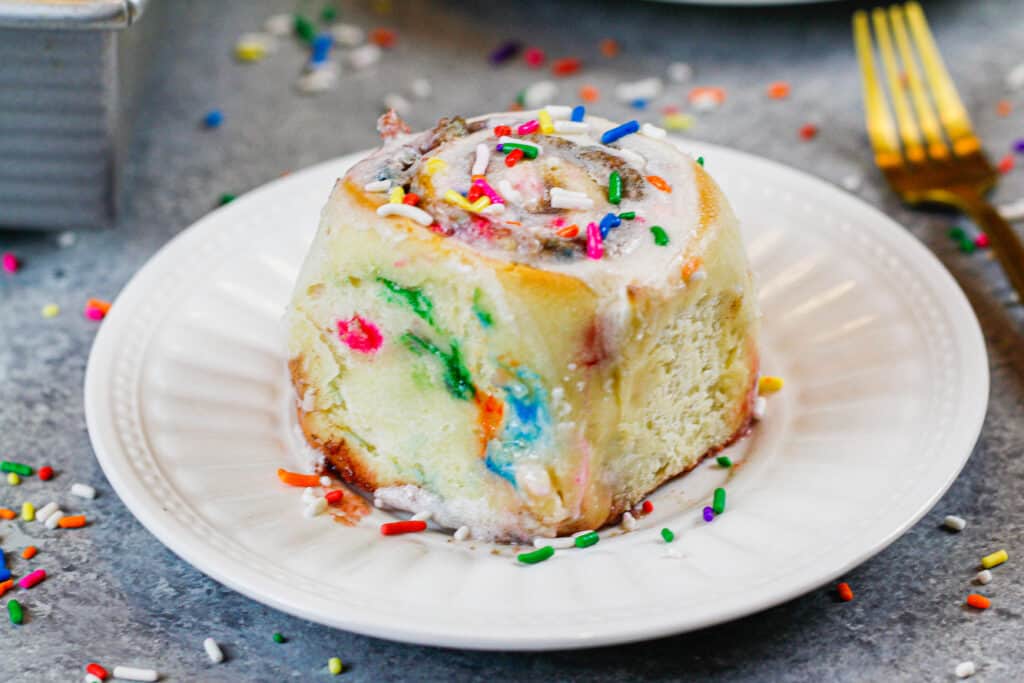
It’s high time I share a gluten free funfetti cake recipe. It’s my favorite cake flavor, and this gluten free version is just as delicious as my classic funfetti cake recipe.
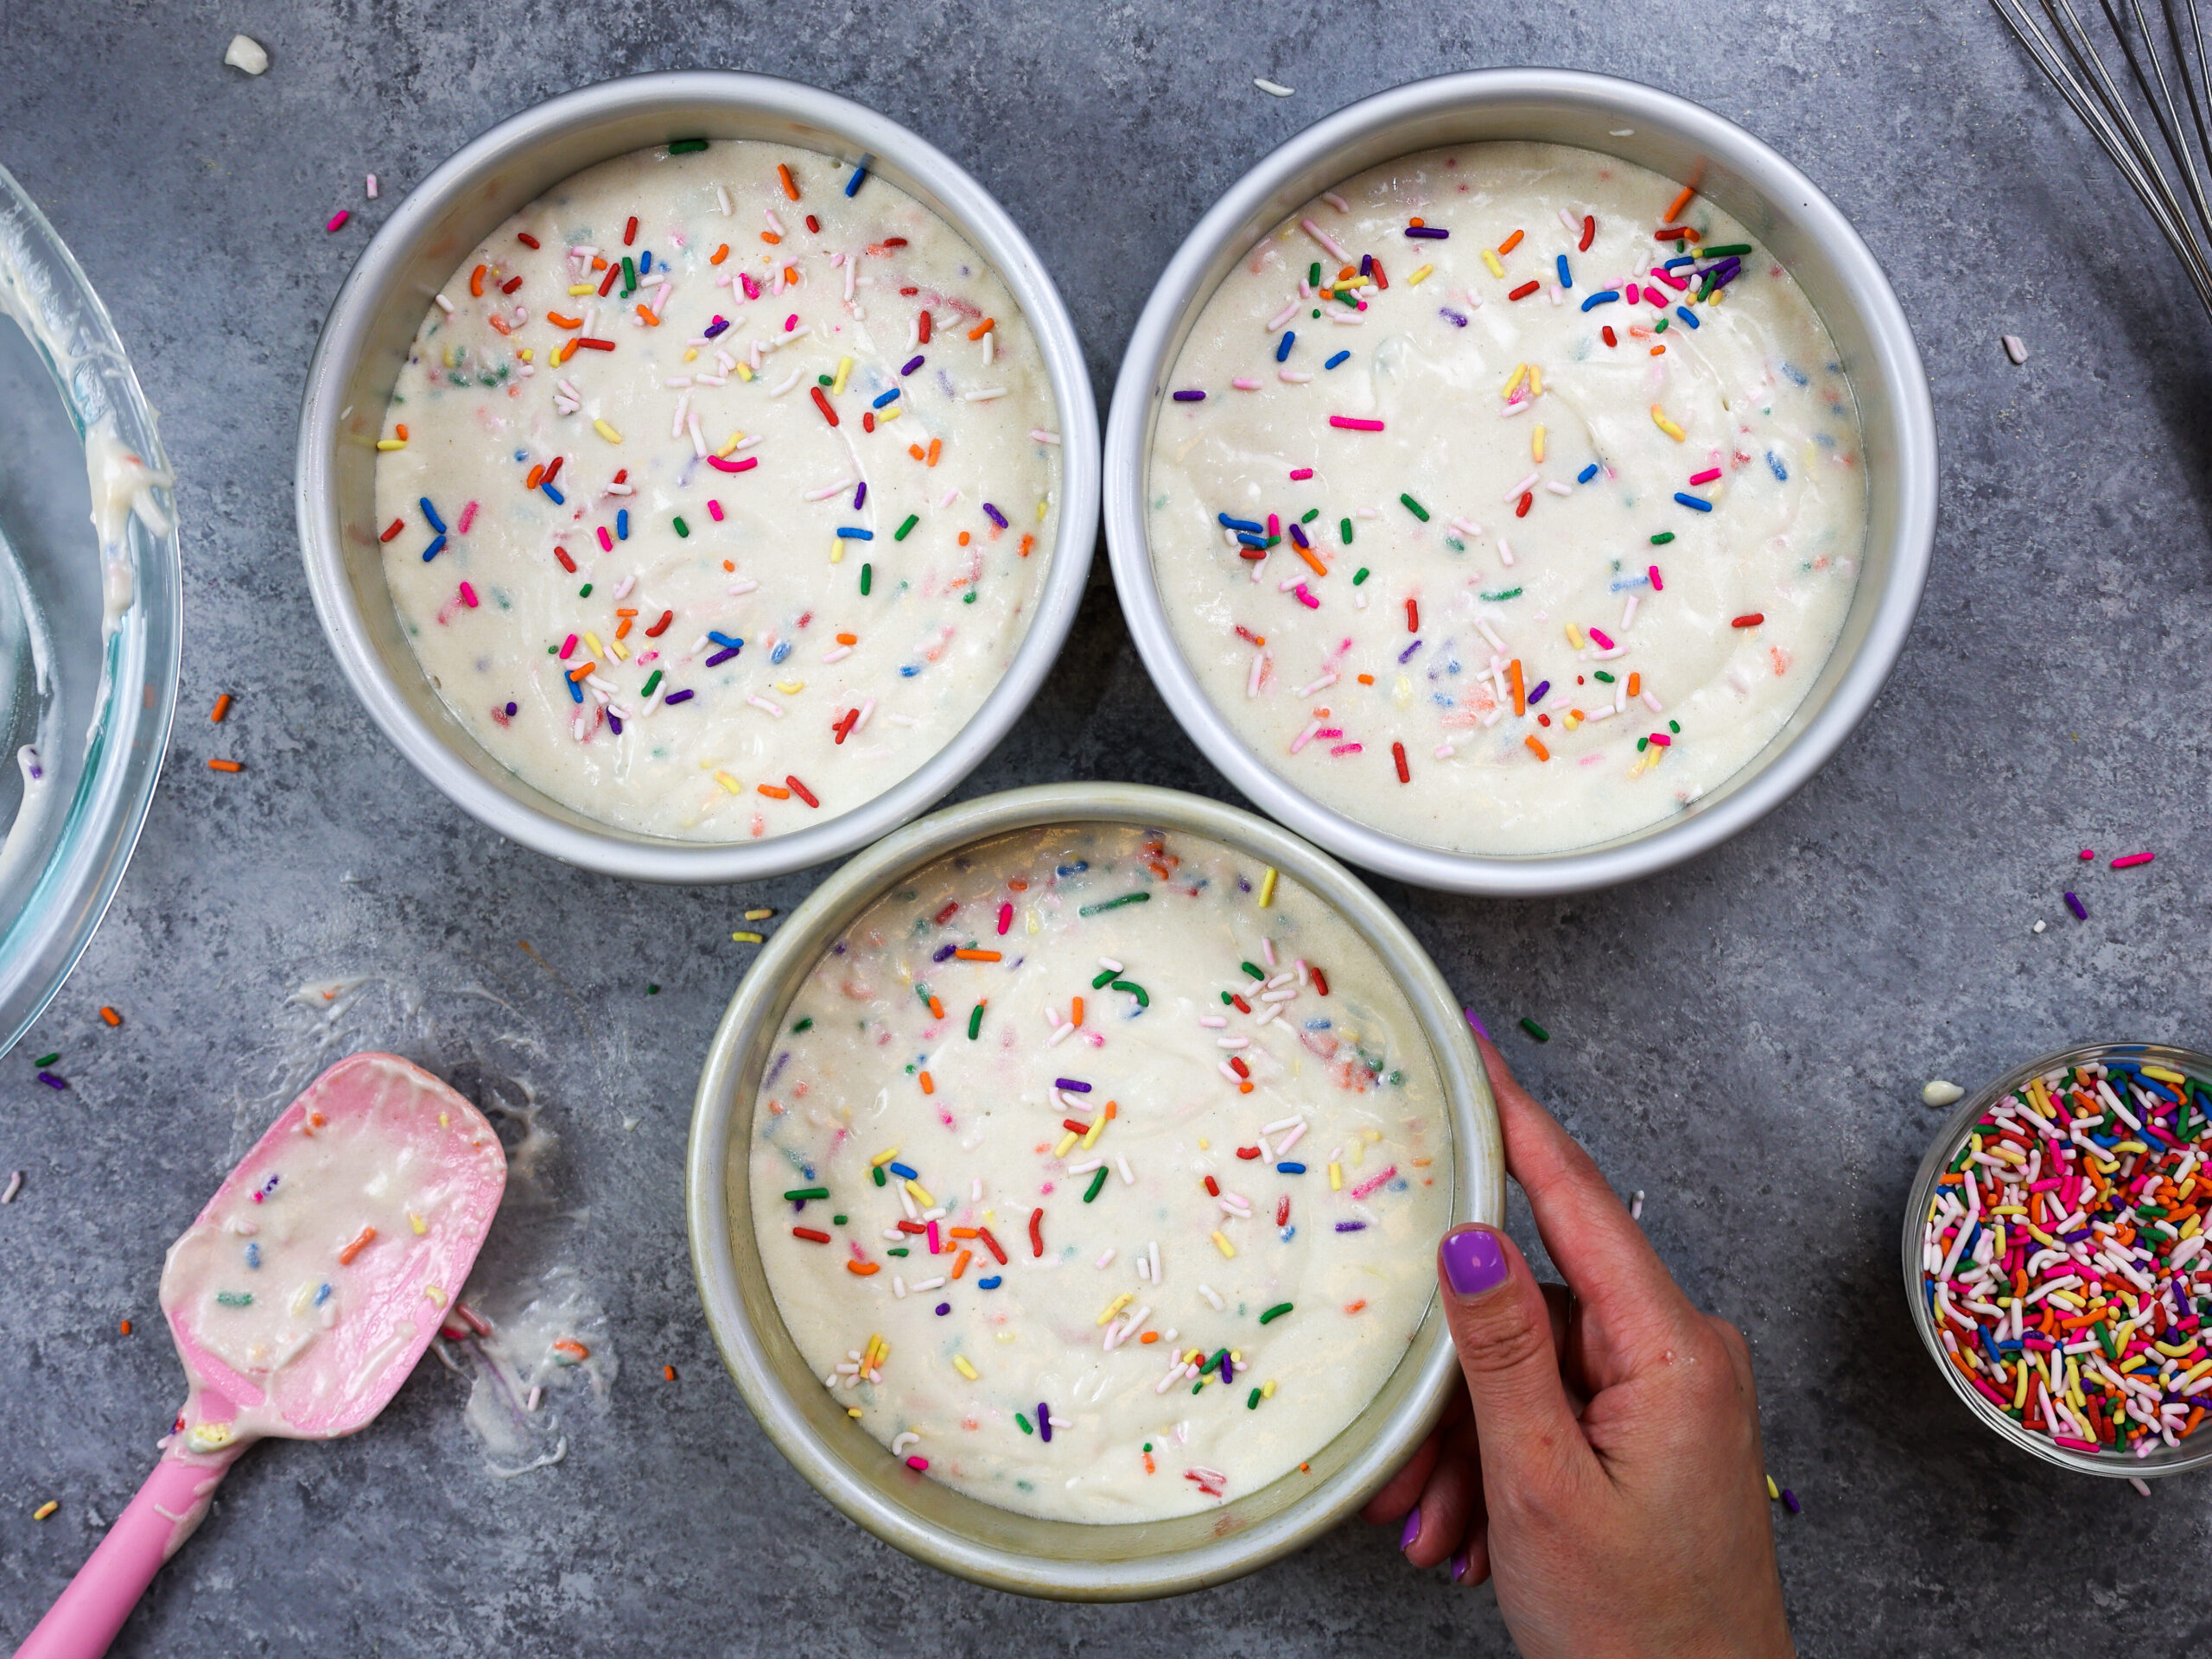
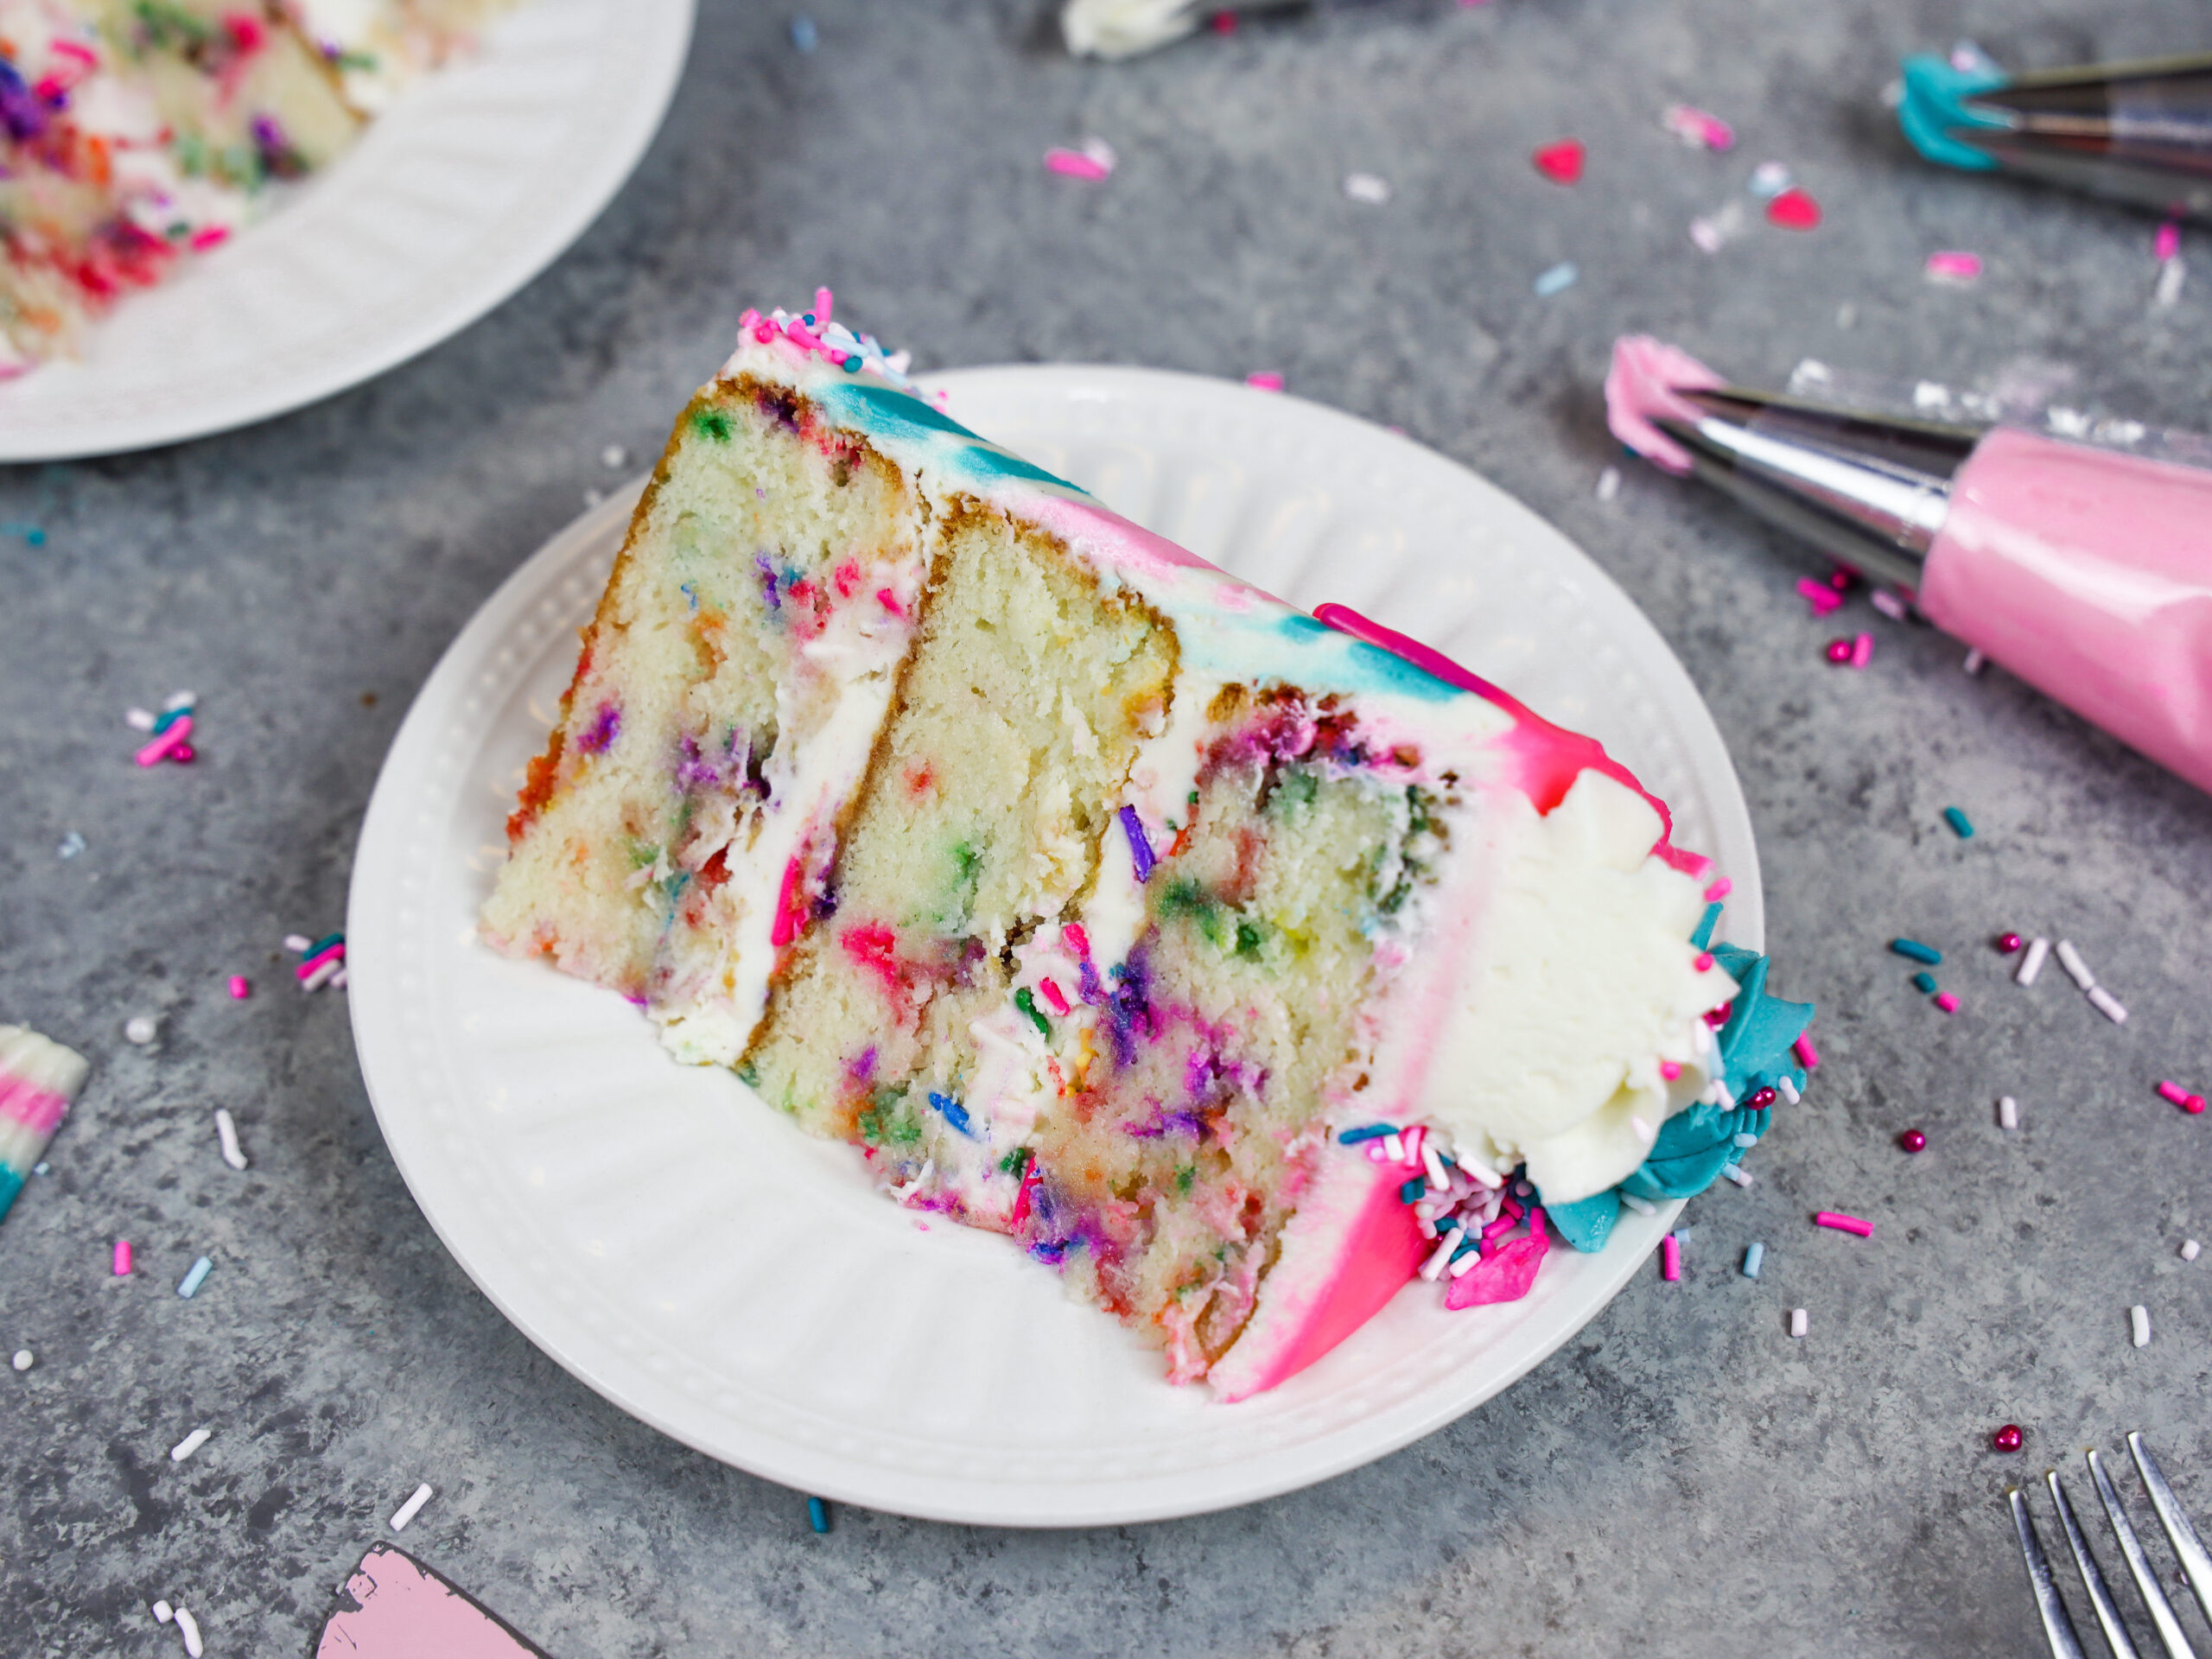
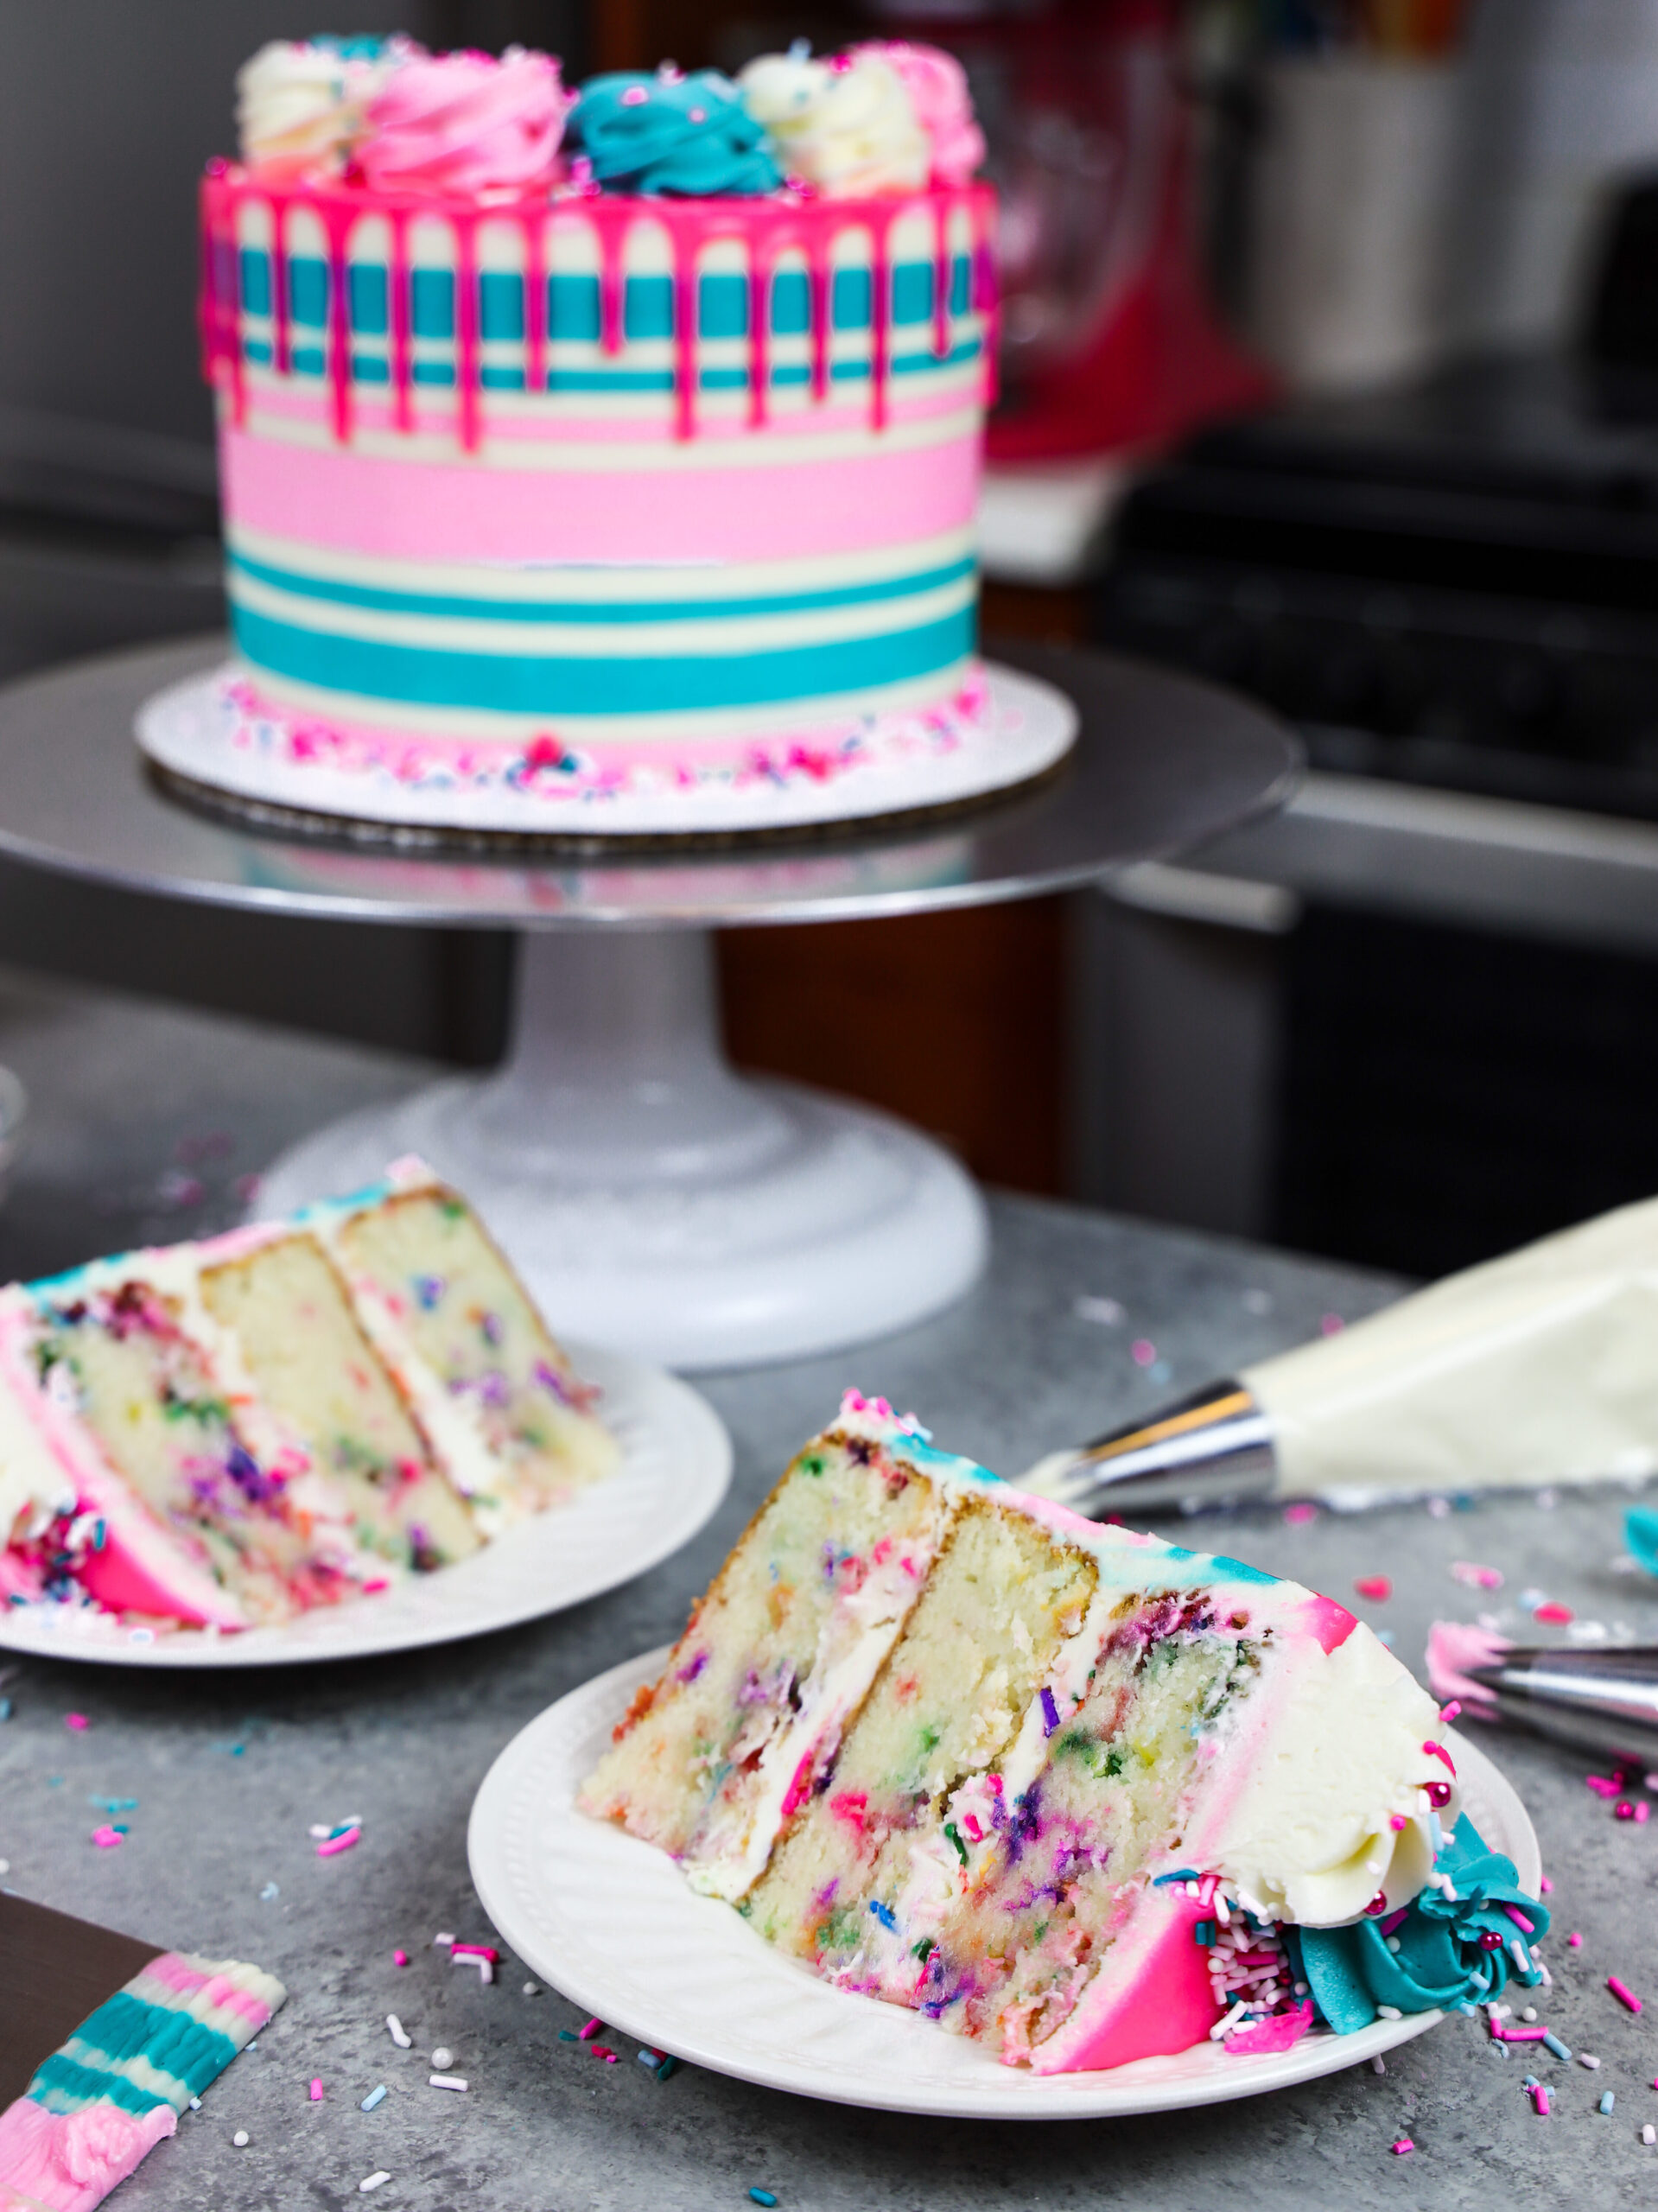
I add sprinkles to the cake batter and include them between the cake layers. I love how pretty this makes the cake slices look once the cake is cut into, and the little bit of crunch you get with each bite.
My Favorite Gluten Free Flour Blend
I’ve tried this recipe with a few different brands of gluten free flour, and so far each of them has worked great:
- King Arthur gluten free measure for measure flour
- Cup4Cup gluten free multipurpose flour blend
- Bob’s Red Mill gluten free 1-to-1 baking flour
My favorite brand of gluten free flour blend for this recipe was King Arthur. However, any brand of gluten free flour you can find at your grocery store should work.
My only word of caution is to be sure you use some sort of gluten free flour blend. Using a single type of gluten free flour like almond flour or cassava flour in this recipe will not yield the same results!
Most grocery stores carry at least one blend of gluten free flour. Stores like Whole Foods or Trader Joe’s also have lots of great options.
If all else fails, amazon is another easy way to get your hands on a gluten free flour blend. I order a majority of my baking supplies on amazon, including most of my specialty ingredients.
What Types Of Sprinkles Should I Use in this Gluten Free Funfetti Cake?
While you might think all sprinkles are created equal, I disagree. When making a funfetti cake, it helps to use a specific type of rainbow sprinkles.
The best sprinkles for making a funfetti cake are rainbow jimmies. They are the longer sprinkles, that you used to (and may still) put on your ice cream.
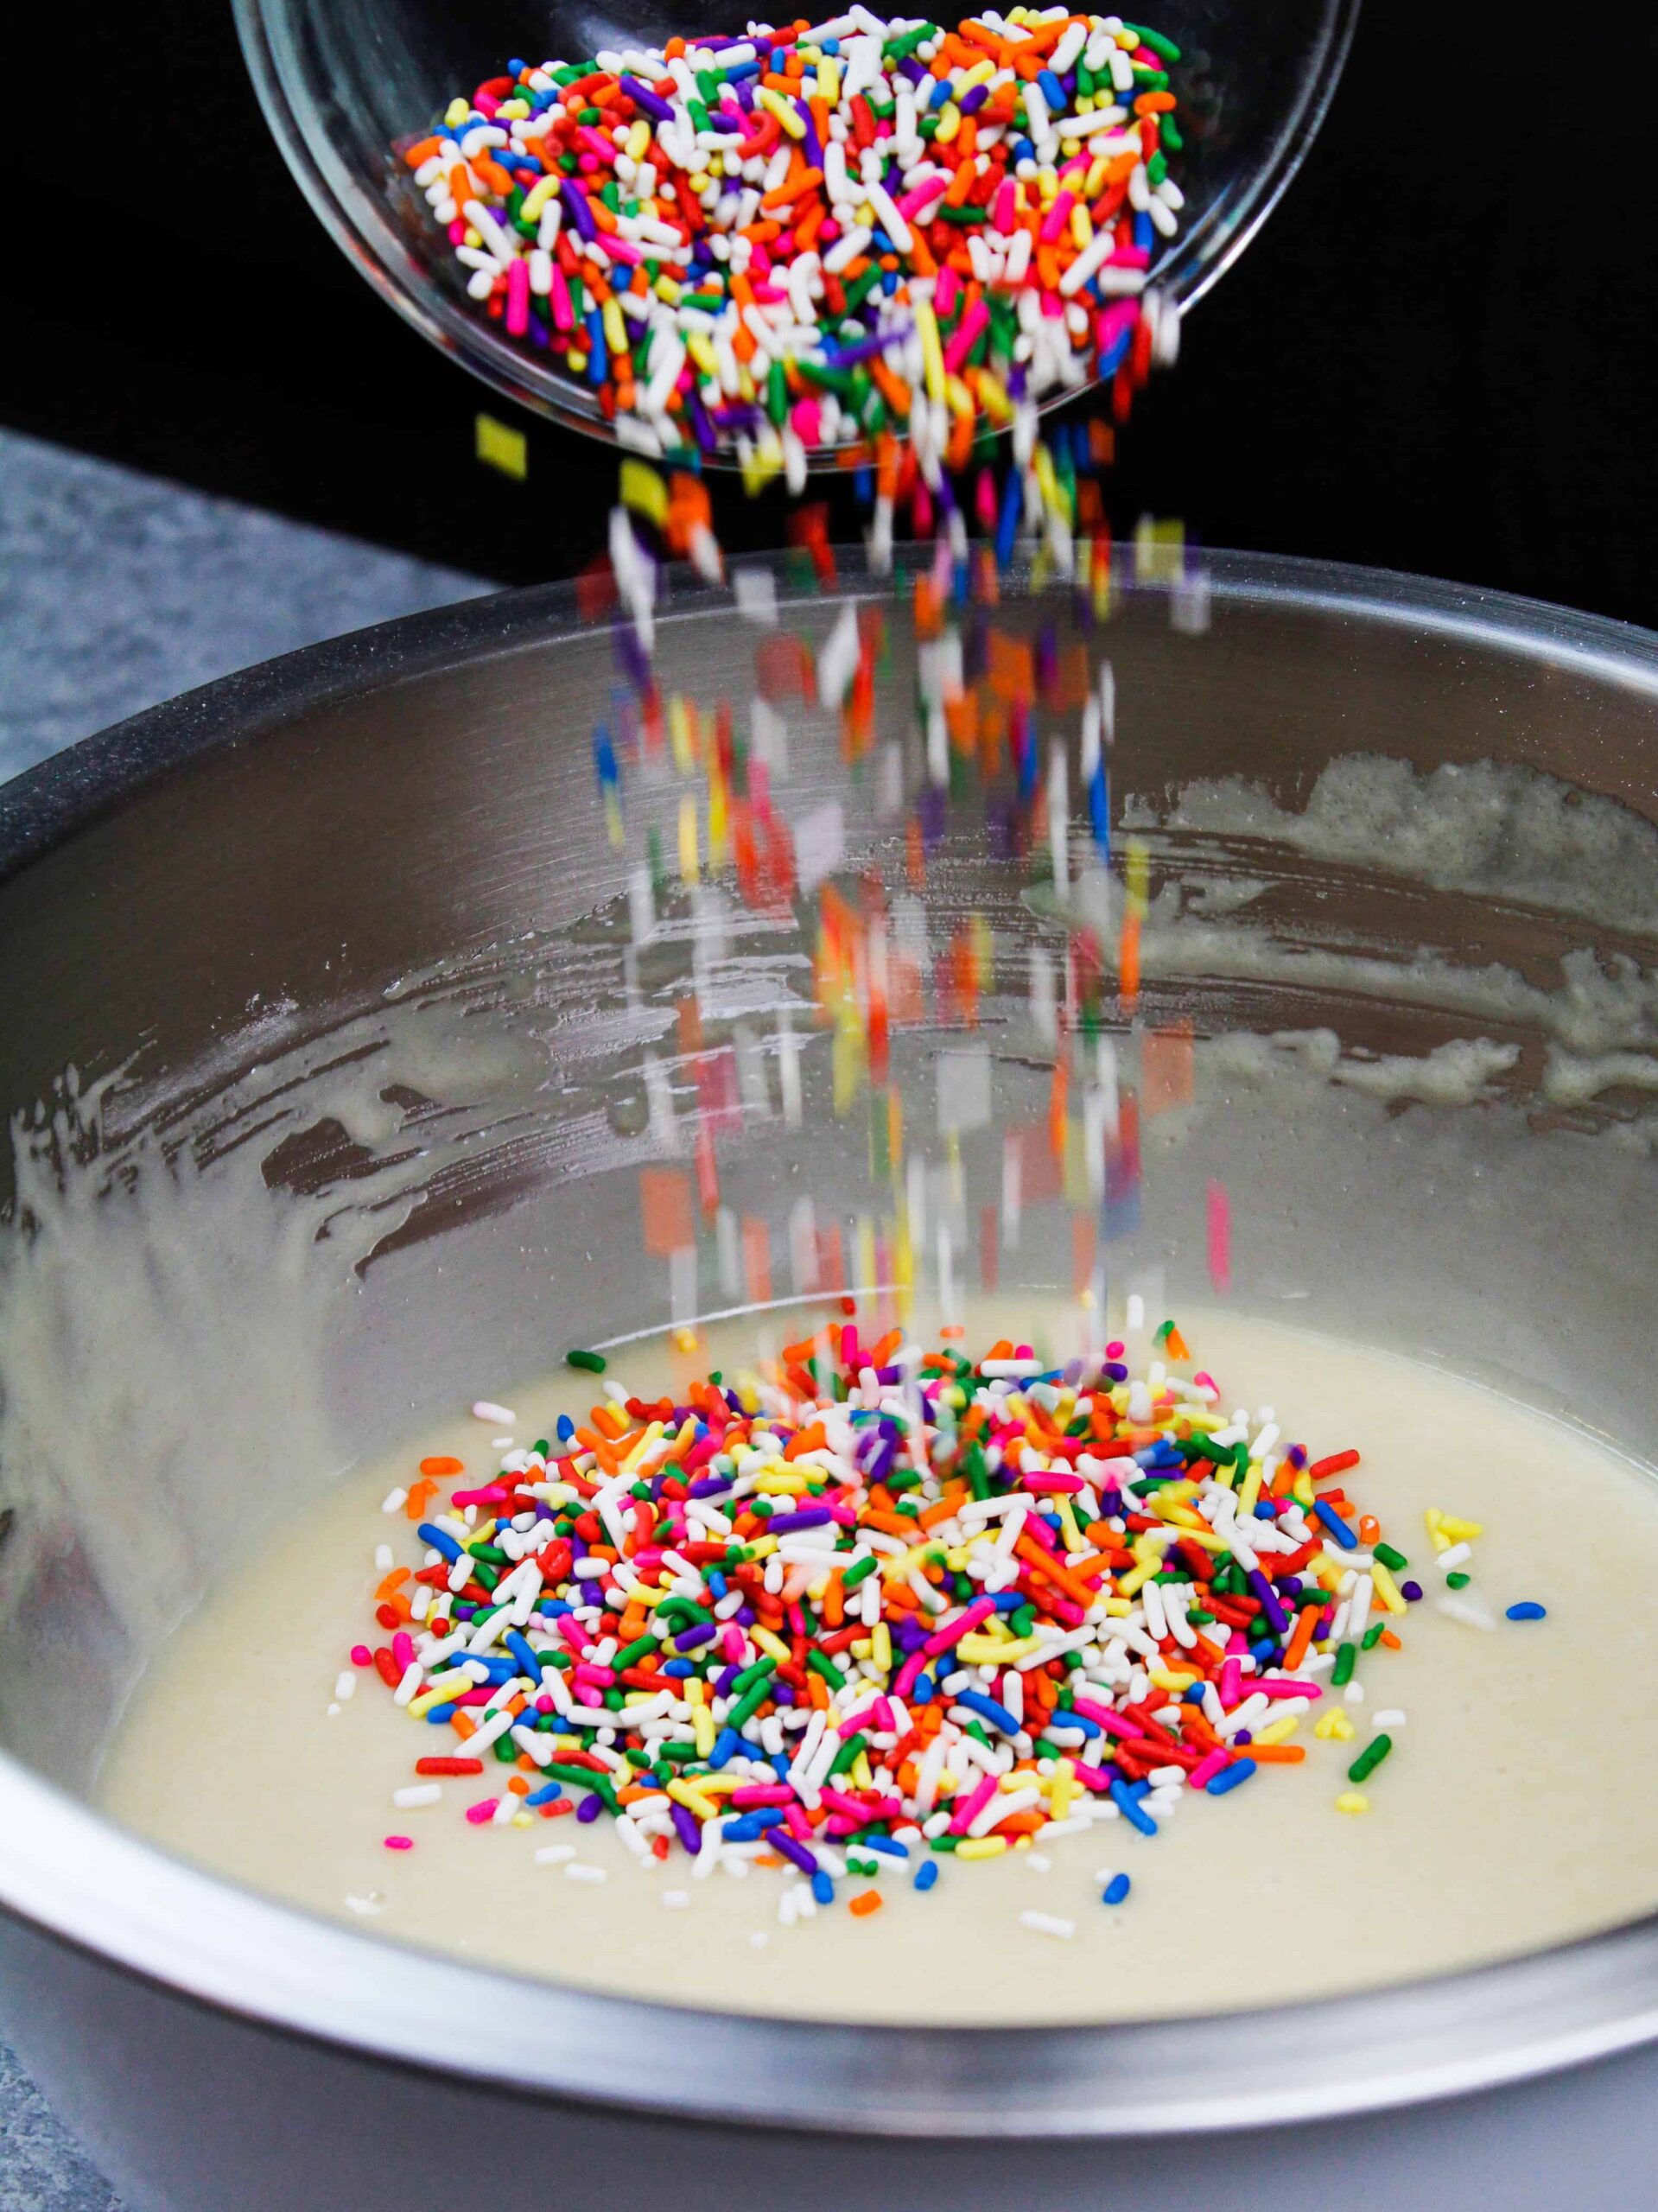
These sprinkles keep their color, and won’t immediately bleed into your batter.
This is important, because it will help your batter say white while you add it to your pans. This will allow the color of the sprinkles to really shine through once the layers are baked.
If you really want to be picky about your sprinkles, I also recommend getting a rainbow sprinkle blend that doesn’t have any chocolate/brown sprinkles in it. Funfetti cake layers look so much better without any brown sprinkles!
The type of sprinkle you should NOT use are the tiny, round, rainbow sprinkles. They’re called nonpareils, and they are the true enemy of funfetti cake layers.
Nonpareils will start to bleed their colors the second they’re stirred into your cake batter, resulting in a creepy, pink/grayish batter.
This can also happen if you let you rainbow jimmies sit in your batter for an extended period of time, and then try to stir it.
The key take aways? Only use rainbow jimmies in this funfetti cake recipe, gently fold them into your batter, and immediately pour into your cake pans.
Tips for Making the Best Gluten Free Funfetti Cake
There are a couple tricks I use to make sure my gluten free baked goods end up with that tender, fluffy texture we know and love.
Tip #1: Over-Mix Your Batter
While I strongly advise against over mixing batter in other recipes, gluten free batter is different.
The whole reason you don’t want to over mix your batter is that it develops thick strands of gluten, which can lead to dense, tough cake. But when you’re using gluten free flour, this isn’t a problem.
In fact, overmixing gluten free flour can actually give the cake better structure! This helps the cake layers rise better as they bake, and gives the cake a more tender crumb.
The incremental structure helps prevent the cake layers from crumbling as they’re bitten into.
Tip #2 Let Your Batter Rest
Gluten free flour blends can have a hard time absorbing moisture and fats.
If you let the batter sit for a bit before baking it, you give the flour more time to absorb all that goodness. This helps thicken the batter, and prevents your cake from having a gritty texture.
Letting the batter sit for about 20 minutes drastically improves the texture of these cake layers. I recommend either resting the batter before folding in the sprinkles, or letting the poured batter rest in the cake pans before baking. Be sure you don’t skip this step!!
Things to Keep in Mind When Making This GF Funfetti Cake
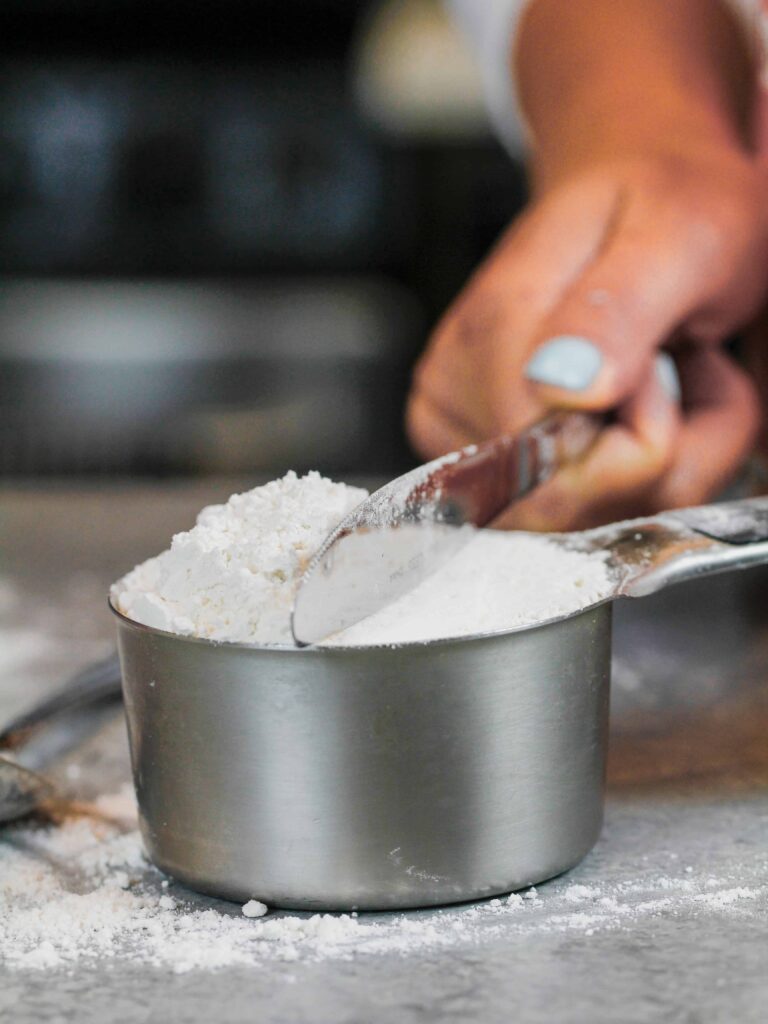
- Properly measure your gluten free flour. Either spoon it into the cup measure, then level with a knife or use a kitchen scale.
- Make sure your ingredients are at room temperature to help them mix together better.
- Don’t level your cake layers until they are completely cooled.
- Make this gluten free funfetti cake vegan or dairy free! Use your favorite type of dairy free milk to replace the buttermilk and heavy cream, vegan butter sticks in place of the butter, and flax seed eggs or a vegan egg replacer in place of the eggs.
- Make sure your buttercream is the right consistency before frosting your cake! It will help give your cake proper structure and make it easier to decorate.
- If you want to add drips to your layer cake like mine, I walk through a detailed video tutorial of the process here.
Making These Gluten Free Funfetti Cake Layers in Advance and Storage Tips
- Make your cake layers in advance and freeze them. It breaks the process up and makes it more approachable.
- Make your frosting ahead of time too, or save any leftover frosting! It can be stored in an airtight container in the fridge for up to a month, or in the freezer for up to 3 months. Be sure to give it a good stir once it thaws to get the consistency nice and smooth again.
- A frosted cake can last in the fridge for up to a week, or in the freezer for up to a month. The buttercream locks in all the moisture, keeping the cake fresh and delicious!
- If you cut into the cake and have leftovers, use any remaining frosting to cover the cut section to keep it moist and store in the fridge for up to a week.
Let Me Know What You Think!
I’d love to hear what you think of this gluten free funfetti cake recipe! Please tag me @chelsweets and use #chelsweets so I can see your beautiful creations!!
Other Recipes You Might Like:


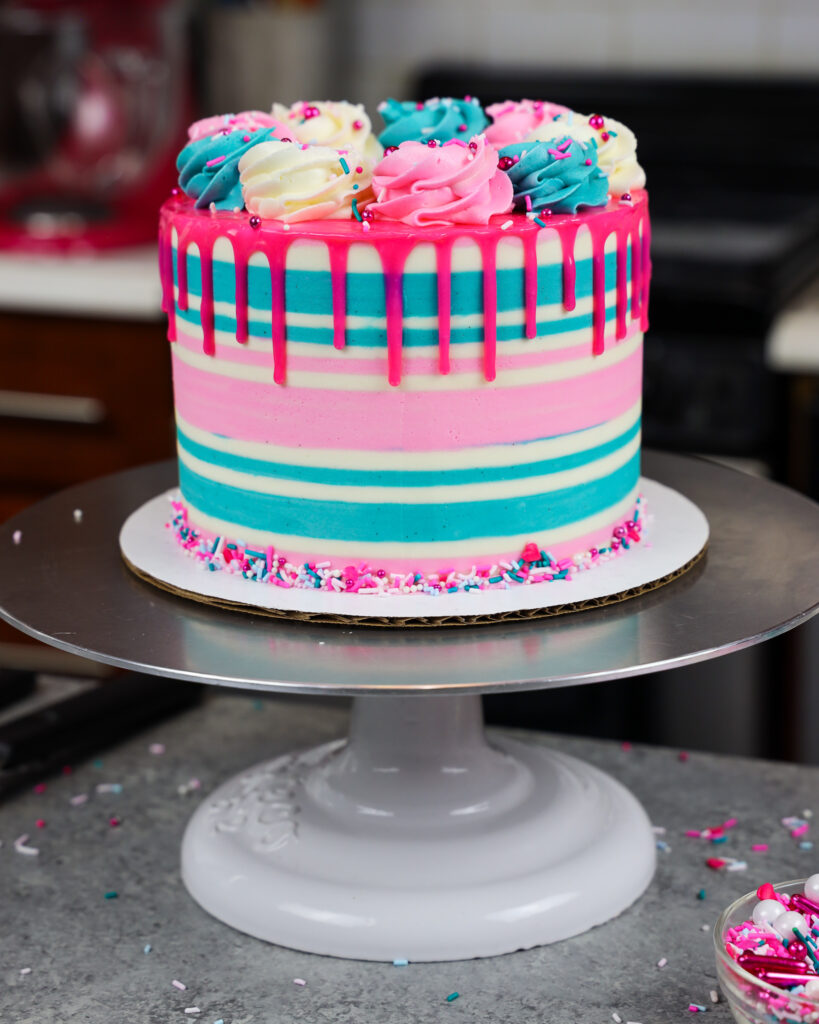
Gluten Free Funfetti Layer Cake
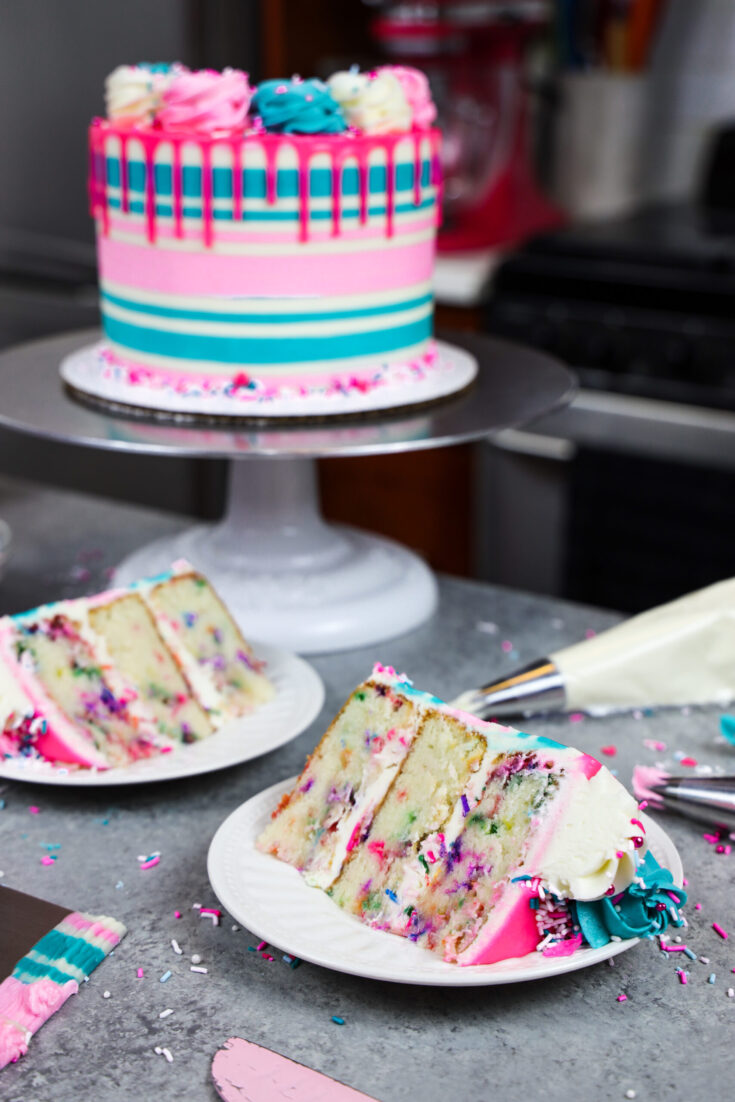
This gluten free funfetti cake recipe makes the perfect six inch layer cake! It makes three, moist cake layers that are perfect for stacking.
Ingredients
Gluten Free Funfetti Cake
- 2 cups + 2 Tbsp gluten free flour blend (255g)
- 2 cups granulated sugar (400g)
- 1 1/2 tsp baking powder (6g)
- 1/2 tsp salt (3g)
- 1/3 cup unsalted butter, room temperature (75g)
- 2/3 cup egg whites (or about 5 egg whites) (155g)
- 1 cup buttermilk, room temperature (228g)
- 1/3 cup vegetable oil (75g)
- 1 tsp vanilla extract (4g)
- 1 tsp almond extract (4g)
- 1/2 cup rainbow jimmie sprinkles (90g)
Almond Vanilla Buttercream Frosting
- 2 cups unsalted butter, room temperature (434g)
- 1 tsp vanilla extract (4g)
- 1 tsp almond extract (4g)
- 1/2 tsp salt (3g)
- 7 cups powdered sugar (907g) - or a 2 lb bag
- 2 Tbsp heavy cream or whipping cream (30g)
Pink Drip Recipe
- 2 Tbsp heavy cream or whipping cream (32g)
- 1/2 cup white chocolate chips (90g)
- pink gel food coloring
Additional Decorations – Optional
- Fun sprinkle blend
Equipment Needed
- 3, 6-inch cake pans
- Spinning cake stand
- 8-inch cake board
- Large offset spatula
- Bench Scraper
- Electric hand mixer or stand mixer
- Microwave
- Plastic Squirt Bottle or metal spoon
Instructions
Gluten Free Funfetti Cake Layers:
- Preheat oven to 350°F. Line three 6 inch pans with parchment rounds, and grease with non-stick baking spray or homemade pan release.
- Mix together all dry ingredients (gluten free flour, baking powder, sugar, and salt) in a stand mixer with a paddle until fully combined.
- Mix chunks of room-temperature butter slowly into the dry mix, on a low speed. Continue to mix until no large chunks of butter remain, and the mixture becomes crumbly.
- Pour in egg whites, and mix on low until just incorporated. Mix in the buttermilk in two installments, on a low speed.
- Add in oil, vanilla extract and almond extract and mix at a low speed until fully incorporated. Scrape down the sides of the bowl with a spatula, then beat on medium high speed for about a minute. Let the batter rest at room temperature for 20 minutes.
- Fold in the rainbow sprinkles with a rubber spatula.
- Divide batter evenly between the prepared cake pans. I like to use a digital kitchen scale to weigh my pans, and ensure they all have the same amount of batter. This guarantees the layers will bake to be the same height.
- Bake for 32-35 minutes, or until a toothpick comes out with a few moist crumbs. Allow the pans to cool for 10 minutes, then run an offset spatula around perimeter of the pan to separate the cake from the pan.
- Place cake layers into the freezer for 30 minutes, to accelerate the cooling process.Once the layers are fully cooled, carefully flip the pans and remove the layers.
- Use a serrated knife to level the tops of the layers.
Almond Vanilla Buttercream Frosting:
- Beat the unsalted butter on a medium speed for 30 seconds until smooth with a paddle attachment and stand mixer or a hand mixer.
- Mix in the vanilla extract, almond extract, and salt on a low speed.
- Slowly add in the powdered sugar and mix on a low speed. Half way through add in the heavy cream to make it easier to mix. I like to place a kitchen towel over my mixer to contain any powdered sugar clouds.
- Mix on low until the ingredients are fully incorporated and the desired consistency is reached.
- If the frosting is too thick, add in additional cream (1 tsp at a time). If the frosting is too thin, add in more powdered sugar (quarter of a cup at a time).
- Cover the frosting with plastic wrap to prevent crusting and set aside.
Assembling this Gluten Free Funfetti Cake:
- Stack and frost cake layers on a greaseproof cake board or flat plate.
- Add an even layer of buttercream between each cake layer with a large offset spatula. If desired, sprinkle 2 Tbsp of rainbow sprinkles on top of each layer of frosting.
- Add a thin coat of frosting around the cake, fully cover the cake layers.
- Smooth using a bench scraper, then chill the cake in the fridge (20 minutes) or freezer (5 minutes) until the frosting is firm to the touch.
- Add a second, thicker layer of frosting to the cake, and smooth using a bench scraper.
- If you want to make stripes around your cake like mine, use a frosting comb to carve lines in the frosting, then place the cake in the fridge (30 minutes) or freezer (10 minutes) until the frosting stripes are totally firm to the touch.
- Color the remaining buttercream teal and pink with gel food coloring and fill in the gaps in the frosting. Smooth with a bench scraper until your stripes are clean. You can learn more about how to make a striped buttercream cake here.
- Chill the cake again until the frosting is firm to the touch.
Adding the Pink Drips:
- While the cake chills, make the white chocolate ganache drip.
- Heat the heavy cream in a heat proof bowl in the microwave for 30-45 seconds, until it's steaming and just beginning to bubble.
- Gently pour the heavy cream over the white chocolate chips, making sure they are fully covered with cream. Allow mixture to sit for 1 minute.
- Stir slowly until the cream and white chocolate are combined. Some bits of chocolate may not be fully melted yet. If you notice this in your mixture, heat the mixture again for 15 seconds and stir. Repeat as necessary until all the chocolate bits are fully melted and incorporated.
- Once the ganache is smooth, mix in the gel food coloring until the ganache is evenly colored. If you plan to use a plastic bottle to add your drips, pour the mixture into a plastic bottle.
- Let the mixture cool until the desired viscosity is reached and it's barely warm to the touch.
- If it seems too thin or thick, you can add a touch more chocolate chips or heavy cream! The type of cream and white chocolate that you use can affect the consistency, so feel free to adjust as needed.
- Make a test drip with your ganache to see if it's the right consistency, then adjust as needed (i.e. if the ganache is too thin let it cool more or add more white chocolate, or if it’s too thick pop it in the microwave for 5 seconds or add a tiny bit more heavy cream).
- Once it's the right consistency, add the drips to the chilled cake using a plastic squirt bottle or spoon. After covering the sides of the cake with drips, chill the cake in the freezer for 5 minutes to help the drips set.
- Add some of the remaining ganache on top of the cake and carefully spread it over the top of the chilled cake.
- Then decorate as desired! I like to add a fun sprinkle blend around the base of the cake and use the leftover buttercream to pipe dollops on top of the cake using an open star frosting tip.
Notes
Things to Keep in Mind as You Make this GF Funfetti Cake
- Properly measure your gluten free flour. Either spoon it into the cup measure, then level with a knife or use a kitchen scale.
- Make sure your ingredients are at room temperature to help them mix together better.
- Don’t level your cake layers until they are completely cooled.
- Make this gluten free funfetti cake vegan or dairy free! Use your favorite type of dairy free milk to replace the buttermilk and heavy cream, vegan butter sticks in place of the butter, and flax seed eggs or a vegan egg replacer in place of the eggs.
- Make sure your buttercream is the right consistency before frosting your cake! It will help give your cake proper structure and make it easier to decorate.
- If you want to add drips to your layer cake like mine, I walk through a detailed video tutorial of the process here.
Tips for Making this Cake in Advance
- Make your cake layers in advance and freeze them. It breaks the process up and make it more approachable.
- Make your frosting ahead of time too, or save any leftover frosting! It can be stored in an airtight container in the fridge for up to a month, or in the freezer for up to 3 months. Be sure to give it a good stir once it thaws to get the consistency nice and smooth again.
- A frosted cake can last in the fridge for up to a week, or in the freezer for up to a month. The buttercream locks in all the moisture, keeping the cake fresh and delicious!
- If you cut into the cake and have leftovers, use any remaining frosting to cover the cut section to keep it moist and store in the fridge for up to a week.
Nutrition Information
Yield
16Serving Size
1Amount Per Serving Calories 650Total Fat 34gSaturated Fat 20gTrans Fat 0gUnsaturated Fat 12gCholesterol 84mgSodium 243mgCarbohydrates 87gFiber 0gSugar 84gProtein 2g
Funfetti Recipe Round Up - 9 Sprinkle Studded Sweet Recipes
Monday 5th of September 2022
[…] 7. Gluten Free Funfetti Cake […]
Linda
Tuesday 19th of July 2022
Can't wait to try this one! When you've tried this with other brands of gluten free flours, d you measure by weight, using the same equivalent (ie; 255g of Bob's Red Mill) or do you change to the equivalent of what the weight of that brand would be (314.5g of Bob's red Mill)? Thanks for sharing your amazing recipes!
Chelsweets
Sunday 24th of July 2022
Hi Linda!! While I normally bake with a scale, I can never remember the weight per cup of different GF flours! I usually spoon the GF flour into a cup measure, then level with a knife and go that route. I'd recommend doing that too if you plan to use a different brand of GF flour. Hope that helps, happy baking!
Amy True
Thursday 7th of July 2022
I loved this cake. It was delicious and I made it for a birthday party, and everybody just ADORED it. Thank you so much Chels
Chelsweets
Tuesday 12th of July 2022
Love that Amy!!! So glad everyone enjoyed it :)
Gluten Free No Bake Cookies: Easy, 7-Ingredient Recipe
Sunday 26th of June 2022
[…] Free Chocolate Cupcakes PB&J Overnight Oats Matcha Overnight Oats GF Funfetti Cake Yield: 12 […]
Sara
Sunday 19th of June 2022
Do you recommend replacing the buttercream with sour cream for a better texture like you do with the gluten free vanilla cupcakes? My gluten free cupcakes are always perfect because of this change.
Chelsweets
Thursday 23rd of June 2022
Hi Sara,
I think a lot of it comes down to preference! In general, I love baking with buttermilk, but if you love sour cream def use it in this recipe too :)