
I’ve made wedding cakes for friends in the past, and I even made my own wedding cake this past summer. However, I had never had to transport a cake long distance.
When one of my good friends told me she was getting married in Chicago, I knew I wanted to make her wedding cake.
She has been an amazing mentor to me in both life, and with my business. She’s given me such incredible advice over the years, the least I could do was make her wedding cake!!
I’d made wedding cakes in the past, and I figured it’d be the same thing just in a different city. In the beginning of this, I don’t think I really thought through everything this would entail.
But then I really began to think about how much time and effort go into a wedding cake.
From buying all the ingredients for the cake, to all the tools and equipment you need. It takes me hours just to bake the cake layers and make the frosting, let alone actually assemble and decorate the cake.
It’s also an insanely messy process. My kitchen looks like a bomb went off in it after a long day of baking wedding cake layers.
My friend’s Aunt had a huge kitchen, and they offered to let me make the wedding cake there. She had a huge fridge and freezer, and told me she’d leave plenty of room for the cake in both.
Realizing I Should Make the Cake Layers and Frosting Ahead of Time
While that was a huge relief, I began to think about how difficult it would be to source all the ingredients in a different city.
To cover my bases, I started making an excel spread sheet with all the ingredients and quantities I needed. There were so many ingredients, it was a chore just to write down everything I needed.
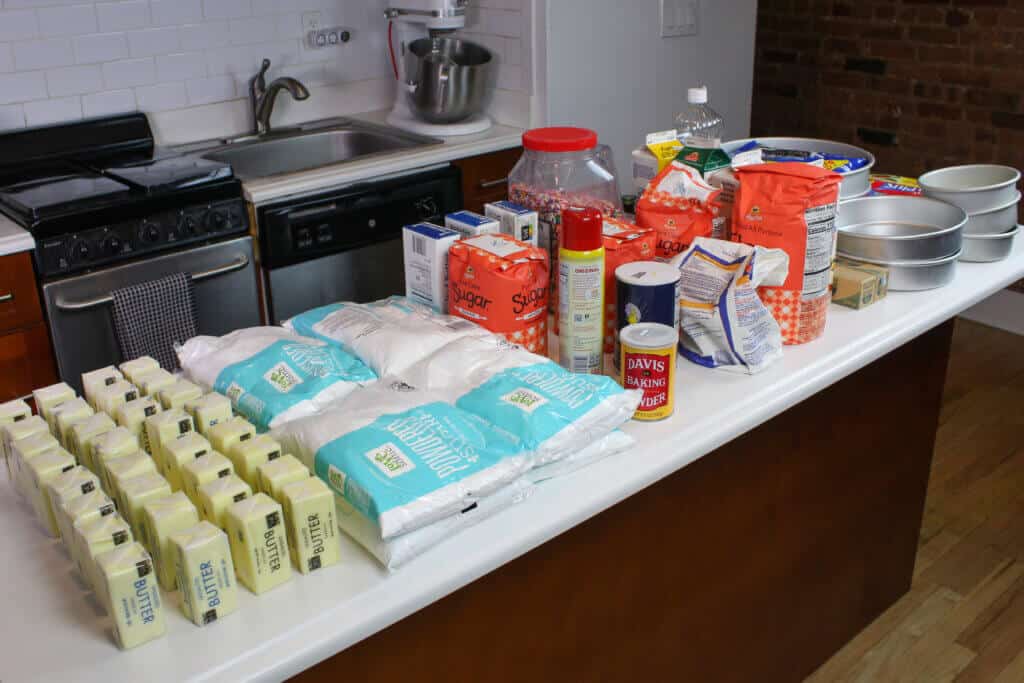
As I worked on this list, I thought to myself, there has to be an easier way to do this. If I made the cake fully in her Aunt’s house, I’d be there for like 18 hours!! Or even longer.
She had a KitchenAid, but I was used to using my commercial KitchenAid to make huge batches of cake batter and frosting. Trying to make all the batter and buttercream in a 5 qt mixer would take a lot longer.
That’s when I slowly started to come around to the idea of making the cake and frosting in my own kitchen, and bringing them with me to Chicago.
I had never traveling with cake like this before. My friend Courtney of Cake by Courtney travels with cake layers and frosting all the time, for TV segments, conferences, and classes.
This helped me build my confidence in the idea, and made me feel like I really could pull this off. Amazingly enough, my plan ended up working out great, thanks to a lot of careful preparation.
Prepping the Cake Layers
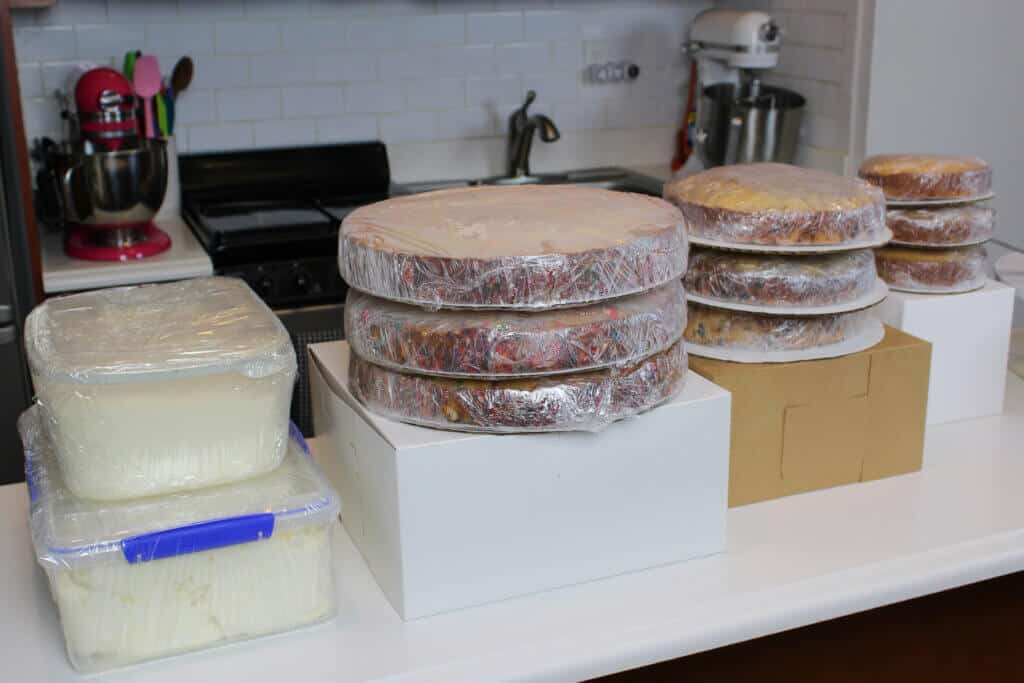
I make cake layers in advance all the time, so I wasn’t worried about wrapping and freezing my cake layers. As long as you double wrap the cake layers (in plastic wrap and/or foil, or a Ziploc bag), they stay fresh in the freezer for weeks.
Once I had baked and cooled all my cake layers, I wrapped them up and placed a cardboard cake round underneath each layer. This helps them freeze flat, and also adds stability when they’re stacked on top of one another.
I have to stack my cake layers to fit them in my freezer, because it isn’t very big. Appliances in Manhattan never seem to be quite big enough 😛
I kept the cake layers in my freezer overnight before my flight, and took them out to pack them about 15 minutes before I had to leave. I tried to wait until the last possible minute to take them out, much to my husband’s chagrin.
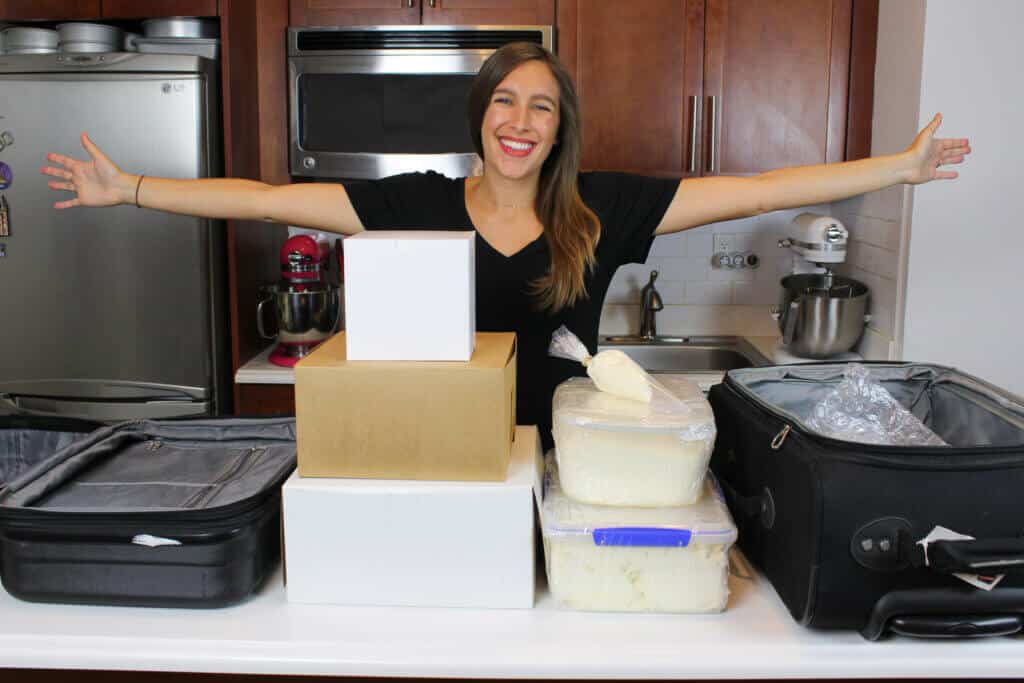
To transport the frozen cake layers, I placed them into a box the same size as the cake layers, and carefully placed them into my carry-on suitcase. I was able to fit the 9-inch and 6-inch cake boxes into a standard sized carry one, and added bubble wrap around the boxes to keep them in place and protected.
Carry-On the Cake Layers
I assembled the cake boxes a few days before all of this, and placed them in my carry-on suitcase to make sure they would fit. This is SUPER important to do ahead of time, so that you know everything will go smoothly as you pack the cake layers right before your flight.
With this in mind, I knew that my 12-inch cake layers were not going to fit my carry on. I decided it would be best for me to carry that cake box in my hands. My husband helped pull my carryon suitcase with the other cake layers, since my hands were full.
They were definitely heavy, but it was the best option for this trip. The flight to Chicago was only a few hours, and it wasn’t too bad having the cake layers rest in my lap during the flight.
I advise against putting cake layers in a checked bag. I feel like checked bags really get thrown around, and even with a hard-shell suitcase, that can be a lot for cake layers to handle.
They may be fine in the beginning while they’re still frozen, but when you get to your destination, they will likely have thawed and be more fragile.
If there’s no other option and you have to, be sure to place reusable ice packs or dry ice packs around the cake box to keep the layers chilled.
Prepping the Buttercream
Once I figured out the cake layers, it was time to tackle the frosting. I made 8 batches of frosting for this cake, just to be safe! I only used about 6 ½ in the end, but that last thing I wanted was to run out of frosting while assembling this cake in a different city.
I divided the frosting between 2 large Tupperware containers. The containers that have latches, and an airtight seal are definitely best for this type of thing! I got mine on Amazon, which has great containers for this type of thing.
It’s important that the container is big enough to fit all the frosting, and to allow you to re-stir it down the road. When buttercream is chilled and then thawed to room temperature, it can develop a bunch of tiny air bubbles.
A good stir with a rubber spatula will make it smooth again, but you need room to be able to work the frosting from side to side.
Being my neurotic self, I wrapped the containers in plastic wrap twice once they were filled. I figured that way if they exploded or something happened, the frosting would be contained.
I’m happy I did this, because one of my containers did break in transit.
Check the Frosting
Since I was carrying my cake layers on with me, I had to check a suitcase with the frosting. I froze the tubs of buttercream before the flight, and then placed them in my checked bag with bubble wrap.
Even with that, my bag must have really gotten thrown around. The side of my smaller Tupperware had a huge crack in it when I opened my bag in Chicago.
Luckily the frosting stayed inside the container and wasn’t really affect because it was still frozen. Big tubs of frosting take forever to thaw, which worked to my advantage this time.
Packing the Tools You’ll Need
After the cake components were taken care of, I set to work packing up everything I’d need to assemble the cake.
This included quite a few things. I tried to think about the entire cake making process from start to finish. I envisioned each tool I’d used along the way, and laid them out in order.
I then walked through my plan to make and decorate this cake, and made sure I had everything. I was able to fit my tools in the zipper side of my carryon with the cake layers.
The only thing I struggled with was the base of my cake stand. I love my Ateco 612 cake stand, especially for wedding cakes. It spins with ease and makes decorating so much easier, even with insanely heavy cakes on it.
The only problem was that the base is made from cast iron, and it’s pretty heavy. I was nervous is might damage the cake layers in my carry on, as it was rolled through the airport.
I ended up putting the cake stand base in with the frosting, which worked out really well. I added in a ton of bubble wrap around my tools and the cake bas, to keep everything in place and minimize any shifting.
Assembling the Cake
After we landed in Chicago, we went straight to the kitchen where I was going to make the cake, and put the cake layers and frosting into the freezer.
It’s a long story, but I had to fly out a week early because I was running the Chicago marathon. I signed up for it before I knew my friend’s wedding date, and it made more sense to stay in Chicago for a week, than to fly to Chicago back to back weekends.
I left the cake and frosting in the freezer for a week. The night before I planned to assemble the cake, we took the frosting tubs out and let them thaw on the counter overnight.
I’m not kidding when I say it takes hours for that much frosting the come to room temp. It took over 8 hours, and I’m so happy I remembered to take them out in advance!
The day of the cake assembly, I took out the cake layers, and let them thaw for about 30 minutes before leveling them. Next, I soaked them with simple syrup, then went to work assembling and frosting each tier.
I stacked the tiers, and placed the cake in the fridge overnight before the wedding.
Transporting the Cake
The very last challenge was transporting the cake.
Some people may disagree with the “build before transportation” viewpoint, but I almost always assemble before transporting. It all comes down to your preference, and your means of transportation.
An important part of cake transportation is a cake box!! I’ve said this before, but moving boxes from Home Depot make the best wedding cake boxes.
They come in a variety of size, are sturdy, and are so cheap! They’re less than $2, and can support the weight of a wedding cake.
I like to tape the box into place, then cut a flap on one side with an x-acto knife to allow me to slide the cake into the box. I then tape up the flap, and am ready to go!!
This cake was only three tiers tall, and easily fit in an Uber XL. However, it was quite heavy!! Or at least for my little arms to carry.
I was lucky enough to have the help of my husband, who helped me get into the Uber and the venue.
Whenever I’m transporting a wedding cake, I like to hold the cake in my lap, so I can keep it safe during the trip.
Every Uber driver thinks I’m crazy and tries to tell me to put it in the back, but I refuse. I shift the weight of the cake during the drip, to help counter the various pot holes and sudden stops that are inevitable in any city.
The cake got there in one piece, and I added the flowers and greenery at the venue to match the bride’s bouquet.

Let Me Know What You Think
So there you have it, my advice on how to transport a cake long distance. If you’re as crazy and I am and have traveled with a cake like this, I’d love to hear about your experience! Or if you have any other crazy wedding cake transport stories, please share them.
If you have any questions I didn’t cover, please ask them in the comments section below 🙂
Jodi
Monday 8th of August 2022
Hi Chelsea, My daughter is making a two tiered wedding cake for her cousin. The caramelised crusts are quite firm. I think she would be reluctant to trim the outer edges off incase the neatness of the circles is damaged but wondering if the syrup you mentioned would moisten the crusts a little and if you think so, would you be able to share a recipe for it. Thanks so much for all you help, it’s great to have access to so many tips! Cheers, Jodi from Australia
Chelsweets
Sunday 14th of August 2022
Hi Jodi,
If she's going for a super white wedding cake, I would recommend trimming the caramelization off the sides with a serrated knife. It can seem scary, but if you chill the cake layers in the freezer for about 20 minutes before trimming them, it makes it so much easier to do!
The simple syrup would make the caramelization softer, and so will the buttercream. So if she's just worried about the texture of it, she can leave it because it will soften from both those things. Hope that helps and that the wedding cake turns out great!! Happy baking :)
Diana
Sunday 17th of July 2022
Greetings, MOB here, I just was told that the venue does not have a refrigerator for a 3 tier cake?. The bakery is delivering it , but my concern is that there is 4+ hrs before serving. The wedding is in a barn in the Mtns of VA. I am flying from Florida. Ideas please. I am trying to locate a tall cooler that the bakery can put the cake in until we serve it. Any thoughts? Suggestions?
Thank you Diana L
Rachel Roepke
Wednesday 22nd of June 2022
I didn’t think you were allowed to carry cake layers on your lap during takeoff and landing so what did you do with them during that time?
Chelsweets
Thursday 23rd of June 2022
Hi Rachel,
I honestly wasn't sure how that would go either, but when I showed the flight attendant what was in the box they let me keep it in my lap! I suppose you could also put it under the seat if needed though too!
Gerda
Saturday 26th of March 2022
I will be making a yellow butter cake with 4 tiers for a wedding cake and have to transport it to texas so the cake layers will be frozen ahead of time do you know if I can freeze cream cheese frosting? And what is that simple syrup you sprayed your cake with.?
Chris
Thursday 27th of January 2022
I live on the east coast, and my son is getting married in Seattle in July. When he asked me if I wanted to make his wedding cake, I was thrilled. Now I’ve been waking up every morning worrying about the details of how this can be done, with 150 guests expected, transportation worries, and hot weather. I am so, so grateful for your detailed advice and suggestions! I am wondering, though, how you managed to keep the biggest layers in a box on your lap during the flight. Were you flying coach class? It’s hard to imagine the flight crew would let you do that. Also, do you think I’ll neeed to freeze the layers and pack them with dry ice for the flight, which will probably be about 6-7 hours? Or can I just freeze them until the last moment and hope for the best? Any concern about refreezing, if they’ve thawed? I’m planning to fly out a couple of days before the wedding, and think it might be best to wait till I get there to make the frosting. He has his heart set on a vanilla genoise with lemon curd and fresh raspberries between the layers, and lemon Italian buttercream frosting; I may make the lemon curd before I go, but will of course get the raspberries there. Any suggestions you might have will be deeply appreciated!