
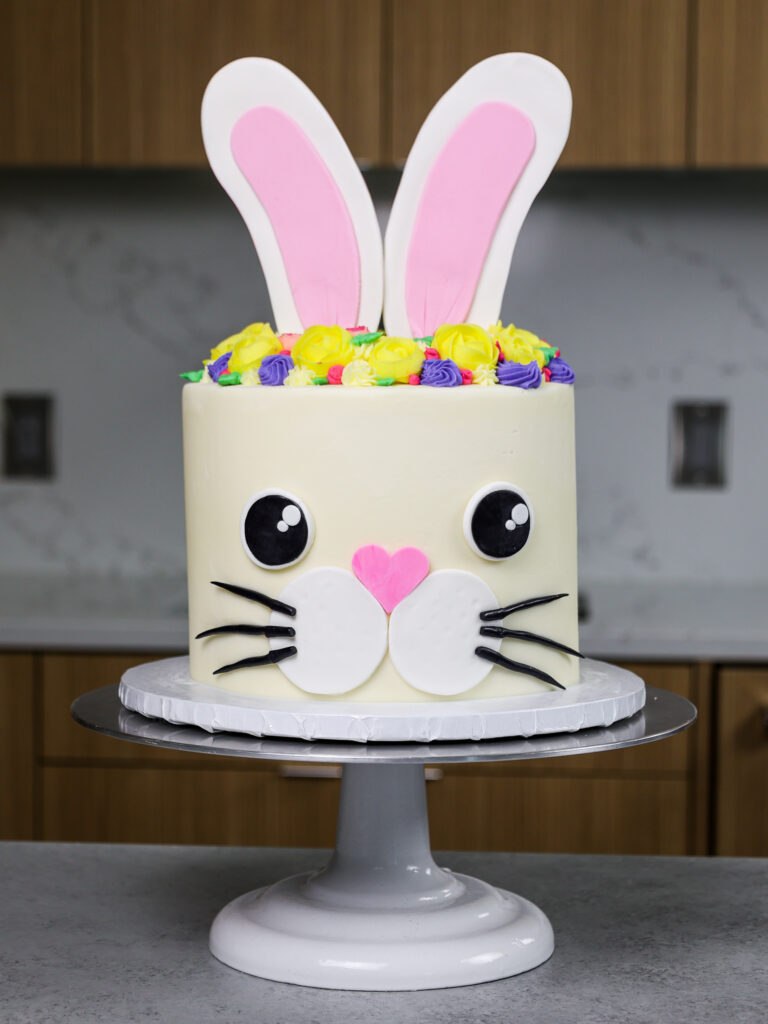
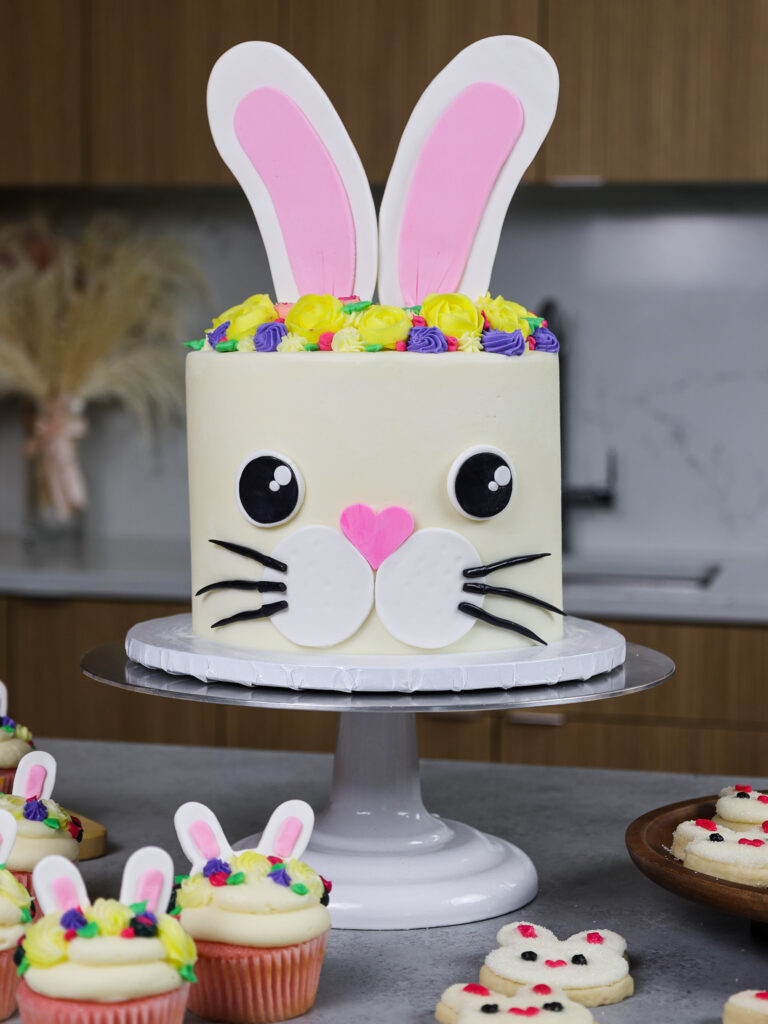
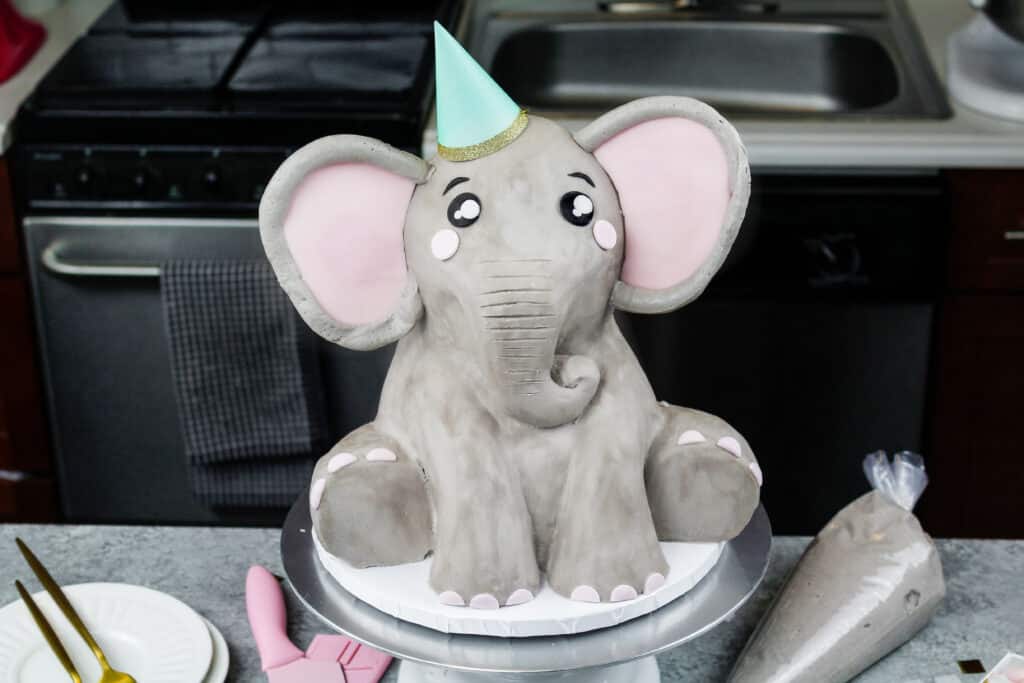
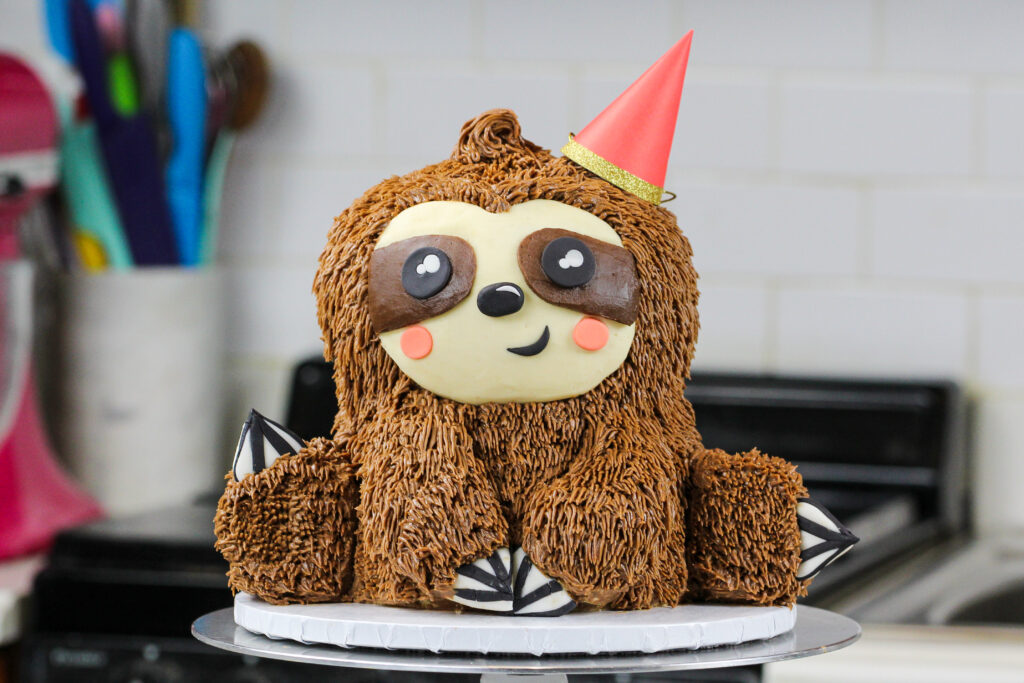
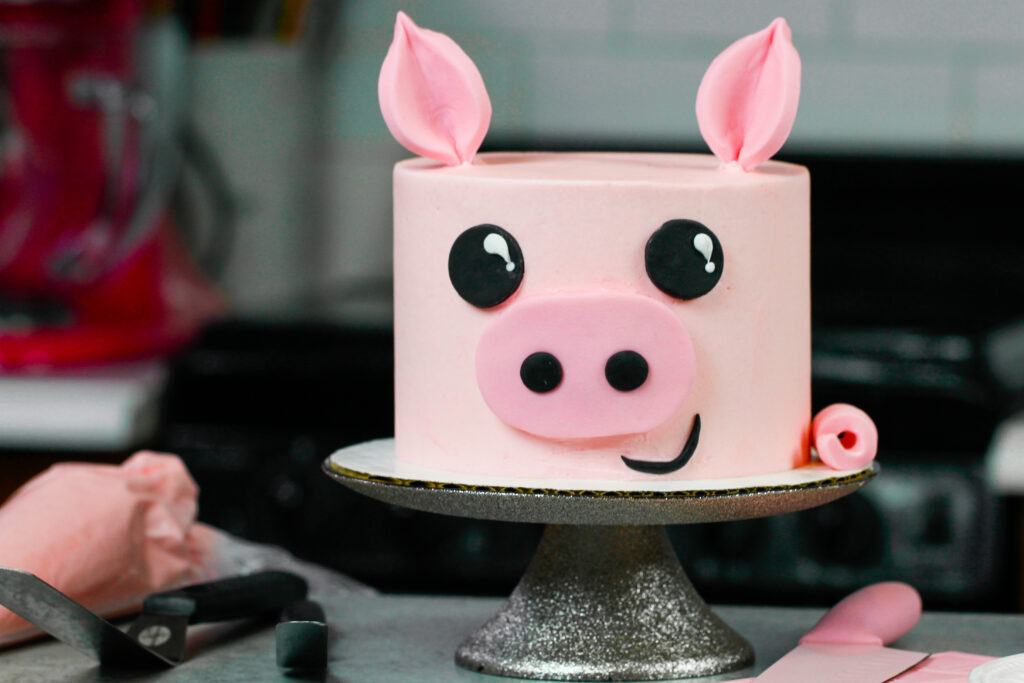
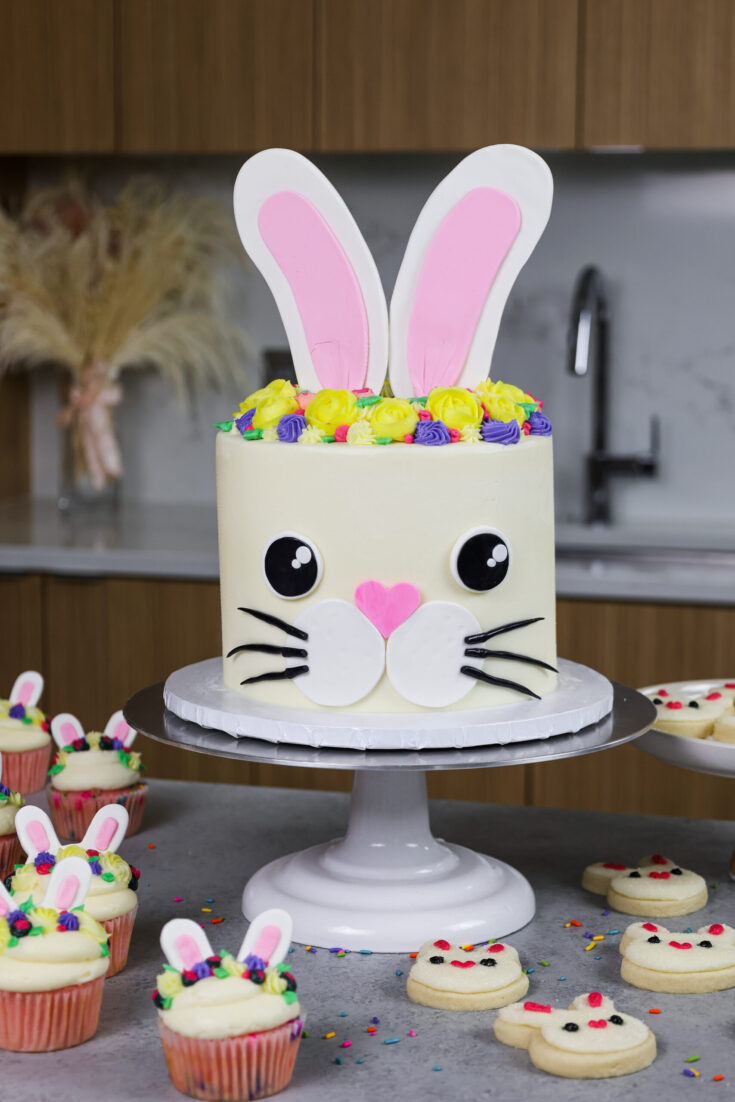
I’m continuing my animal cake series with this adorable bunny birthday cake!
It’s made with moist funfetti cake layers and delicious vanilla buttercream. It’s just as cute as it is tasty!
This cake was made for a very special party so I went all in on the bunny theme and made matching bunny cookies and cupcakes too.
Making this Bunny Rabbit Cake: Step by Step Tutorial
Let’s walk through each step of this bunny rabbit cake together to make sure it turns out as amazing as possible!
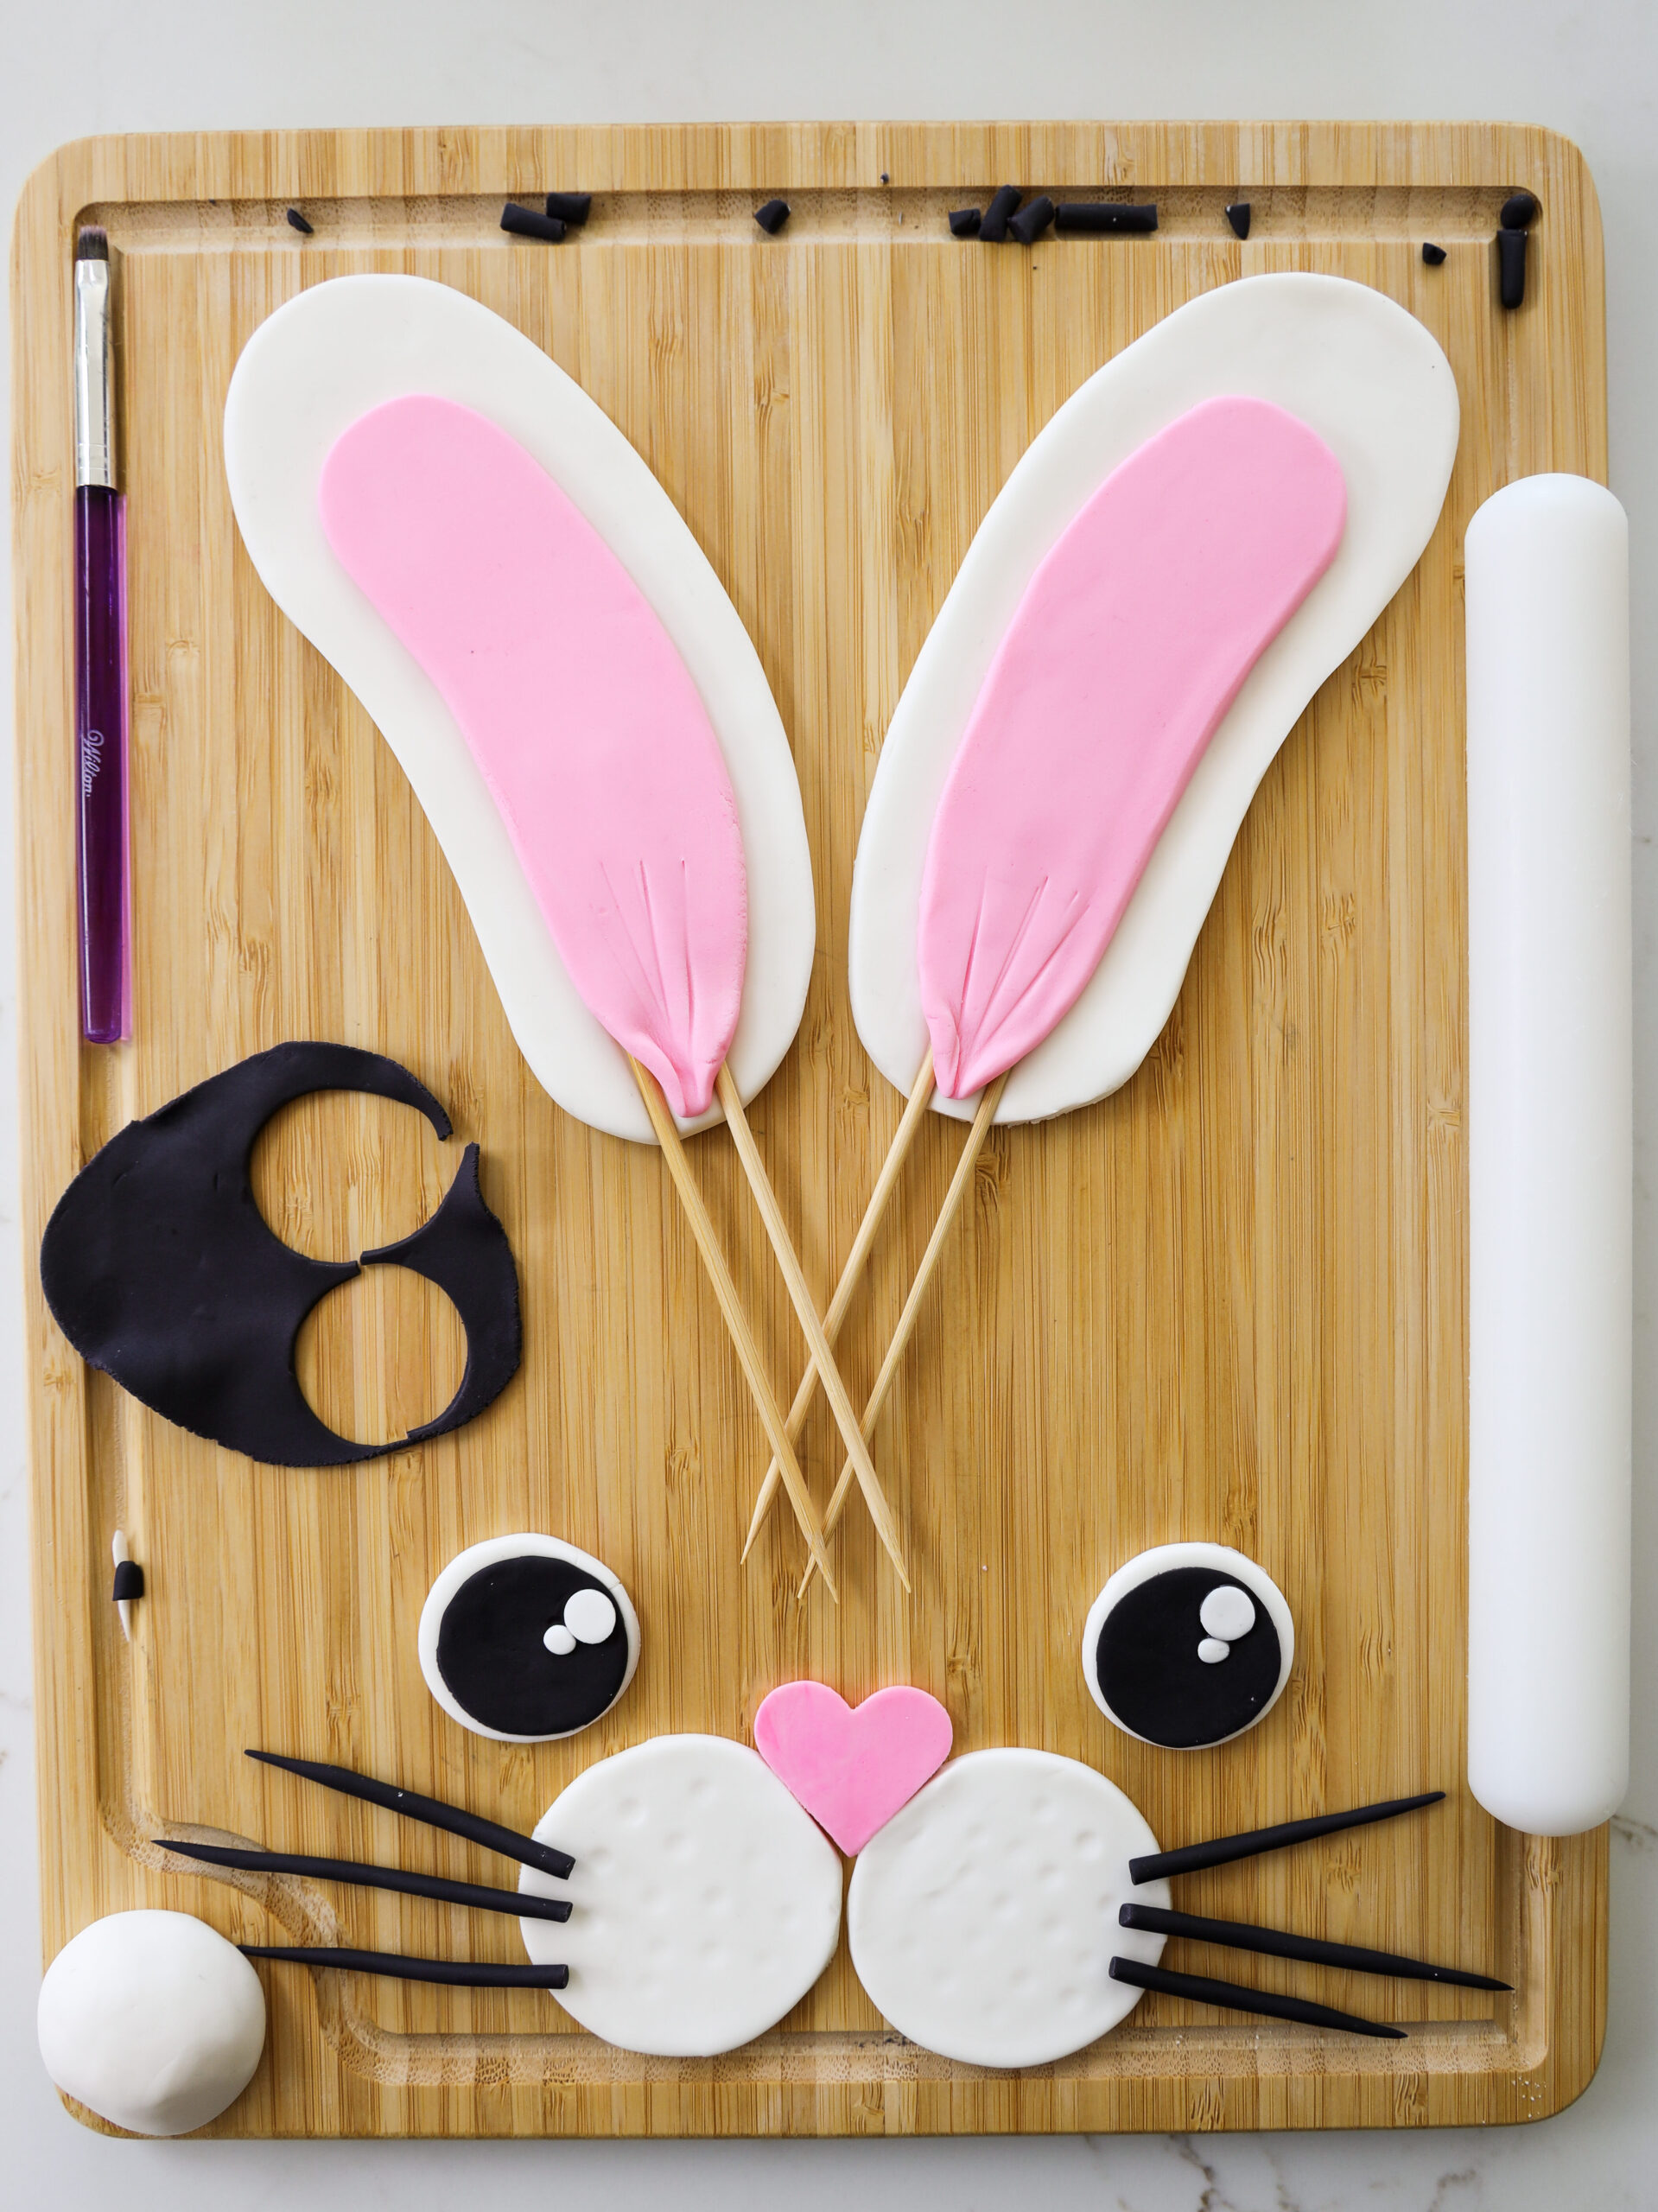
Step 1: Making this Little Bunny Rabbit’s Face and Ears
If possible, make the the bunny rabbit’s facial features and ears a day or more in advance! The ears will need time to dry so that you easily press them into the cake.
Roll out 1 cup of white fondant and cut out 2 large ovals to make the bunny’s ears. They should be about 5-inches long.
Roll out 1/2 cup of pink fondant and cut out two smaller ovals to look like the inside of the bunny’s ears.
Press two wooden skewers on top of the white fondant, and sandwich them by placing the pink fondant on top of the white fondant. Brush a bit of water between the two layers to help them seal together.
While the pink fondant is still rolled out, cut out a 1 inch heart. This will be the bunny’s nose. Set aside.
Roll out the remaining white fondant and use a 2-inch circle cutter to make the bunny’s cheeks.
Roll out the black and white fondant and use a circle cutter or bottle cap to cut out 1-inch circles to make the eyes.
I recommend using small circle cutters to get the shape of the eyes and cheeks just right.
If desired, roll out 6 thin lines of black fondant to make the bunny’s whiskers.
Place the ears and other fondant pieces on a piece of parchment paper to dry and set aside.
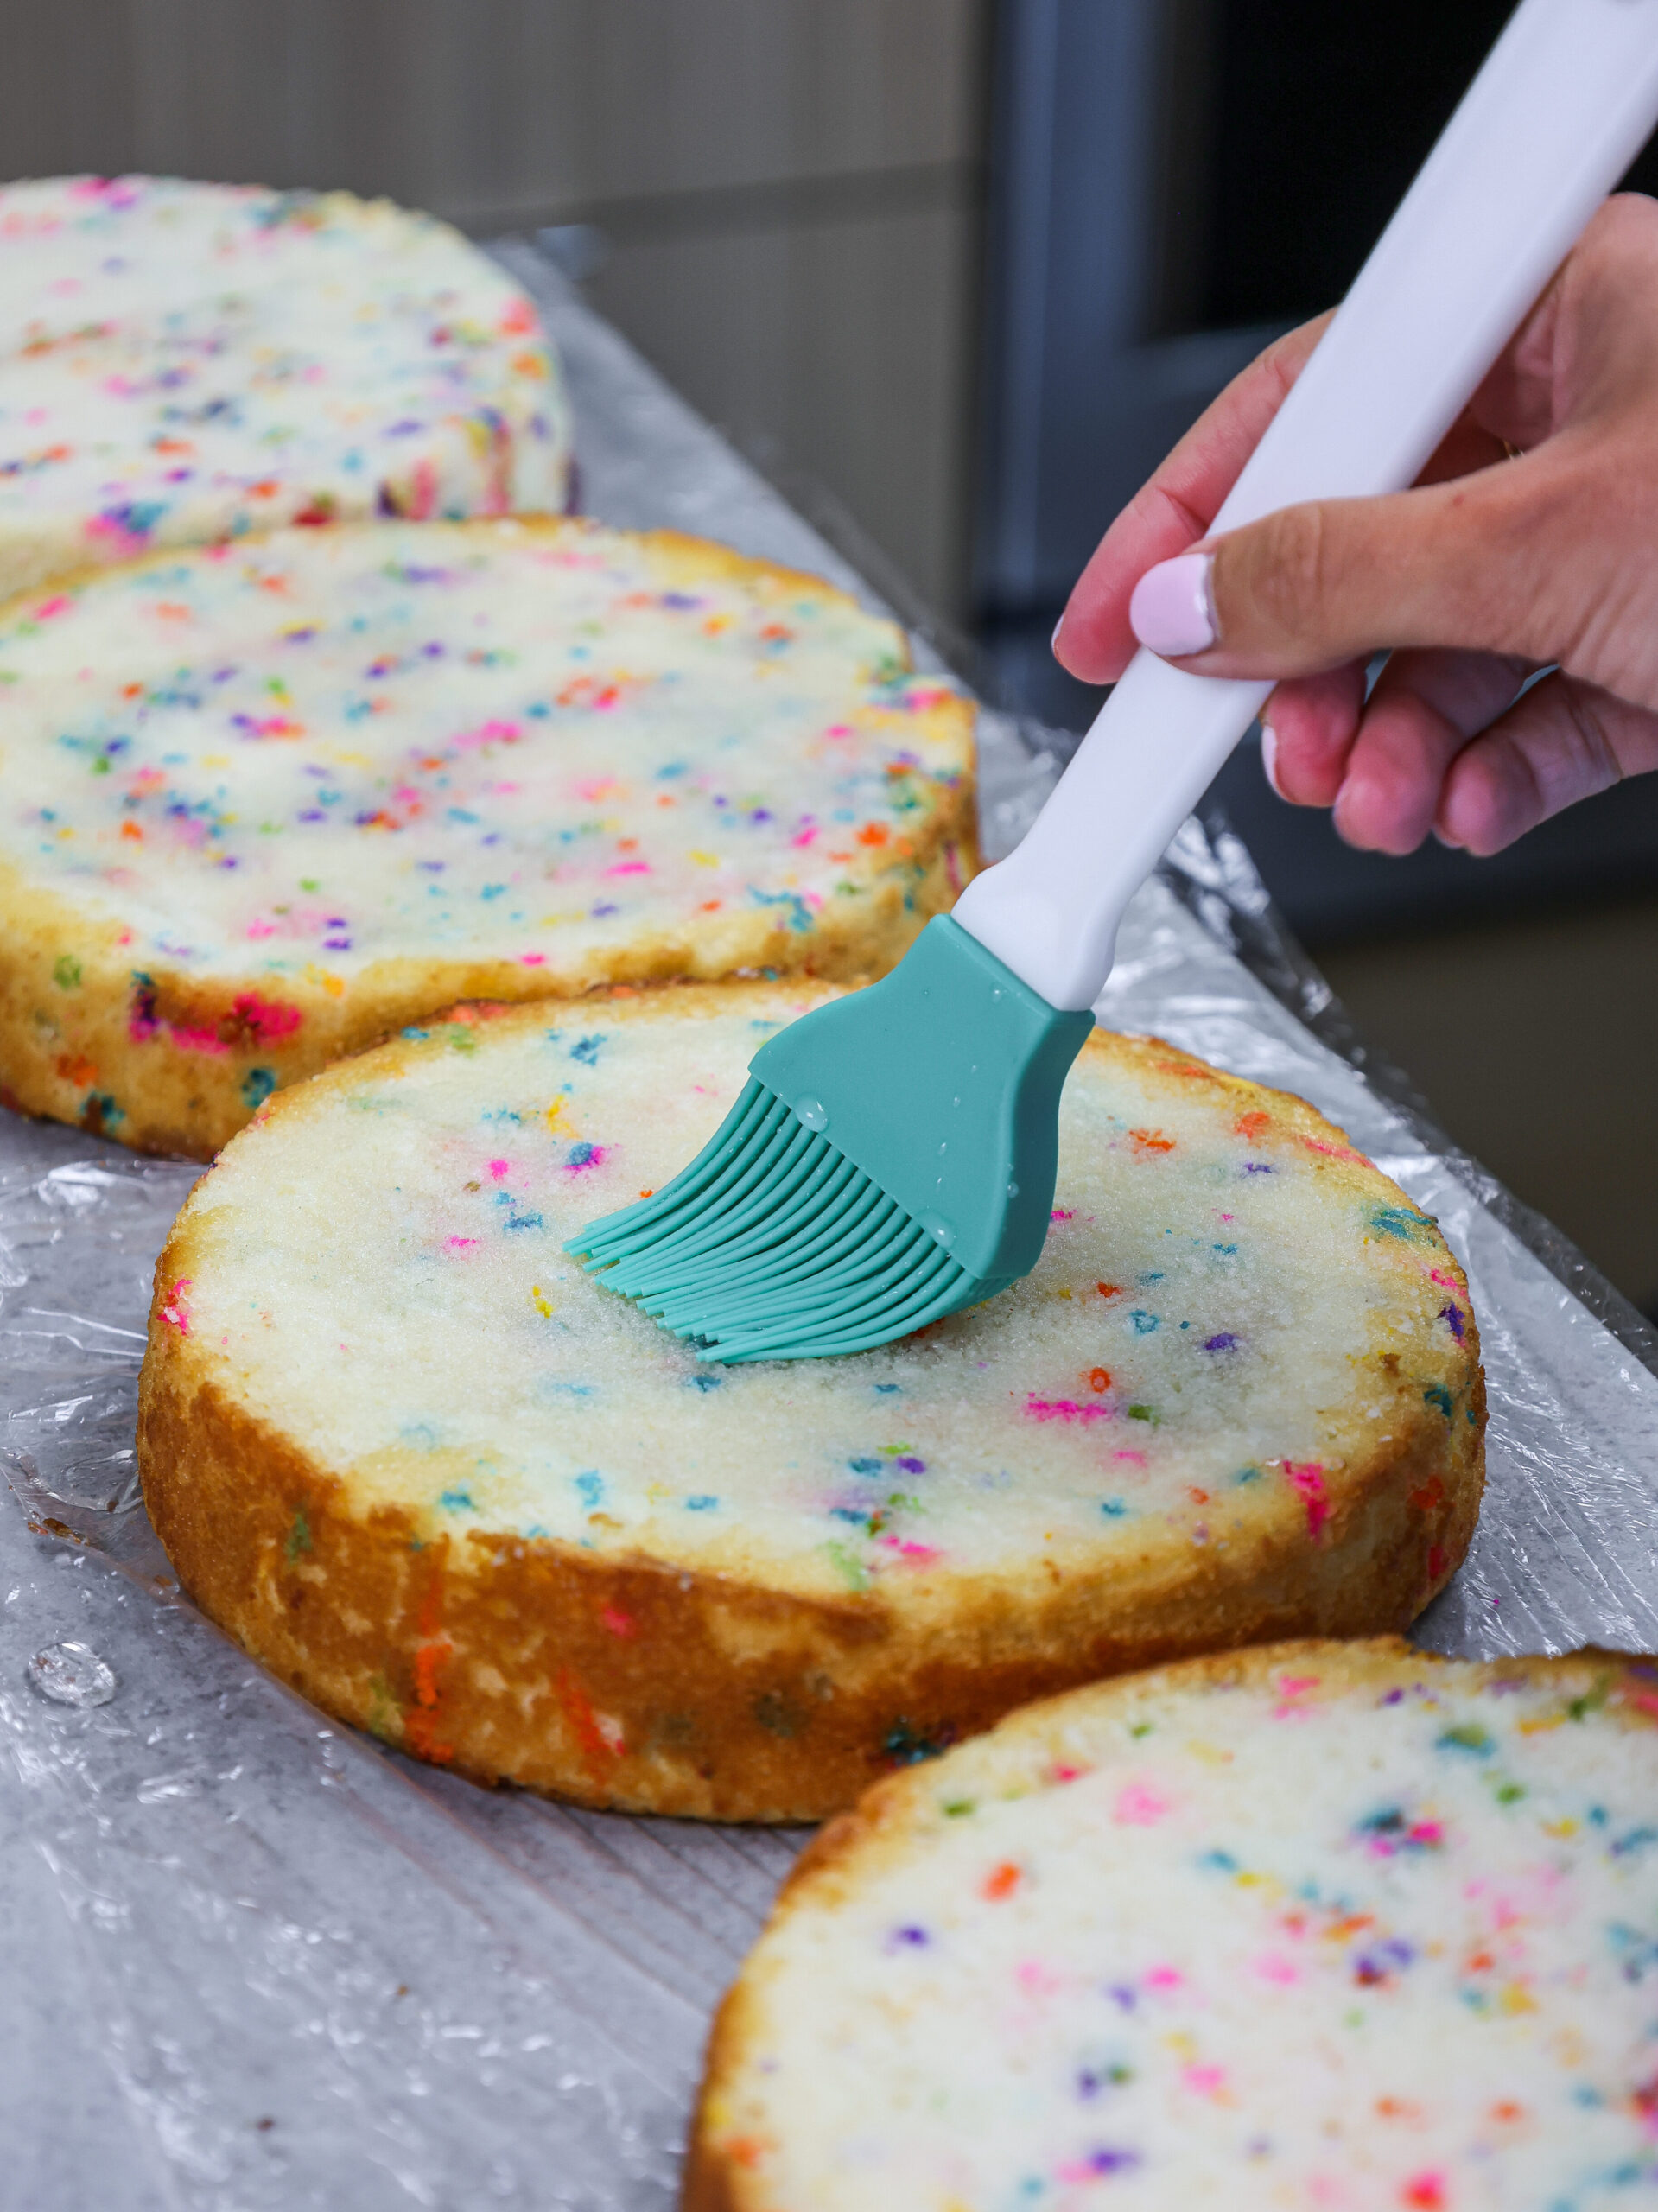
Step 2: Bake and Trim Your Cake Layers
Line four round cake pans with parchment rounds and grease with non-stick baking spray or homemade cake release.
Pour the funfetti cake batter evenly between the prepared cake pans, filling them roughly one inch high with batter.
Bake for 33-36 minutes or until a skewer comes out with a few moist crumbs. Let them cool for 10 minutes, then run an offset spatula around perimeter of the pan to separate the cake from the pan.
Flip the cake layers onto a wire rack to finish cooling.
Level the cake layers with a serrated knife once they’re fully cooled. If making these cake layers in advance, wrap and freeze them at this point.
If desired, brush the leveled cake layers with simple syrup right before assembling the cake.
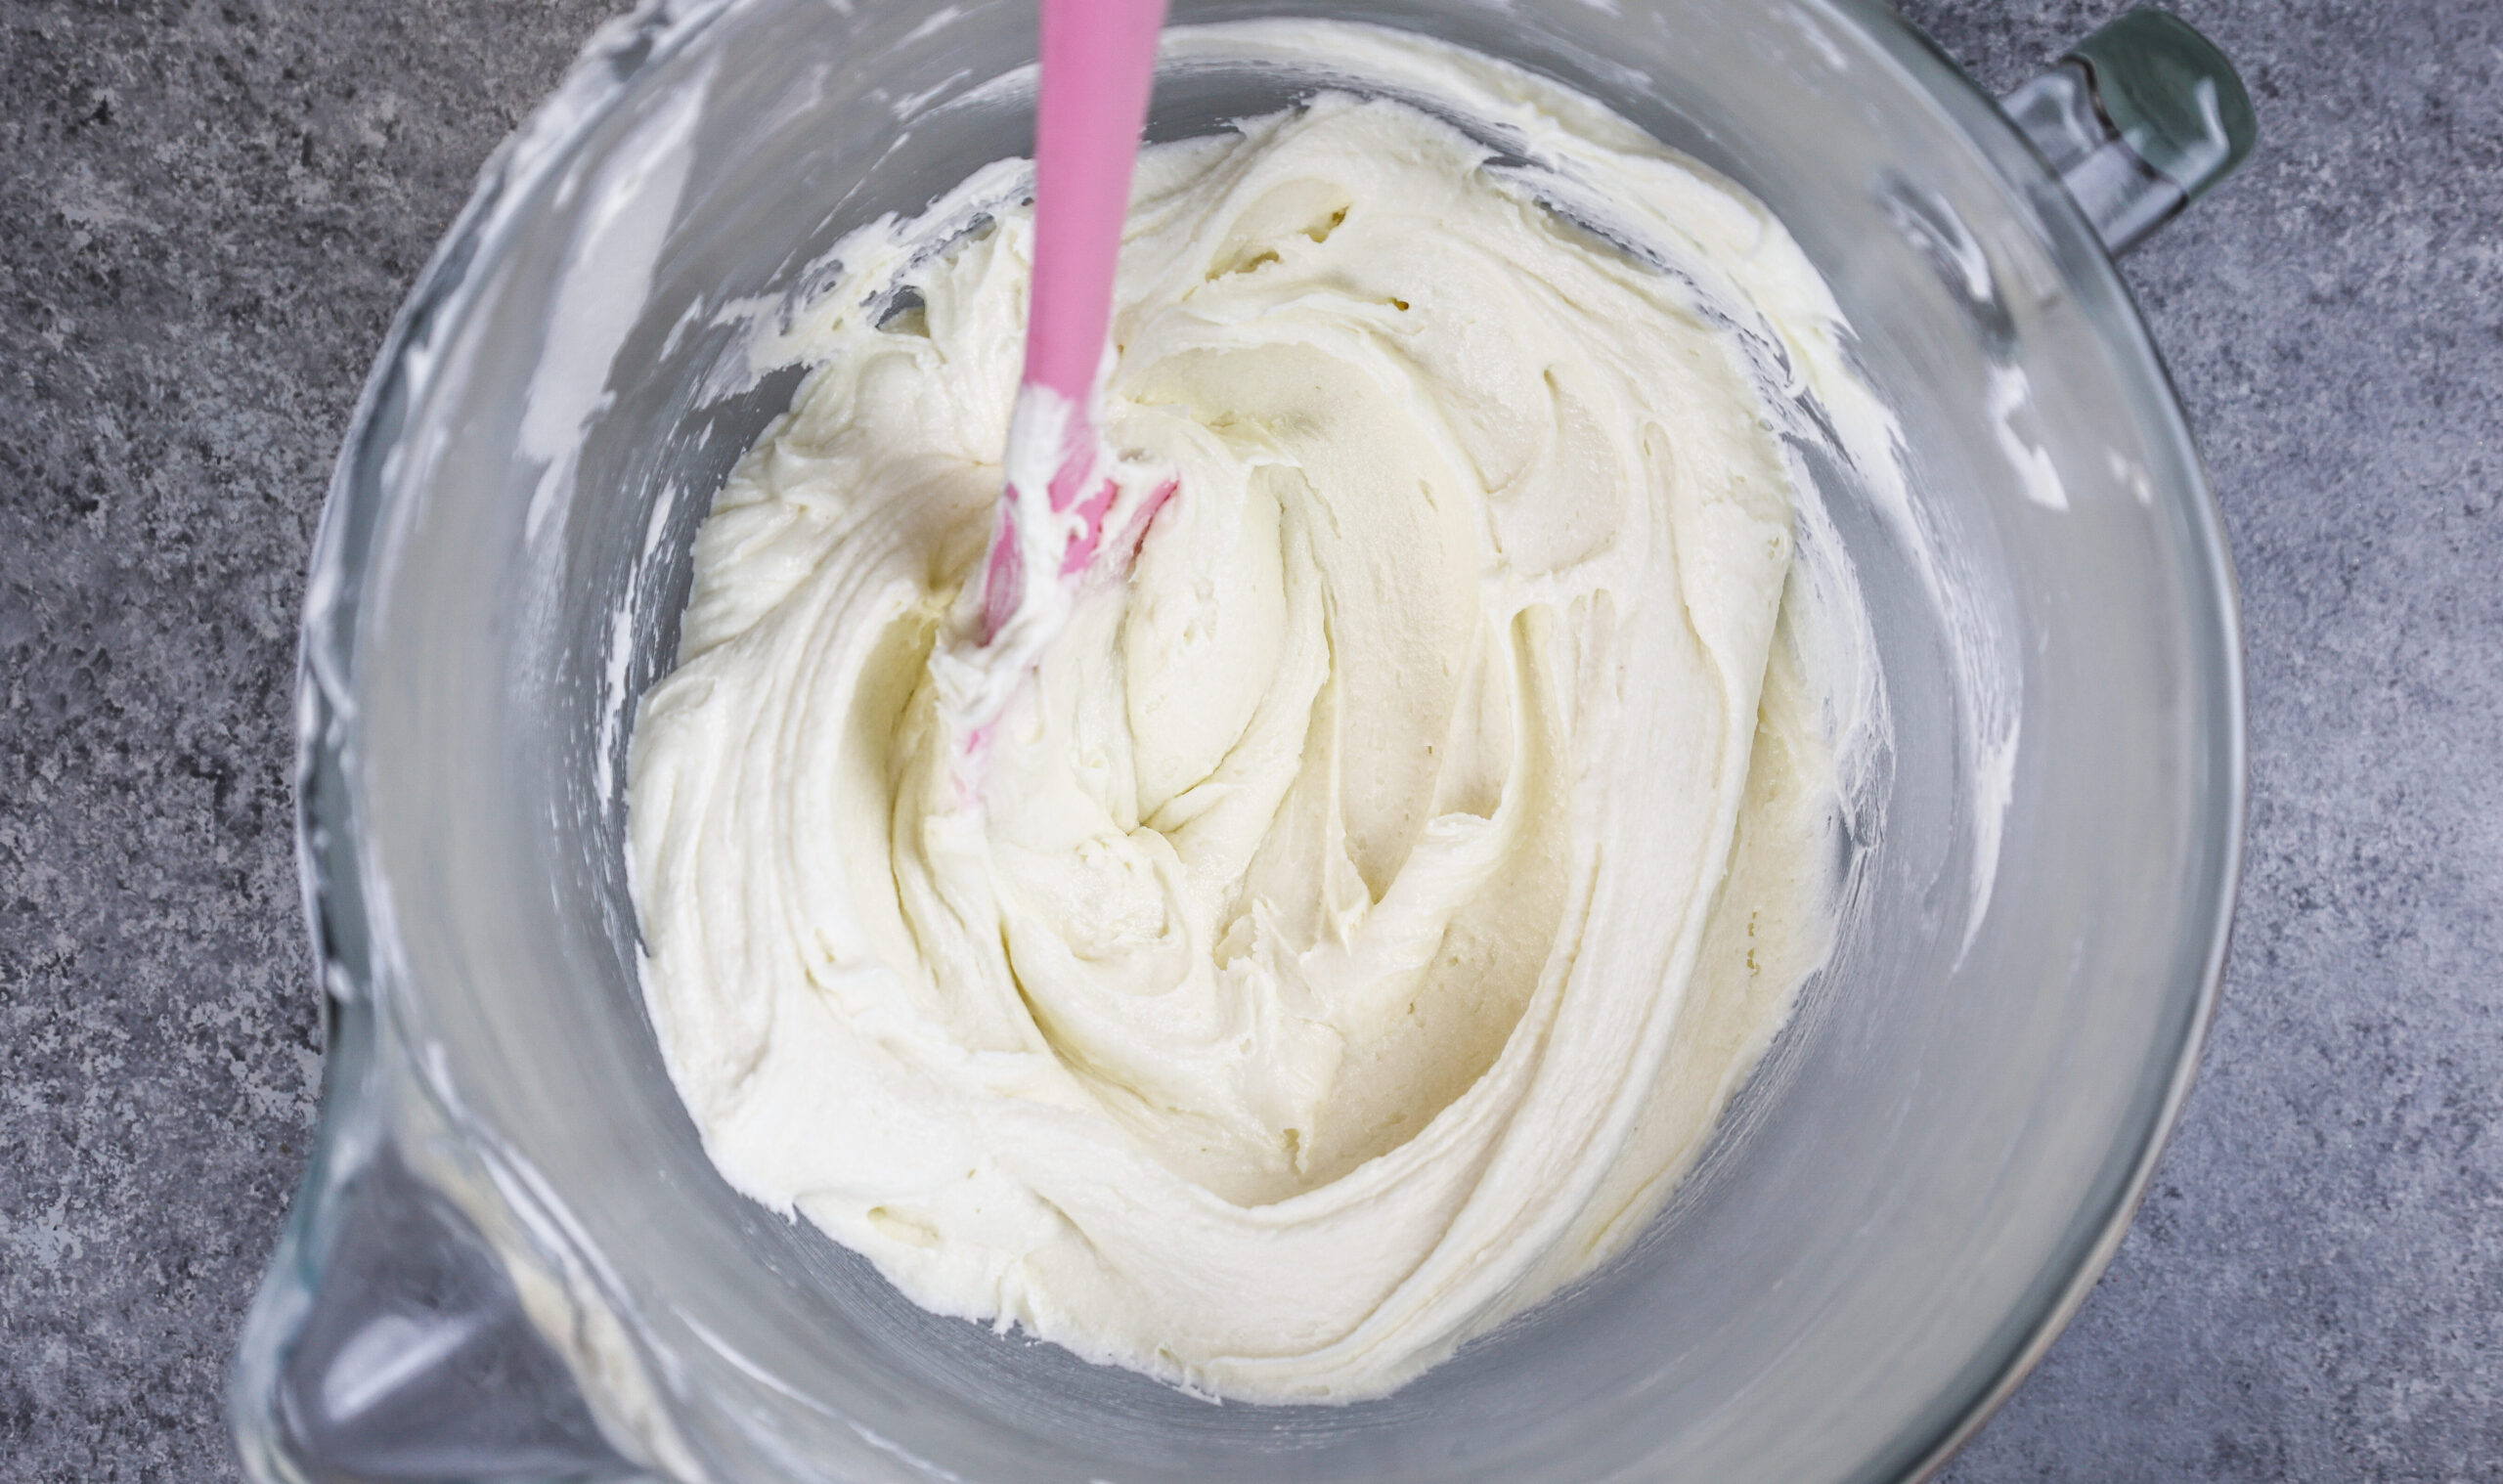
Step #3: Make the Buttercream Frosting
While the cake layers bake and cool, make the vanilla buttercream frosting. It can be made with an electric hand mixer or a stand mixer.
If your frosting seems too thick after mixing together all your ingredients, add in additional cream (1 teaspoon at a time). Or if the frosting is too thin, add in more powdered sugar (1/4 cup at a time).
If you’re unsure how thick your frosting should be, you can learn what consistency you’re looking for in my frosting consistency post.
Once your frosting is made, be sure to cover it with plastic wrap to prevent it from crusting.
Step 4: Assemble and Frost the Cake Layers
Next it’s time to assemble the cake! I recommend freezing your cake layers for about 20 minutes before stacking them. It will make them was easier to handle and frost.
Or if they’re made in advance and already frozen, let them thaw for about 20 minutes so that they’re not totally frozen but still cold to the touch.
Stack and frost the cake layers on a 10-inch greaseproof cake board. I recommend using a dab of frosting to help stick the bottom cake layer to the board.
Spread an even layer of frosting between each cake layer with an offset spatula and sprinkle a 1/4 cup of rainbow sprinkles between the cake layers as you stack them.
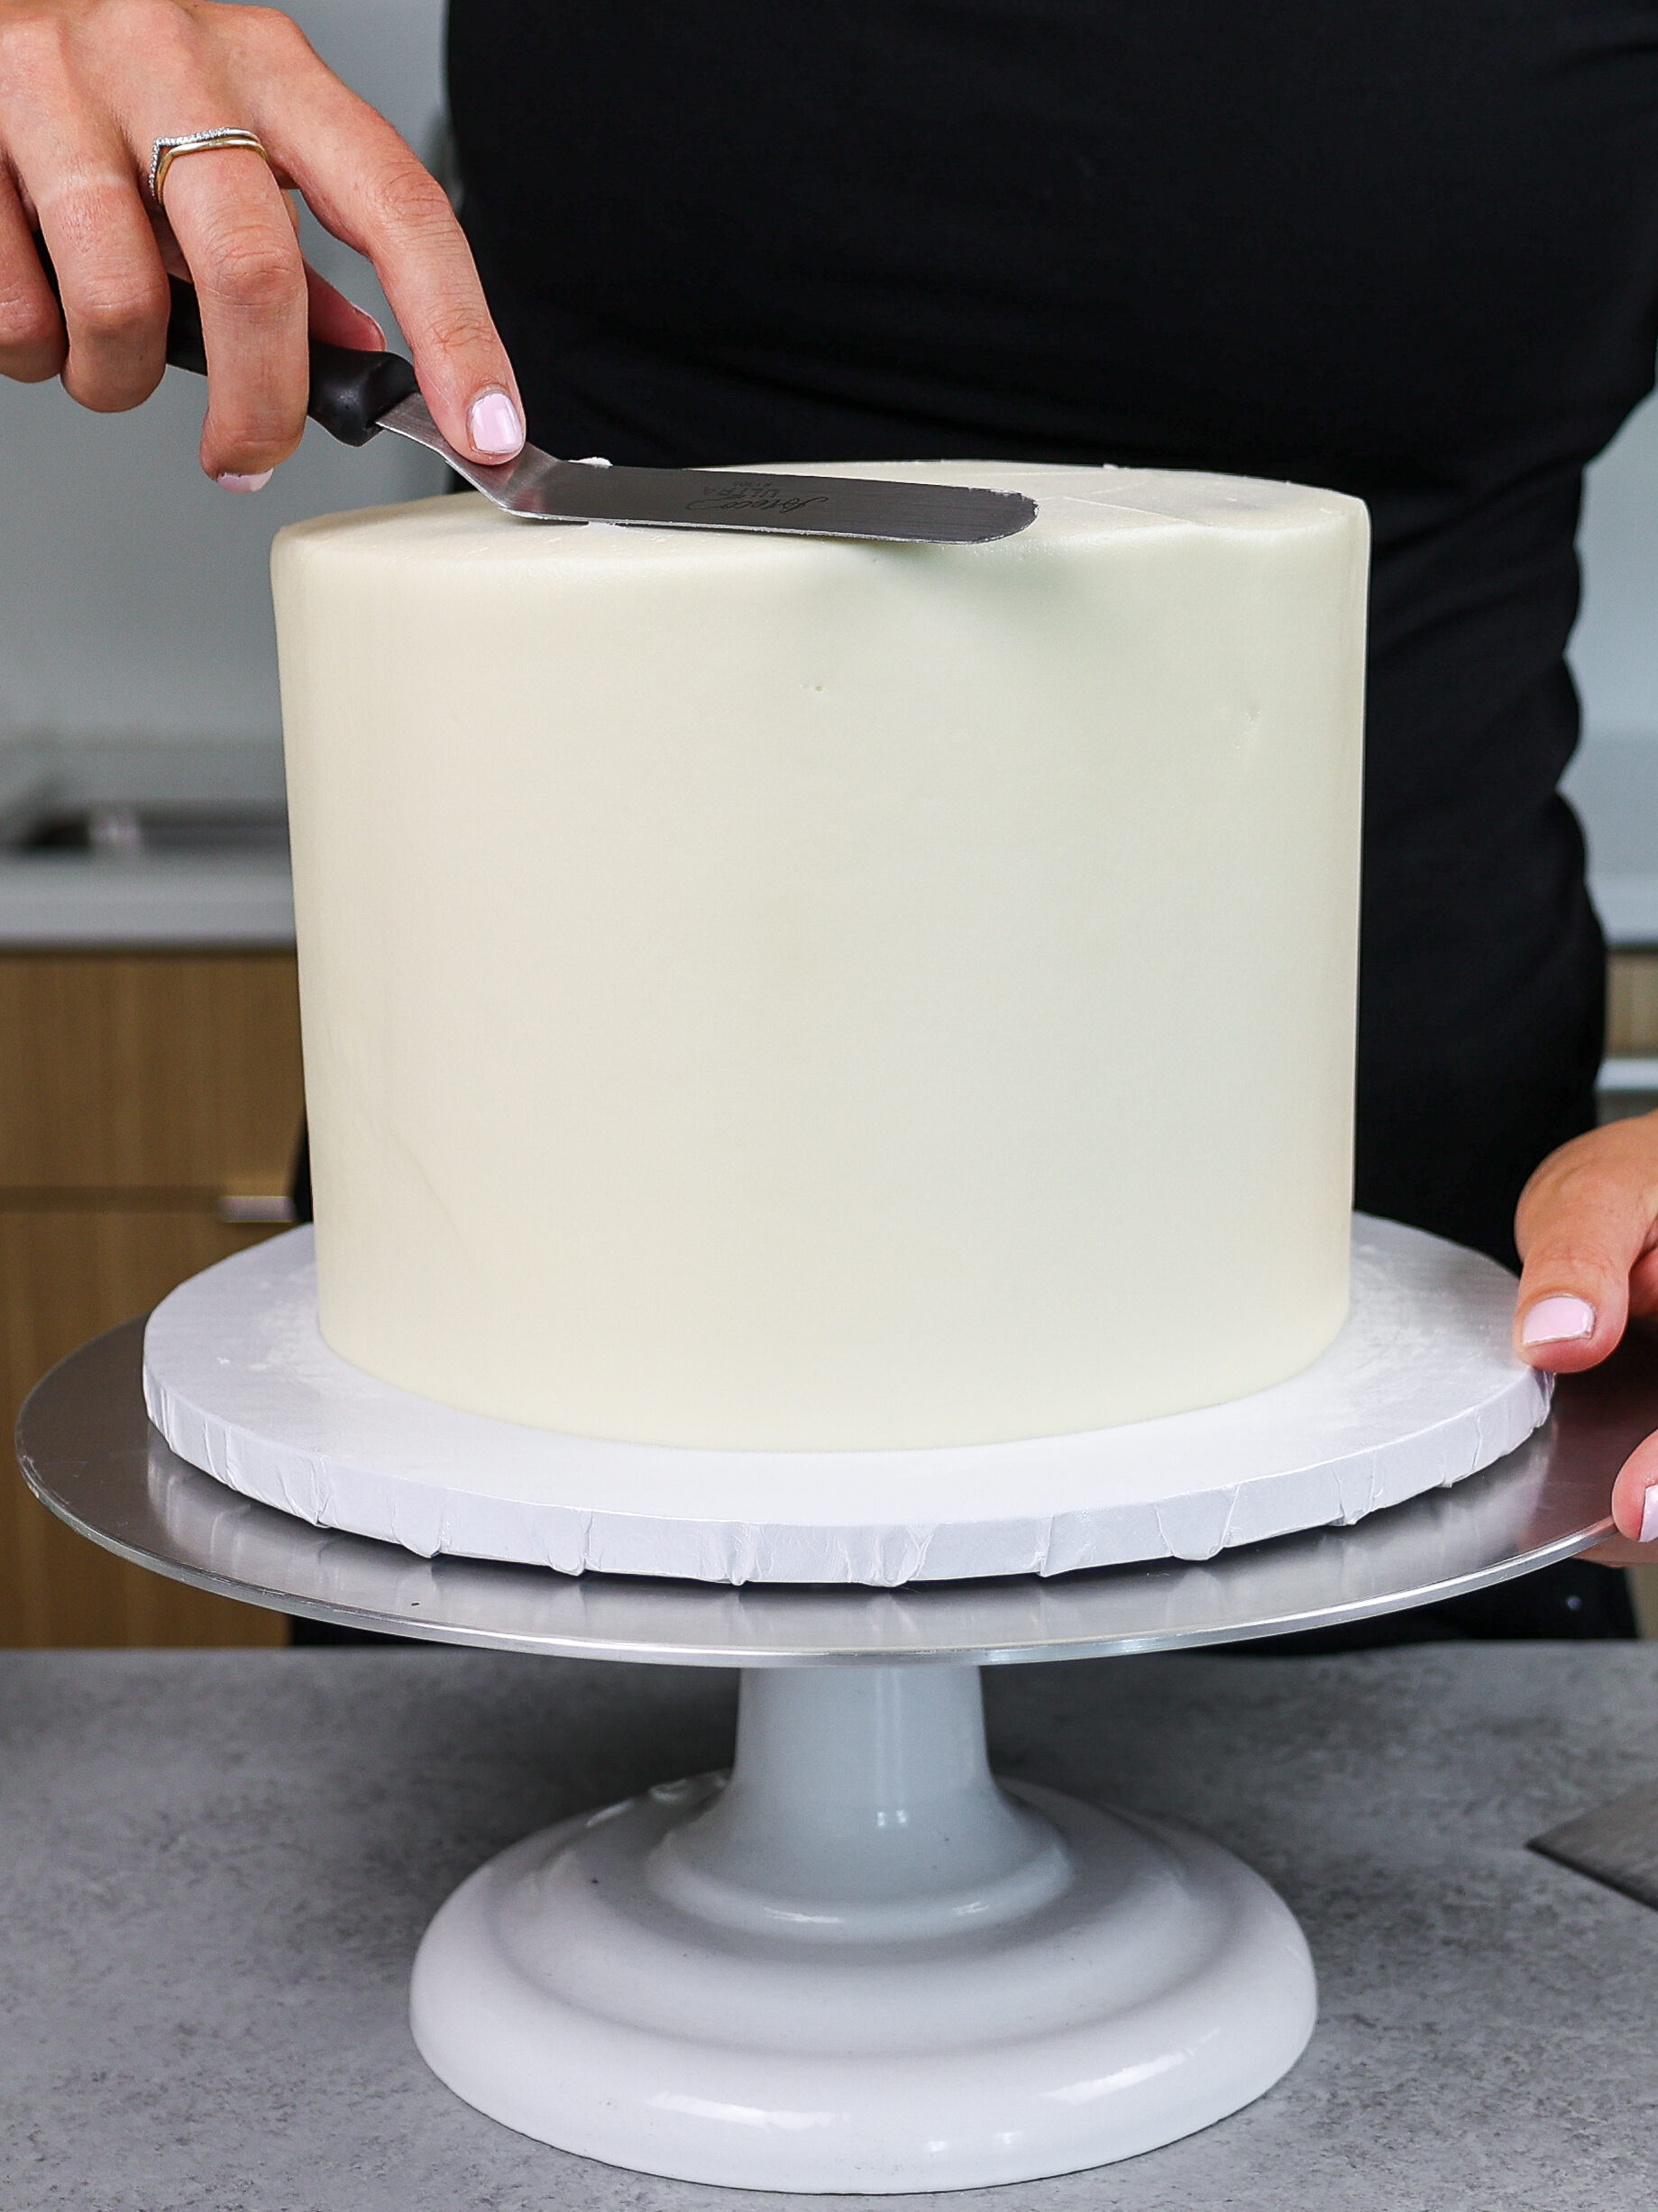
Once all the cake layers are stacked, add a thin coat of frosting (crumb coat) around the cake to fully cover the cake layers.

Smooth using a bench scraper, then chill the cake in the fridge (30 minutes) or freezer (10 minutes) until the frosting is firm to the touch.
Next cover the cake in a thicker layer of the vanilla buttercream and smooth using a bench scraper.
Chill the cake again until the frosting is firm to the touch. This will make it much easier to add on the bunny’s face and ears.
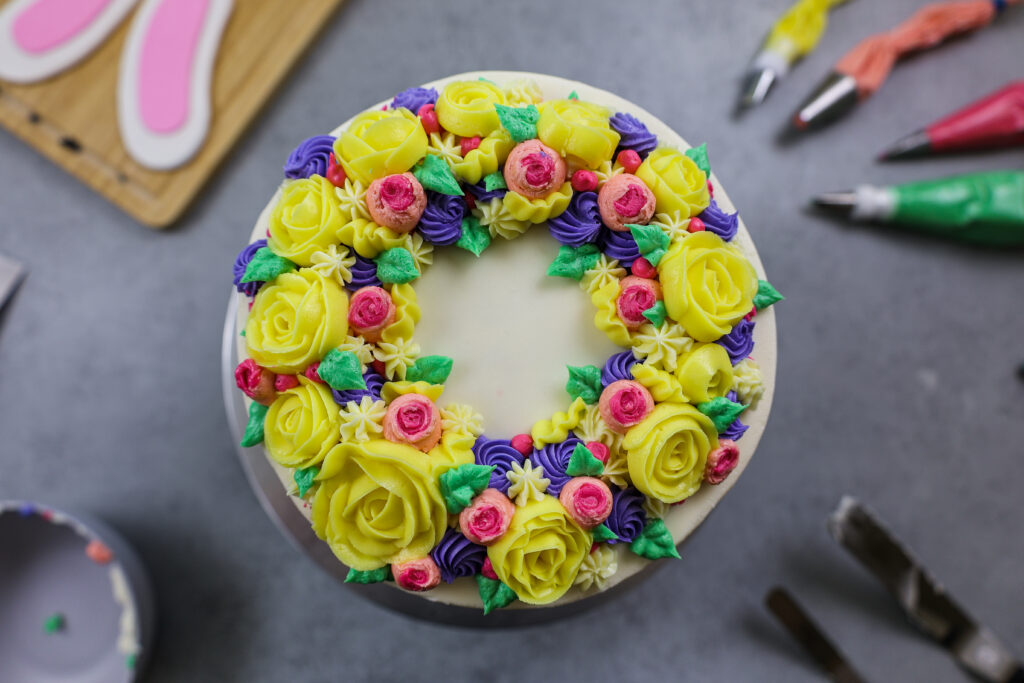
Step 5: Add the Frosting Flower Crown
This step is totally optional, but if you want to take this bunny birthday cake to the next level pipe a ring of buttercream flowers on top of the cake!
Color the remaining buttercream using gel food coloring and pipe swirls and dollops of buttercream on top of the bunny’s head.
Step 6: Add the Finishing Touches
The final step is to add on the facial features! Remove the cake from the freezer or fridge.
Add the fondant nose, cheeks, whiskers and eyes. I recommend waiting to add the ears until right before you serve the cake! It will make the cake easier to store in the fridge, and easier to transport.
Bunny Cake Substitutions and Swaps
Below are some swaps and substitutions that can be made in this funfetti bunny birthday cake recipe.
- All Purpose Flour – This recipe turns out best with AP flour, but you can use a gluten free flour blend if needed.
- Granulated Sugar – I do not recommend reducing the amount of sugar or changing the type of sugar, as it will change the texture of the cake layers.
- Buttermilk – You can also use full fat yogurt, sour cream, whole milk, or an alternative yogurt or milk (almond, soy, oat) if you’re dairy free.
- Egg whites – I use the type that comes in a carton, but you can also use fresh egg whites. Or if you have an egg allergy you can use a vegan egg replacer.
- Vegetable Oil – You can use any flavorless oil in this recipe, so canola or even sunflower oil would work great.
- Almond Extract – If you don’t have almond extract or have a nut allergy, use additional vanilla extract in its place.
- Unsalted Butter – If you only have salted butter on hand you can use it in place of the unsalted butter in this recipe. Just be sure to omit the salt that this frosting recipe calls for. You can also use vegan butter in its place.
- Heavy Cream – Whole milk or alternative milk (soy, almond, oat) will work fine in this frosting recipe if that’s what you have on hand.
Tips for Making the Best Bunny Birthday Cake
- Be sure to properly measure your flour (spoon into the cup measure, then level) or use a kitchen scale to measure your dry ingredients.
- Ingredients at room temp mix together better, so be sure you set out any cold ingredients ahead of time.
- Mix your cake batter just until the ingredients are incorporated. This will ensure your cake layers are tender and soft.
- Make sure your buttercream is the right consistency before frosting your cake. It will help give your cake proper structure and make it easier to decorate.
- Level your room temperature or thawed cake layers with a serrated knife to make them easier to stack.
- Chill your leveled cake layers in the freezer for about 20 minutes before assembling the cake. This makes it easier to stack and frost.
- Use a bench scraper to help you get your final coat of frosting super smooth.
- Make this bunny rabbit cake vegan or dairy free if needed! Use your favorite type of dairy free milk to replace the buttermilk and heavy cream, and use vegan butter sticks in place of the butter. For the eggs I recommend using an egg replacer like this.
Making this Bunny Rabbit Cake in Advance & Storage Tips
- Make your cake layers in advance and freeze them. It breaks the process up and make it more approachable.
- Make your frosting ahead of time too, or save any leftover frosting! It can be stored in an airtight container in the fridge for up to a month, or in the freezer for up to 3 months. Be sure to give it a good stir once it thaws to get the consistency nice and smooth again.
- A frosted cake can last in the fridge for up to a week, or in the freezer for up to a month. The buttercream locks in all the moisture, keeping the cake fresh and delicious!
- If you cut into the cake and have leftovers, use any remaining frosting to cover the cut section to keep it moist and store in the fridge for up to a week.
Other Recipes You Might Like:
Let Me Know What You Think!
If you make this bunny birthday cake, I’d love to hear what you think of it! Let me know by leaving a rating below.
If you plan to share on social media, tag me @chelsweets and #chelsweets so that I can see your amazing creations on social media.
Bunny Birthday Cake
This adorable bunny birthday cake is made from scratch, and is just as delicious as it is cute! It's made with funfetti cake layers and delicious vanilla buttercream.
Ingredients
Bunny Face and Ears
Funfetti Cake
- 3 cups all-purpose flour (390g)
- 3 cups granulated sugar (600g)
- 2 1/2 tsp baking powder (10g)
- 1 tsp salt (6g)
- 1 cup unsalted butter, room temperature (226g) - 2 sticks
- 2 tsp vanilla extract (8g)
- 1 1/2 tsp almond extract (6g)
- 1 cup pasteurized egg whites from a carton (or about 7 egg whites) (235g)
- 1 1/2 cups buttermilk, room temperature (345g)
- 2 Tbsp vegetable oil (28g)
- 3/4 cup of rainbow jimmies or long strand sprinkles (130g)
Vanilla Buttercream Frosting
- 3 cups unsalted butter, room temperature (678g)
- 1 1/2 Tbsp vanilla extract (18g)
- 1 tsp fine salt (6g)
- 11 cups powdered sugar (1375g)
- 1/3 cup heavy cream or whipping cream (80g)
- gel food coloring - optional
Suggested Tools and Equipment
- 4, 7-inch cake pans
- Spinning cake stand
- 10-inch cake board
- Large offset spatula
- Bench Scraper
- Electric hand mixer or stand mixer
Instructions
Making this Bunny's Face and Ears:
- If possible, make the bunny rabbit's facial features and ears a day or more in advance! The ears will need time to dry so that you easily press them into the cake.
- Roll out 1 cup of white fondant and cut out 2 large ovals to make the bunny's ears. They should be about 5-inches long.
- Roll out 1/2 cup of pink fondant and cut out two smaller ovals to look like the inside of the bunny's ears. Press two wooden skewers on top of the white fondant, and sandwich them by placing the pink fondant on top of the white fondant. Brush a bit of water between the two layers to help them seal together.
- While the pink fondant is still rolled out, cut out a 1 inch heart. This will be the bunny's nose. Set aside.
- Roll out the remaining white fondant and use a 2-inch circle cutter to make the bunny's cheeks.
- Roll out the black and white fondant and use a circle cutter or bottle cap to cut out 1-inch circles to make the eyes.
- I recommend using small circle cutters to get the shape of the eyes and cheeks just right.
- If desired, roll out 6 thin lines of black fondant to make the bunny's whiskers.
Funfetti Cake Layers:
- Preheat oven to 350°F. Line four 7 inch pans or three 8 inch round pans with parchment rounds, and grease with non-stick cooking spray.
- Mix together all dry ingredients (flour, baking powder, sugar, and salt) in a stand mixer with a paddle attachment or hand mixer until fully combined.
- Mix chunks of room-temperature butter slowly into the dry mix, on a low speed. Continue to mix until no large chunks of butter remain, and the mixture becomes crumbly.
- Pour in egg whites, and mix on low until just incorporated. Mix in the buttermilk in two installments, on a low speed.
- Add in vanilla extract, almond extract, and oil, and mix at a low speed until fully incorporated. Scrape the sides and bottom of the bowl with a spatula, then beat on low speed for about 15 seconds (the key is to mix until the ingredients are JUST incorporated, so that the batter isn't over-mixed).
- Fold the sprinkles into the cake batter using a rubber spatula until they're evenly distributed.
- Divide batter evenly between the prepared cake pans.
- Bake for 33-36 minutes, or until a toothpick comes out clean. Allow the pans to cool for 10 minutes, then run an offset spatula around perimeter of the pan to separate the cake from the pan.
- Carefully flip the pans and remove the layers from the pans onto a wire rack. Let them cool fully.
- Use a serrated knife to level the tops of the cooled layers, then set aside. If you're making these in advance, wrap and freeze your cake layers at this point.
Vanilla Buttercream Frosting:
- While the cake layers bake and cool, make the vanilla buttercream frosting.
- Beat 3 cups of butter on a medium speed for 30 seconds with a paddle attachment or hand mixer, until smooth.
- Add in 1 1/2 Tbsp vanilla extract and 1 tsp salt and mix on a low speed.
- Gradually mix in 11 cups of powdered sugar on a low speed. Halfway through add in 1/3 cup of heavy cream to make the frosting easier to mix.
- Once fully mixed, beat on low until for a couple additional minutes to make the frosting super smooth and push any extra air out of the frosting.
- If the frosting seems too thick, add in additional cream (1 Tbsp at a time). If the frosting is too thin, add in more powdered sugar (1/4 cup at a time).
- Cover and set aside.
Assembling this Bunny Rabbit Birthday Cake:
- Stack and frost cake layers on a greaseproof cake board, using a dab of frosting to help stick the first cake layer to the board.
- Spread an even layer of buttercream between each cake layer with a large offset spatula and add 1/4 cup of rainbow sprinkles between each cake layer.
- Spread a thin coat of frosting around the cake to fully cover the cake layers. Smooth using a bench scraper, then chill the cake in the fridge (20 minutes) or freezer (10 minutes) until the frosting is firm to the touch.
- Add a second, thicker layer of frosting to the cake, and smooth using a bench scraper.
- Color the remaining frosting different colors with gel food coloring and pipe buttercream swirls and flowers in a ring around the top of the cake to create a frosting flower crown. I used a few different piping tips, including a Wilton 104, Ateco 822, Wilton 5, and a Wilton 366.
- Use a bit of buttercream to help stick the fondant facial features into place. Wait to add the ears until right before you serve that cake! It'll make it easier to store in the fridge and transport.
- When the time comes to add the ears, carefully press the ears into the center of the cake. Focus on pressing the skewers into the cake rather than squeezing and pressing on the fondant portion of the ears to prevent them from cracking.
Notes
Tips for Making the Best Bunny Rabbit Cake
- Properly measure your flour. Either spoon it into the cup measure, then level with a knife or use a kitchen scale.
- Make sure your ingredients are at room temperature to help them mix together better.
- Chill your cake layers in the freezer for about 20 minutes before assembling the cake. This makes them easier to stack and frost.
- Level your room temperature or thawed cake layers with a serrated knife to make them easier to stack.
- Make sure your buttercream is the right consistency. It allows you to easily pipe your rosettes and have them keep their shape.
- Crumb coat and chill your cake, then smooth on a second layer of frosting. This will help make sure your final coat of frosting is crumb-free and beautiful.
- Make sure your buttercream is the right consistency before frosting your cake. It will help give your cake proper structure and make it easier to decorate.
Making this Bunny Cake in Advance and Storage Tips
- Make your cake layers in advance and freeze them. It breaks the process up and make it more approachable.
- Make your frosting ahead of time too, or save any leftover frosting! It can be stored in an airtight container in the fridge for up to a month, or in the freezer for up to 3 months. Be sure to give it a good stir once it thaws to get the consistency nice and smooth again.
- A frosted cake can last in the fridge for up to a week, or in the freezer for up to a month. The buttercream locks in all the moisture, keeping the cake fresh and delicious!
- If you cut into the cake and have leftovers, use any remaining frosting to cover the cut section to keep it moist and store in the fridge for up to a week.
Nutrition Information
Yield
24Serving Size
1Amount Per Serving Calories 687Total Fat 35gSaturated Fat 20gTrans Fat 0gUnsaturated Fat 13gCholesterol 86mgSodium 297mgCarbohydrates 92gFiber 0gSugar 78gProtein 4g
Rabbit Cookies: Easy Recipe from Scratch - Chelsweets
Monday 9th of August 2021
[…] to make these adorable rabbit cookies for the dessert table. And yes, I also made a matching bunny cake and bunny cupcakes. Go big or go home, […]
Ellie
Monday 2nd of August 2021
Hi chelsweets! First off I wanted to tell you how much I've been enjoying your website! My sister teases me all the time that all I do on my phone is look at your website!?...(I do check for new recipes of your every other day.). Anyways your animal series is so cute!!! I like the bunny!! And the giraffe and elephant were so cute!... I was wondering have you considered doing a horse cake?...